Having your toilet break down can be quite an inconvenience for you and your family. Clogs and blockages that can’t be resolved by simply plunging will need the assistance of a professional plumber.
However, most of the other toilet problems are fairly easy to repair and require no more than a few adjustments. If these simple adjustments do not resolve your toilet’s problems, then repairing would be the next solution. Even then, toilet repairs do not require a plumbing license and are fairly inexpensive to complete.
Common Toilet Problems & Repairs
Sticky toilet handle
When your toilet’s handle sticks, you’ll want to start by adjusting the lift wires in addition to the handle itself. After adjusting these two parts, give the handle a nice clean.
Handle must be pushdown throughout the complete flush
You know that there’s something wrong with your toilet when you have to hold down the handle until your toilet is done flushing. Fortunately, the fix is quite simple. Simply adjust the handle, shorten the length of the wires or chain and if needed, replace the waterlogged flapper with a new one.
Loose handle
With this problem, all you have to do is adjust the handle. In addition to this, the lift chain or the lift wires will need to be reattached to the toilet’s lever.
Toilet won’t flush
The first thing you want to do is make sure your home’s water is turned on. If you have the water turned on, then go back to the toilet and adjust the lift wires or the lift chain.
Toilet only partially flushes
Start by adjusting the lift chain and then adjust the water level in the reservoir. You’ll also want to raise the pressure on pressure-assisted toilet.
Overflows or sluggish flushing
Equip yourself with a plunger and try and clear the blockage. If that doesn’t work, then you’ll want to try and remove thee blockage from the drainage stack or the branch drain.
Toilet doesn’t stop running and/or phantom flushes
First, you’ll want to start by adjusting the lift chain or the lift wires. If that doesn’t solve the problem, then try one of the following solutions listed below:
- Check the float ball to see if it’s leaky. If it is, replace it.
- Check to see if the water level is where it needs to be, and if it’s not, adjust it.
- Clean the flush valve and then adjust it.
- Check to see if the flush valve is damaged. If it is, replace it.
- Check to see if the flapper is damaged.If it is, replace it.
- Check to see if the pressure-assist valve is damaged. If it is, replace it.
Even a silent toilet leak (that’s one you normally can’t hear) will waste from 30 to 500 gallons of water per day! The ones you can hear will waste much, much more. Such wastage can normally be attributed to a faulty water level adjustment or to a leaky flapper.
For information on how to adjust the water level see toilet maintenance page.
Leaky toilet
You will want to equip yourself with a wrench and see if the bolts at the base of your toilet are loose. If they are, tighten them. In addition to this, check the condition of your toilet’s wax ring. If this is damaged, you’ll want to replace this part. One more thing you’ll want to check is the condition of the toilet bowl. If it’s cracked or broke, you’ll want to replace it.
Leaky flappers and the “dye test”
Most people will say their toilet does not leak. There is one sure way to find out. Put some food dye in the tank and then leave for 15 minutes. When you return, look into your bowl to see if there is now dye color in the water spot. If there is color, or if you already can hear and or see water running in your bowl, it’s time for a new flapper!
The best bet is to remove your old flapper and take it with you to the hardware store. Removing the old flapper is easy but can be messy if it is partially disintegrated. A pair of cheap latex gloves and a small container to hold the old flapper will make your job less of a hardship.
When removing your old flapper, you will first need to turn the water off at the shut-off/supply valve. Next, disconnect the chain or tail from the trip lever arm and then slip the ears of the flapper off of the trunion ears.
You will need to select a new flapper that, as near as possible, matches your old one. If your flapper is one of the hard-to-find ones, you may even need to contact the manufacturer of your toilet for a recommendation, so if you only have one toilet, it’s a good idea to keep the old flapper handy until you’ve found a suitable replacement.
While the flapper is out, take your finger and move it over the seating surface of the Douglas flush valve. If the surface is rough, get some 400 grit wet or dry sandpaper and lightly go over the entire surface. Repeat the process until the surface is smooth. For toilets with a flat seal type of flapper, simply slip it off the piston or other holding device and replace it with a new one.
After installing the new flapper, run the dye test again to assure you have no leak. If the leak persists (and every now and then it will), you are probably going to have to replace the entire flush valve. To do this, you will need to turn your water off and disconnect the supply line.
Then loosen the bolts that hold the tank to the bowl, remove the tank to bowl seal and remove the flange nut on the bottom side of the tank which holds the flush valve in place.
Next purchase a replacement valve assembly from your hardware store, but be sure that the new assembly has an overflow tube at least as tall as the old one.
If the new one is taller, then note the correct height from the old one, mark that height on the new one and, using a hack saw, cut it to the proper length. Using new seals, reassemble in the reverse order as used in removing the old valve.
Fill valve (ballcock) leaking
If, after making these adjustments, you find that the water still creeps up the overflow tube, or escapes through the refill tube, then its time to repair or replace your fill valve. If you value your time, you are probably better off to replace the entire mechanism, rather than just replacing the diaphragm inside.
The replacement of the fill valve is relatively simple. Turn the water off at the shut-off/supply valve, re-move the supply line from the ballcock, remove the fill valve flange nut on the underside of the tank, disconnect the refill tube and pull out the old valve.
This is another situation that requires taking the old valve to the hardware store to find out which valve will be the best replacement choice. Replacement units are available that are great improvements over the outdated models. Install your new model following the manufacturer’s instructions.
Remember that a new fill valve is a small investment to pay for the water you will save and for a sound night’s sleep!
Flapper leaking
If the water is not creeping up the overflow tube and you continue to hear the toilet cycling, perform the dye test to be sure there is not a flapper leak. If the dye test is positive, then complete the procedure for the replacement of the flapper as described earlier.
Noisy toilet
You’ll want to open the shutoff valve all the way. Check the ballcock and the float valve, and if they’re damaged, replace them. Also, check to make sure the refill tube has not become disconnected.
Flush is very weak
See if your rim openings are clogged, and if they are, clean them out. If this doesn’t work, you can also dispose of the old-flow toilet and invest in a new one.
Toilet rocks
To eliminate toilet rocks, you’ll want to replace both the bolts at the base and the wax ring. You may also have to replace the toilet flange as well.
“It only runs in the middle of the night”
Many toilets really do run only at night; that’s because people use much less water during those hours and in many municipal water systems, the water pressure rises considerably during this time.
It is not uncommon for system water pressure to rise by 15 to 20 pounds per square inch (psi), and by as much as 30 psi in some situations. This rise in pressure could cause “water creep” inside your gravity-fed tank by one-half of an inch or more. That is why the manufacturers of toilets normally suggest that the water level to be set at approximately one inch below the top of the overflow tube.
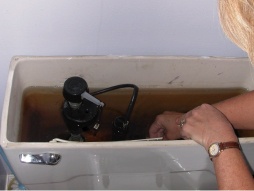
Water level in the tank
If you only notice your toilet running in the middle of the night, there is a good chance that the water level in your tank is set too high. Remove your tank lid and observe the water level.
If you are doing this in the middle of the night (which, by the way, would be the ideal time to check this out!), and the water is running over the top of the overflow tube, adjust it down using the adjusting screw on the top of the fill valve mechanism (turn clockwise) or the “V” shaped clip on the stiff wire link (slide it down) on the “sliding float” so it’s not overflowing. Then, the following day, make another adjustment down to the one-inch level.
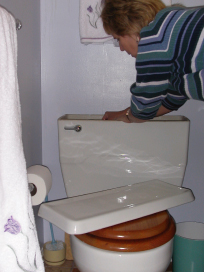
You can remove the tank lid to find out if the water level in your tank is set too high.
Douglas valve replacement
After installing the new flapper, run the dye test again to assure that you don’t have a leak. If the leak still exists (and every not and then it will), you probably need to replace the entire Douglas valve. To do this, you will need to turn your water off again.
Disconnect your supply line, loosen the bolts that hold the tank to the bowl, remove the tank, and remove the tank to bowl seal. Get a big pair of channel lock pliers and remove the flange nut on the bottom side of the tank that holds the Douglas valve in place.
Next, you will need to get a new Douglas valve assembly from your hardware store. Be sure the new assembly has an over-flow tube at least as tall as the old one.
If the new one is taller, note the correct height from the old one, mark that height on the new one and using a hacksaw, cut to the proper length. Using new seals, reassemble in the reverse order as used in removing the old valve.
“It takes forever to refill my toilet”
If it is taking a long time for the water in your toilet tank to refill, chances are your supply line or the fill valve is partially blocked.
First turn the water off at the shut-off/supply valve.
Disconnect the supply line and check it for blockage. If blocked, clean it out or replace it. If the problem is not the line, then it may be the fill valve mechanism.
Some mechanisms have strainers in their inlets and if you are that fortunate, your job is probably simple: remove and clean the strainer. If there is no strainer, then remove the fill valve from the toilet, disassemble and clean it.
If after all this you still have a slow filling problem, then replace your fill valve. See procedure for replacing the fill valve (earlier in this document).
When Your Toilet Fills Slowly It’s Not For Energy Conserving Purposes
“Lately I have to flush it at least twice”
If, in the past, your toilet has only required double-flushing in rare circumstances, and now you have to double (or triple) flush it quite often, you may be experiencing one of two problems. The first is a low water level inside the tank and the second is a partially clogged waste line.
Low water level inside the tank
If you have a fill valve mechanism with the float on the end of the rod or arm, then get your screwdriver or trusty dime out and turn the adjustment screw located on top of the valve mechanism.
Turn counter-clockwise until you raise the water to the manufacturer’s water level mark or, alternatively, to a point where the water level is 1-inch from the top of the overflow tube.
If your valve has the slide-type float mechanism, the same task is accomplished by moving the stiff wire link upward using the adjusting clip.
If this action solves your flushing problem, lady luck is with you. If you still must double flush, then try working a toilet bowl clean-out “snake” through the trapway from the inside of your bowl. If this fails, it’s time to break out your work clothes and a few wrenches, or call a plumber.
When There’s Low Water in the Toilet Bowl, Put These Useful Tips to Use
Clogged waste line
This is a chore that only the more hearty and adventurous souls will want to tackle. First, clear everything that is on the bathroom floor out of your way. Have a few old bath or beach towels handy.
Shut off the water at the shut-off/supply valve. Flush the toilet to remove as much water as possible.
Remove the flex line from the fill valve. Remove the caps covering the “T” bolts that secure your toilet to the closet ring.
Remove the nuts and washers from the “T” bolts and then remove the toilet from the closet ring. If you are doing this by yourself, you may want to separate the tank from the bowl, as the whole assembly is quite heavy.
Clean the wax off the outlet on the underside of the base of your toilet. Look into the toilet outlet (ugh!) to see if you can observe any blockage that your toilet bowl snake might have missed.
If all looks clear in the bowl outlet, it is now time to “snake out” your waste line.
Snaking out your waste line is hard, dirty work. You will now be looking down at your closet ring (the bomb-sight!), the round flange at floor level with the four-inch hole in its center. It will have two “T” bolts, threaded-end up and a bunch more wax all around it.
Play it safe and remove the “T” bolts before they drop down the waste line. In fact, chuck them out along with the nuts and washers you removed to free the toilet from the flange.
Now use a putty knife and some paper towels to remove all of the remaining old wax.
Now you are ready for the fun part. This is where the towels (or even a sheet of plastic) are handy. Run your snake down the waste line until you clear the obstruction.
If your snake is not long enough or, the obstruction won’t clear, it’s probably time (no, its definitely time) to call out the professionals! Once you, or they, have finished the dirty work, its time to reinstall your toilet.
As the first part of your resetting project, make a trip to your hardware store and buy the best wax ring and solid brass billy bolt set that you can find. The best will only cost slightly more and the trouble you will save yourself is well worth it.
First install the new “T” bolts in the slots on the closet ring and be careful to position them across from each and parallel to your back wall. Next place the oval shaped brass washer with the round hole in the center over the “T” bolts and positioning slots in the flange.
Now use the brass “jam” nuts or thin spring steel fastener to secure the “T” bolts and oval washers in place. Take extra care to center the new wax ring over the closet ring flange opening or alternatively, over the outlet on the underside of the bowl.
Next, install the bowl (or the whole toilet, if you have left the bowl and tank assembled together).
Be sure to get the bowl relatively level before tightening anything down. Use a two foot long “carpenters” level placed over the center of the bowl to see if it is level.
If leveling is required, then pick up some plastic shims from your local hardware or building supply store. Taking care not to disturb the wax ring, insert shim material until you reach the required height.
Once this is accomplished place the plastic “cap” washers (lip up!) over the “T” bolts taking care to cover as much of the oblong holes provided in the base of the toilet as possible.
Next, place one round brass washer on top of the plastic washer and then use the “dome” nuts to snug down the bowl.
Next, see if your new plastic caps will snap in place over the “T” bolt assemblies. If you hear the “snap,” all is well and you are done. If not, take your trusty hack-saw and cut off the excess thread-end of the “T” bolt protruding from the dome nut and now snap your caps in place.
The rest of your project will now be simple (and a lot less messy!). In completing the job, remember to caulk around the base of your toilet where it meets the floor. If you are not too tired, take a moment to admire your handiwork and pat yourself on the back! You have just accomplished a big job that would otherwise have cost you big bucks!

- If You Have No Hot Water Pressure, Here’s What You Should Do - December 28, 2021
- What is the Right Shower Drain Pipe Size? - January 25, 2020
- Wet Vent Plumbing, What Is It? How Do You Utilize It? - November 17, 2019
Pedro G. Morales
Sunday 29th of December 2019
I just replaced the handle and flapper in my toilet. When I flush the toilet, the water in the tank goes into the bowl, but the water in the bowl does not flush into the drain. The water swirls around in the bowl like it wants to go down the drain, bur it doesn't . I don't believe the bowl is clogged, cause the water level in the bowl stays the same level.
Doreen Barkowitz
Monday 3rd of December 2018
Actually, what am I saying... the tank does fill up, like right away. The point is that the flapper goes down immediately, tank fills up but nothing flushes unless I hold the handle down. Does that make more sense???
Doreen Barkowitz
Monday 3rd of December 2018
I replaced the flapper, adjusted the chain (several different options), and just changed the handle. When I flush, the flapper drops down immediately and the tank won't fill up. I have to hold the handle down until everything is flushed away. Any ideas????