Before you plant, decide how you will water your new landscape. There are two basic ways to accomplish this task: manual watering with hoses and sprinklers, or by an in-ground automatic irrigation system. Increasingly, people are choosing to install irrigation systems.
Landscapes account for an average of 50 percent of residential water use, so it’s important to design and operate the irrigation systems as efficient as possible. Whether you intend to install one yourself or hire an irrigation contractor, this section provides important advice.
Hand Watering or Automatic Irrigation?
Even if you’ve selected low-water using plants for your new landscape, you will need to water them for the first year or two until their roots are established. Medium and high water using plants such as turf and annuals will require frequent watering during the hot summer months, even after they are established unless your climate has regular rainfall during these months.
Some things to consider when choosing between manual watering and automatic irrigation:
- Water consumption – As a rule of thumb, expect outdoor water use to double if you install an automatic sprinkler system (Maddaus and Mayer, 2001).
- Expense – A quality irrigation system for an average sized new landscape will cost $8000 – $10,000 for a contractor to install. A sub-standard system may cost less but you may pay for it in increased water bills and poor performance.
- Landscape – If you have a small yard, have low water using plants or live in a climate that receives regular rainfall during the hot summer months, you can probably forgo an automatic system.
Despite the drawbacks there are obvious advantages to automatic irrigation:
- Convenience – No dragging hoses and sprinklers around the yard.
- A Healthier Landscape – if you are unwilling or unable to water by hand. Newly planted landscapes require regular irrigation until they are established.
- Added value – an in-ground system may add value to your home.
An automatic irrigation system does require regular attention and maintenance: seasonal shutdown and startup, annual repairs and increased mowing (because the grass will grow faster).
Most importantly, frequent adjustments to the irrigation controller in response to changes in the weather are necessary to avoid over-watering or under-watering.
New “Smart” irrigation controllers are now on the market, which automatically adjust watering according to weather and climate.
If you decide to water manually, there are many tips for making it easier and more efficient (see Watering Basics).
Otherwise, read on for important guidelines for designing and installing efficient irrigation systems for your new landscape. Even if you intend to hire a contractor, it’s a good idea learn about systems so you know what to ask for. Remember your irrigation system will be the largest water-consuming feature of your home.
Types of Irrigation Systems
Which type of system works best for your landscape? There are typically two types of irrigation systems: overhead and drip. Both of these can be utilized in your garden as needed.
Spray Heads
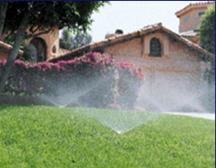
Overhead Systems
Overhead systems are typically used in lawns and for ground cover areas. There are two basic types of sprinkler heads used in an overhead system: spray and rotors.
Both apply water in gallons per minute. Spray heads emit a fixed spray and are generally for smaller areas, throwing water in about a 5 to 15-foot radius. Rotor heads can be gear-driven or impact types. These rotate slowly as they distribute single or multiple streams of water.
Rotors can cover up to about a 45-foot radius. They apply water at a slower rate than spray heads, and thus must run for longer periods of time. Rotors are less likely to cause runoff. Both spray and rotor heads are available in pop-up models or on fixed risers.
Drip Irrigation
Drip or Low Volume Systems
They are good for many tree and shrub areas as well as for vegetable gardens and container plants. Drip or low volume irrigation describes application of water by drip emitters as well as by soaker hoses and micro-sprays. All of these methods deliver water at low pressure and in low volume (in gallons per hour) to specific areas and often just to individual plants.
Water is applied slowly near the plant, resulting in little or no water waste to runoff or evaporation. Emitters deliver the water just where plants need it. Watering depth is controlled by how long the system runs. Drip irrigation is discussed further in this section.
Irrigation Equipment
Efficient irrigation begins with an understanding of the components that make up a system. Become familiar with the equipment for a properly designed system.
Sprinkler heads
As discussed above there are two basic types: spray and rotors. Spray heads emit a fixed spray and are generally for smaller areas, while rotors rotate as they shoot out water and are generally for larger areas. Newer technology includes micro-rotor or low-pressure rotary heads which are a more efficient alternative to the spray head for smaller areas. Bubbler heads are designed to flood or soak small planter areas.
Pop-up heads or risers
Sprinkler heads are available as pop-ups or on fixed risers. Pop-up heads raise the nozzle typically 2, 4, 6, or 12-inches above the ground to avoid interference with surrounding plants. Lawn should be watered with either 4 or 6-inch pop-ups.
They can also be placed next to walks or patios to avoid tripping over heads. Fixed risers are vertical pipes that raise the sprinkler 12 to 18-inches to clear shrubs. Drip irrigation should be used in lieu of fixed risers to irrigate shrubs because it is more efficient.
Nozzles
These are an interchangeable part of the sprinkler head that determines the pattern of spray (full, half, quarter circle, and variable arc), radius of throw in feet, and rate of water applied. Choose the spray pattern carefully to fit the size and shape of the area being watered.
Rotating sprinkler nozzles
Also known as matched precipitation rate sprinklers and rotary nozzles, these are small rotors that can be retrofitted to any pop-up spray head body. They use less water than conventional spray heads by producing lower precipitation rates and higher uniformity. These rotating sprinkler nozzles rotate while emitting multiple distinct streams of water at one-third of the rate of spray heads, allowing the soil to more-efficiently absorb the applied water.
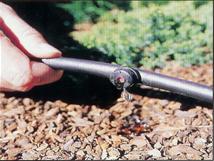
Emitters
Deliver water to the plant for drip irrigation.
Soaker hose
This is a long tube of rubber that is porous. These are good for watering trees, flower beds and vegetable gardens.
Filters
Removes dirt and debris from water; small emission devices can easily clog.
Pipes
Main line pipe is the pressure or main service line for the irrigation system. Lateral pipes connect the sprinkler heads back to the main line. Fittings come in various configurations, including tees and elbows, and enable you to connect pipe together by glue or threaded sections.
Gate or shut-off valve
A manual valve is used to turn the system off, if needed. It is usually placed at the beginning of the system. Valve groups may originate off a hose faucet and should be separated from the water source by a shut-off valve. This allows the irrigation system to be isolated from other household plumbing for installation, maintenance, and repairs.
Automatic control valves
Used to control the flow of water to each irrigation zone allowing different parts of your yard (hydrozone) to be watered independently. These valves are controlled by your irrigation controller discussed below. Control valves should incorporate pressure regulators to maintain a constant pressure for best operation of the equipment. Some valves are designed to operate at very low flows for drip irrigation.
Pressure Regulator
Reduces pressure for system operation. Can be located after gate valve, in the control valves and/or in some sprinkler heads.
Anti-siphon valves
Prevent water in the pipes from flowing backwards into the drinking water system and are required by building codes. Anti-siphon valves must be installed at a higher elevation than the sprinkler heads to function properly. If in a specific situation the heads are higher than the valve, another type of backflow prevention device will be required by code. Check with your local building department.
Irrigation Controller (a.k.a. Irrigation Timer or Clock)
The controller is very important piece of irrigation equipment. The controller works by turning on and off the control valves which irrigate different areas of your landscape (irrigation zones or hydrozones).
Each valve can be set independently to irrigate at a specific time, for a specific length of time and number of days per week. You are the brains behind the controller since you will be setting the irrigation schedule for each zone. Improperly setting the controller is the most common cause water waste in irrigation. Here are some features to look for in controllers:
- Multiple independent programs (2-4) open and close the control valves, allowing watering of different irrigation zones on different days and run times. Separate programs can be set for groups of high, medium, and low water using plants.
- Variable run-times so you can set a different watering time for each irrigation valve. For example, the lawn can be watered for 10 minutes three days a week, while the shrubs (using low volume drip irrigation) can be watered for 30 minutes two days a week.
- Multiple start times allow the controller to water several times a day. For example, the lawn can be watered for 5 minutes, turned off for 1 hour, and then turned on again to water for an additional 5 minutes. This feature allows the first irrigation water to soak into the soil before applying more water. This is useful for soils high in clay, compacted soils and slopes.
- Water budget feature allows you to easily change the watering run time for all valves according to the weather. The schedule can be adjusted in percentage increments.
- Nonvolatile memory and battery backup allow you to keep the irrigation schedule after a power failure.
- Smart Irrigation Controllers. Major advances in controller technology have occurred in recent years. New “smart controllers”, also know as Weather Based or ET Irrigation Controllers, schedule irrigation according to information such as local weather conditions, plant type and soil type of your landscape. This takes much of the guess work out of programming a traditional clock type irrigation controller. Using a smart controller is highly recommended.
- Rain Sensors. These are hooked into your controller and shut the irrigation system off when significant rainfall occurs.
- Moisture sensors. These are buried into the soil surrounding the plant material and based on soil moisture content, tell the system when the soil has dried out enough to water again.
- Subsurface irrigation. This is an alternative way to water lawns, shrubs, and ground cover areas. Emitter lines are buried 4 to 8 inches below the lawn or soil surface and are usually spaced 12 to 18 inches apart. Water from the emitter line spreads slowly through the soil to *
Designing Your Irrigation System
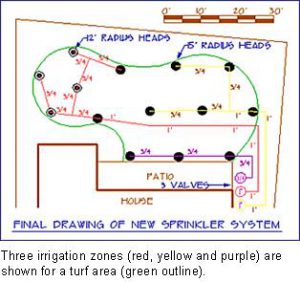
In STEP 1 Layout your design, you grouped plants together in your landscape design with similar water needs into “hydrozones”. These hydrozones will become the irrigation zones for your new system.
Each zone will have a control valve with its own watering schedule, allowing you to deliver the appropriate a mount of water to each plant grouping. Designing your system by hydrozones greatly improves watering efficiency and the health of your landscape.
The tips below will help you design an efficient system. If you decide to hire an irrigation contractor make sure they incorporate the following principles into your system and see Consulting a Professional.
If you design your own system consult do-it-yourself manuals for more information such as, Ortho’s All about Sprinklers and Drip Systems, Sunset Garden Watering Systems or Jess Stryker’s web irrigation tutorials at irrigationtutorials.com.
Tips for Planning a System
- Make a scaled drawing of your property or put a piece tracing paper over your landscape design from STEP 1. Sketch out your design with the following things in mind.
- Determine your hydrozones. Separate irrigation zones should be created for planting areas with different cultural requirements: plant type and water needs, sun or shade needs, soil type, or slope. Each hydrozone will have a control valve so it can be watered on its own schedule. Use the same sprinkler type for each hydrozone: all spray heads or all rotors for a turf hydrozone; all drip emitters for a shrub hydrozone.
- Choose the right sprinkler for the plants being watered. Drip emitters are the best choice to deliver water to a shrub area, while pop-up spray heads may work best for the lawn. Rotor heads may work best for a large slope area.
- Determine your water capacity and water pressure. Water capacity is the maximum flow of water available to use at any one time from your home. It is expressed in gallons per minute (GPM) and will determine the maximum number of sprinklers or emitters you can have on any one irrigation zone. For example, if your water capacity is 12 GPM, you should use no more than twelve 1GMP sprinkler heads per irrigation zone. Heads are also designed to operate best at a specific pressure and are labeled accordingly. For example, a spray head may be labeled: 1GPM @ 30psi. Operation at too high of pressure will create a lot of water wasting mist and too little pressure will cause uneven coverage. Water pressure and flow rate can be most easily determined by attaching a combination flow and pressure gauge to an outside faucet.
- Do not use spray heads in areas less than 8-feet wide. This reduces overspray in small areas. Drip emitters, micro-sprays, or bubblers can be used instead.
- Use low precipitation rate (low volume) sprinkler heads where possible. These heads deliver water at a lower rate, so that the soil can absorb more of the water it receives. This helps to eliminate runoff. These are particularly useful for clay soils, where water infiltrates slower, and on slopes.
- Use matched precipitation rate heads. Precipitation rate is the rate the sprinkler applies water to the landscape. This guarantees that a half circle head delivers the same amount of water as a full circle head to insure uniform water coverage. Check product information.
- Lay out heads for head-to-head coverage. This means heads should be located so that the water throw from one sprinkler head reaches the adjacent head. This helps eliminate dry spots, especially in turf grass which is less forgiving.
- Design to prevent overspray. Match the radius or throw of the sprinkler to the size and shape of the area to be watered. Ideally, no water should be wasted from overspray onto walks or patios.
- Special climate conditions may require specific sprinkler heads. In high wind areas, low angle sprinkler heads will keep water throw near the ground where it resists blowing away. Slope areas will benefit from low precipitation rate heads (low volume) to reduce runoff.
- Use new water saving technologies to improve efficiency.
Smart controllers that schedule irrigation based on climate, plant type and soil conditions can significantly improve efficiency.
- Rain switch will shut off the irrigation system during rainfall to avoid waste.
- Drip Irrigation for shrubs, trees and beds (see below).
- Rotary Nozzles that fit into typical spray heads have excellent uniformity of coverage which improves their efficiency. Good for turf areas in 13-24 foot range.
- Use check valves on sprinkler heads that are in the low areas in your yard to eliminate drainage after use, ending water waste and soggy areas around low heads.
Drip Irrigation
Drip irrigation is an excellent choice for watering trees, shrubs and garden beds because it delivers water to precisely where it is needed. Drip applies water to the root zone of the plant at low pressure and low volume (in gallons per hour), making efficient use of water.
Water is delivered just where plants need it. Because water is applied slowly on or near the ground, no water should be wasted to runoff or evaporation. The a mount of water applies is controlled by varying the length of time the system runs or by varying the a mount being delivered from the emitters.
Many nurseries or irrigation supply stores carry drip irrigation kits and components. A drip system can connect to a hose end or have a permanent connection to your main water source and operate by an automatic controller.
Drip Tips
- Above-ground drip is generally not recommended for continuously rooting ground covers. It is useful in watering trees, shrubs, and vegetable gardens.
- Subsurface drip can be used to irrigate lawn areas and ground cover areas.
- Drip irrigation (also known as micro, low flow, low volume, and trickle) can take the form of emitters, micro-sprays, or soaker hoses.
- Drip systems can be connected to a hose end and manually operated, or permanently connected to your main water source and be operated by an automatic controller.
- Plan enough capacity (emitters) for when your landscape matures. Use the product’s emitter selection chart to determine the flow rate and number of emitters per plant.
- Polyethylene (“poly”) tubing on the surface in areas of heavy foot traffic or children’s play areas can easily be broken, disconnected, or vandalized.
- Dogs, raccoons, gophers, and other animals can chew tubing and emitters. If this is a problem bury the tubing or use rigid pipe (polyvinylchloride or PVC) and protection for emitters.
- Drip irrigation, as well as all irrigation systems need to be maintained regularly.
Irrigation System Installation
Install the irrigation system before planting your landscape. To summarize here:
- Prepare the soil. Compacted soils will need to be loosened by plowing to a depth of 8-12 inches. Mix in ample organic compost if your soil is too sandy or clayey.
- Grade your yard for proper drainage.
- Install the irrigation system.
- Install any hardscape such as sidewalks, patios, decks, retaining walls, fences and arbors (This is done after the irrigation system because irrigation supply lines may have to be run under these structures).
- Plant the plants and apply a 3-4 inch layer of mulch.
The basic steps for installing the irrigation system are listed below.
- Tie into your water supply. This always done after your home’s main water supply shut off valve and the water meter. For non-freezing climates it is commonly done at an outdoor faucet. Install a shut-off valve and then an anti-siphon valve or other backflow prevention device as required by your local water department.
- Check the water pressure of the water supply. Install a pressure regulator if needed.
- Next install the control valves for each hydrozone. Connect them to the system water supply.
- Dig the trenches for the irrigation lines. Each control valve will have its own network of irrigation lines corresponding to its hydrozones. Dig trenches for the main supply lines and the secondary lateral lines to the sprinkler heads.
- Install PVC irrigation pipes connecting them to the control valves.
- Install the sprinkler heads and the drip line(s). Install check valves on lines at bottom of slopes to prevent drainage.
- Turn off the sprinkler heads and pressure-test the system for leaks. Bury the lines if there are no leaks.
- Install the irrigation controller. Run wires from the controller to the respective control valves. Label which controller program controls which irrigation valve on the information card inside the controller. Run the system and adjust the irrigation heads and drip emitters so they are operating correctly.
- Program the irrigation controller for each hydrozone (see below).
For a helpful list of tools needed for installing an irrigation system see Irrigation Installation Tools.
Irrigation Scheduling
After you have installed your system, how much water should you apply to the plants in each hydrozone? When and how should you apply it? Many landscapes are over watered by as much as 50 percent.
Proper irrigation scheduling is perhaps the most important thing you can do to conserve water and ensure the health of your landscape.
Please read the section of this website for advice on proper scheduling. Below is an example of an irrigation schedule. Yours will vary depending on the plant types, soils, season and climate.
Watering Schedule for an Irrigation Controller (Start times: 3:00 a.m., 4:00 a.m. and 5:00 a.m.)
| Controller Hydrozone | Plants | Water Use | Sprinkler Type | # of Starts | Min. Per Start | Days Per Week | Total Min. Per Week |
| 1 | Lawn – full sun | High | Spray | 3 | 6 | MWF | 54 |
| 2 | Lawn – partial shade | Medium | Spray | 3 | 4 | MWF | 36 |
| 3 | Ground cover | Low | Spray | 3 | 4 | MF | 24 |
| 4 | Shrubs | Low | Drip | 1 | 15 | MF | 30 |
| 5 | Garden | High | Drip | 1 | 15 | MWF | 45 |
| 6 | Trees | Low | Drip | 1 | 20 | MF | 40 |

- Hiring a Landscape Professional - January 19, 2017
- Water-Wise Plant Materials - January 13, 2017
- Water-Wise Plants Timing and Seasonality - January 13, 2017