The design and installation of an automatic sprinkler system is a complex project involving numerous steps and considerable effort.
There are college courses, books, and magazine articles dedicated to the subject and there are a large number of professional irrigation designers and installers who would be pleased to do the job for you. You can find an irrigation designers and installers in the yellow pages of your phone book.
If you are set on doing the job yourself, we offer some points to think about during the design and installation process and some references that offer more complete information on the step by step design and installation process.
If you are mechanically inclined do-it-yourselfer and willing to take on a challenging home improvement project, designing and installing your own automatic irrigation system can be a rewarding experience.
Drip Irrigation
Drip irrigation is the most efficient method of irrigating. While well designed and maintained sprinkler systems are around 75-85% efficient, drip systems typically are 90% efficient or higher. This means less wasted water. For this reason drip is the preferred method of irrigation in the desert regions of the United States and around the world.
Drip irrigation has other benefits which make it useful almost anywhere. It is easy to install, easy to design, can be very inexpensive, and can reduce disease problems associated with high levels of moisture on some plants.
Drip irrigation (sometimes called trickle irrigation) works by applying water slowly, directly to the soil. The high efficiency of drip irrigation results from two primary factors. The first is that the water soaks into the soil before it can evaporate or run off.
The second is that the water is only applied where it is needed, (at the plant’s roots) rather than sprayed everywhere. While drip systems are simple and forgiving of errors in design and installation, there are some guidelines that if followed, will make for a much better drip system.
In many cases a drip irrigation system may be the most efficient option for your landscape.
Basic Steps for Designing a Standard (non-drip) Irrigation System
This information comes courtesy of IrrigationTutorials.com. For more details and specific instructions on each of the points listed below, please visit this excellent site.
Step #1 Collect Information:
- Measure Your Yard – You must have an accurate measurement of the area to be irrigated.
- Determine the water pressure (PSI) and gallons per minute (GPM) available from your water connection.
Step #2 Select Your Equipment:
- Pressure Loss – Determine pressure losses for your sprinkler irrigation system.
- Water meter – Determine the capacity of your water meter.
- Select a backflow preventer. A backflow preventer is a device that prevents water from your sprinkler system from entering (and contaminating) the municipal water system. You must have a backflow preventer on your irrigation system.
In most places this is the law, everywhere else it’s just the smart thing to do. Almost everywhere the local authorities will dictate that certain types of backflow preventers may not be used with irrigation systems because they do not provide adequate protection. In some cases, the authorities will dictate the exact type of backflow preventer you must use.
- Mainlines – determine the type of pipe to use and calculate pressure loss in your irrigation system mainline.
- Valves – select the irrigation valves for your system.
- Elevation Pressure Loss – calculate the pressure loss in your irrigation system caused by elevation changes.
- Sprinkler Heads – select the appropriate sprinkler heads for your system.
- Laterals – determine the type of pipe and pressure losses for your sprinkler systems lateral pipes.
- Adjustments – make pressure loss adjustments to balance the system (very important if you want the sprinklers to work).
Step #3 Place Sprinkler Heads in your Plan:
- Sprinkler Spacing – determine the correct distance between sprinklers.
- Sprinkler Precipitation Rate – determine the correct precipitation rate for the sprinklers in your irrigation system.
- Draw in the Sprinklers – determine where to place each sprinkler head in the irrigation system.
- Sprinkler GPM – determine the GPM for each sprinkler head.
Step #4 Create Valve Zones and Draw in Pipes:
- Hydro-Zones and Valve Zones – identify hydro-zones and create valve zones.
- Sprinkler Pipe Layout – route the sprinkler piping in your irrigation system.
Step #5 Size Piping:
- Pressure Loss – calculating the pressure loss is essential for proper operation of an irrigation system.
- Lateral Pipe Sizes – calculate the size for each lateral pipe in the irrigation system.
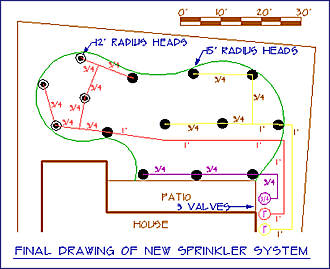
Figure 1: Sample irrigation system design
Basic Steps for Installing a Sprinkler and Drip Irrigation System
This list again comes from Jess Stryker at IrrigationTutorials.com. This is the only non-commercial web site we have found that offers this information.
Before you go to the store:
Prepare a Take-Off (materials list) – creating a take-off (materials list) is the first step necessary to install your irrigation system. You’ll save a lot of time by doing this right.
Irrigation System Components:
- Understand Sprinkler Fittings. A complete guide to common PVC fittings, including the correct terminology to use when describing them to others. Includes sketches of each fitting.
- Understand Sprinkler Risers. The sprinkler riser plays a large part in determining how often you will need to repair broken sprinklers.
- Understand Anti-Siphon Valves. The most common valve type for residential irrigation systems.
- Reduced Pressure Backflow Preventer – select a backflow preventer that meets your needs and local codes.
- Sprinkler controller (clock) – a wide variety of sprinkler clocks are available. Some are battery operated while others will require AC power. Some mount on the wall in the basement or garage others can be mounted outside on a pedestal.
- Rain shutoff device or soil moisture sensor – several devices are available to help better manage irrigation and save water. These devices can shut off your system if it is watering when it is raining or if the soil is already moist.
- Drain Valve Winterizing Sprinkler System – you must be able to drain your sprinkler system in the winter, especially if you live in an area that freezes during the winter.
- Drip Emitter – select the appropriate drip emitter for your plant materials.
- Quick Coupler Valve on Spring Joint Riser
- Subsurface Drip Irrigation
- Underground Ball Valve
- Underground Auto. Valve with Filter and Pressure Regulator
Irrigation Installation Tools – Tools that make the job easier
The tools required to install an irrigation system are fairly basic; a shovel, hacksaw, wire cutter, a couple of wrenches, and a knife will get the job done in most cases.
But like most projects, a few special tools make the work much easier and faster to perform. So here is a list of the tools commonly used by professionals.
- Round Point Blade Shovel – almost everyone has one of these. You’ll use it to dig larger holes needed for valves, multiple pipes, etc.
- Square Point Blade Shovel – handy for back-filling trenches and for scraping mud off of sidewalks.
- Trenching Shovel/Spade – this shovel is very similar to the Round Point shovel only it is narrow – usually only 4 inches wide so it can fit in trenches.
- Mattock – by far the handiest tool for putting in irrigation systems! A mattock is a cross between a pick and a shovel. It has a narrow blade like a trenching shovel but you use it like an ax or a pick. A railroad pick is similar to a mattock/pick, but the blade is narrower than a standard mattock. A mattock digs twice as fast and twice as easy as a shovel. A longer handle is much less tiring to use than a short one. If you were to only buy one specialty tool this should be the one.
- Tamper Bar, Pry Bar, Digging Bar – these closely related tools all consist of a heavy steel bar about five feet long. A tamper bar has a head on it similar to a huge nail head that is used to compact soil. A pry Bar has a point on the end and is great for loosening rocks. A digging bar has a wide, flattened point similar to a large chisel. Most bars are a combination of a Pry bar on one end with a Tamper or Digger on the other.
- Broom – you know what it is and what to use it for.
- Landscape Rake – a landscape rake is a 3 or 4 foot wide rake, usually made of aluminum, with teeth on one side of the rake head and a flat surface on the other. It is used for shaping the ground prior to planting.
- PVC Pipe Cutter: This is a handy cutting tool used for cutting PVC pipe and poly hose. It looks something like a pair of garden shears. It works much faster and easier than a saw, and results in a square cut with little or no burrs. A real time-saver. Proper technique is essential when using a cutter! Follow the instructions that come with it and make several practice cuts to get the hang of it. Using the cutter wrong can result in almost invisible hairline cracks in the pipe that will not be noticed until it is too late. Often it takes a year or two for the water to burst through these cracks. If the pipe deforms at all while you’re cutting it you are doing it wrong!
- Work Gloves – a pair of heavy gloves is essential to prevent blisters. If this is a weekend job you’re likely going to have enough aches the next day, don’t add blisters to the list.
- Latex Gloves – latex gloves can help keep PVC cement off your hands when assembling pipe. You will need several pairs. When you get glue on a pair they will stay attached to the next pipe you touch! By the way, acetone will remove PVC cement from your hands, clothes, car seat.
- Pipe Wrench – if you’re using any steel or brass pipe you will need a couple of pipe wrenches to assemble it. Do not use wrenches or pliers on PVC fittings, hand tighten them only!
- Measuring Tape – a measuring tape is needed to lay out the irrigation system. A 25′ tape works well for most residential systems.
- Riser Extractor – hopefully you won’t need this! Sometimes a piece of threaded pipe will break off right at the point where it is screwed into a fitting. The result is that there is not enough pipe extending out of the fitting to grab with pliers or a wrench. A pipe extractor has a toothed probe that you insert into the open end of the broken-off pipe. The teeth bite into the pipe allowing you to twist it out. Riser extractors come in 1/2″ and 3/4″ sizes, you must use the correct size. An indispensable tool to have when you need it.
- Hack Saw – used to cut metal pipe and PVC pipe. In tight places you can use just a hack saw blade. Wrap half the blade with duct tape to make a handle. I’ve been known to use a bent hacksaw blade to reach into tight places that I can’t even get my hand into.
- Wire Cutters – a combination wire cutter/stripper is even more handy.
- Screw Drivers – one flat blade and one Phillips for connecting wires to the controller.
- Sledge Hammer – a long-handle 10 lb. sledge hammer is useful for breaking chunks of concrete and rocks. Wear safety glasses! A sledge hammer also makes a great tamper to compact soil in trenches.
- Garden Hose – water is the best tool for settling soil around the pipe in trenches. You can also use water from a hose to bore under sidewalks and driveways. You’ll need a long enough hose to reach anywhere you are digging a trench.
- Hose Sweeper Nozzle – this non-adjustable type hose nozzle is used as a boring tool . Attach the nozzle to one end of a length of pipe and a garden hose to the other. Turn on the water and use the concentrated water stream from the nozzle to bore a hole under sidewalks, driveways, or large tree roots.
- Trencher Machine – unless you’re planning to install irrigation systems for a living don’t run out and buy a trencher. You can rent one from most rental yards. When you do, get the newest, biggest, meanest, most powerful one available (but make sure it will fit through your gate if you’re working in a fenced yard!).
Rider type trenchers are the best, but few rental outlets have them. Operating the typical, dull-bladed, on it’s last legs, walk-behind-style rental trencher is a bone-shaking, tough job (actually walk-behind is not the right term, you walk backwards in FRONT of a trencher, so don’t fall down!).
You will feel like you have wrestled a bear when you are done. Have lots of aspirin and sore muscle lotion on hand. Tip: In many areas there are companies that will dig the trenches for you.
Installation Steps
- Layout Your Irrigation System.
- Make sure you have everything and check for design errors.
- Connect to Water Supply.
- Install Underground Piping.
- Backfill & Flush – proper flushing is critical to your system’s survival.
- Install Sprinklers and Emitters – proper installation will reduce the need for future repairs.

- Hiring a Landscape Professional - January 19, 2017
- Water-Wise Plant Materials - January 13, 2017
- Water-Wise Plants Timing and Seasonality - January 13, 2017