The first step to having a beautiful water-efficient landscape is developing a good plan. Whether you design it yourself or hire a professional, a plan will guide you in purchasing the right plants and allow you to install the landscape in manageable phases, ensuring that the end result will be water efficient, attractive, and functional.
The information below will help you develop your ideas and put them down on paper.
Determine your needs
Too often people approach landscaping haphazardly, buying attractive plants at a garden center and then planting them in the wrong place. The first step in planning a landscape is to decide what you want it to be. Here are a few common interests consider:
- Curb and window appeal. Improve the view to and/or from your house.
- Conserve water. Reduce water use and maintenance needs.
- Create an outdoor living space. creen your garden from public view and create outdoor living rooms.
- Provide recreation opportunities. Design play areas or structures for children or pets.
- Entertain your friends. Establish outdoor cooking and seating areas.
- Attract wildlife to your garden. Create a backyard habitat for birds and butterflies.
- Grow a vegetable garden. Plant and harvest vegetables and fruit from your backyard.
- Moderate the climate. Protect your home and garden from strong summer sun or harsh winter winds.
Garden check list
The check list below will help you refine your landscape ideas.
On a scale of 1 to 5, (5 being most) which of the following is most important to you:
Landscape Use Preferences
- Back yard area for entertaining or dining?
- Active play areas? Hard surface or lawn?
- Private areas for reading, sunning or reflection?
- Wildlife habitat for birds and butterflies?
- Swimming pool and/or spa?
- Edible garden?
- Pets?
Design preferences
- View(s) you want to keep or hide?
- Outdoor decking or patio areas?
- Fence or gates in your garden?
- Outdoor lighting?
- Grill or cooking area?
- Arbor, trellis, or pergola?
- Planters, sculpture, rocks, or other features?
- A fountain or water feature?
- A compost bin?
Plant preferences
- Shade trees?
- Groundcovers?
- Lawn?
- Spring flowering trees or shrubs?
- Summer colorful annuals and perennials?
- Trees and shrubs with fall color?
- Vegetable or herb garden?
- Fruit trees?
Consider the limitations that may affect your design
- What level of maintenance are you willing to commit to (Low, Moderate, or High)?
- Will you hire a landscape service to install or maintain it, or do it yourself?
- What are your budget limitations?
- Are there existing property conditions that may affect your design (e.g. Lot size, sun/shade patterns over your yard, existing trees and shrubs you would like to keep, property slope, soil type, drainage, etc.).
- Are there adjacent property uses, homeowner’s association restrictions, neighbors or other factors that may affect your plan?
See Link to Other Things to Keep in Mind
Based on the limitations and preferences above, narrow down your Garden Check List to the things you can realistically have. Now you can proceed to put your ideas down on paper (discussed below), or you may decide to hire a professional to draw up a landscape plan for you (see link to Hiring a Professional).
Either way, it’s highly recommended that you have a good plan before installing a landscape. A plan will help you select the right plants and ensure that the final landscape is beautiful, as well as functional and water efficient. A plan also allows you to install your landscape in phases, spreading out the cost and the work.
Create a base map
The next step is to inventory your property’s existing features and plot them on a base map. A base map is an overhead view of your property on which you will sketch your design ideas.
A base map needs to include:
- Property boundaries and dimensions;
- An outline of your home, driveway, patios and other structures, indicating their placement on the property; and
- Property orientation (a north arrow) in order to identify sun/shade patterns on your property.
Save yourself some time creating a base map by using an existing map or survey of your property. A deed map, topographical plan, or architectural plan of your lot that includes actual dimensions and orientation of your home and other structures is ideal.
There is also easy-to-use landscaping software available to create a base map and landscape plan. If neither is available, measure your property using a standard measuring tape. Transfer your measurements onto graph paper using a scale where 1/4-inch equals 1-foot. Make a several copies of your base map to experiment with later.
Note the following on your base map:
- Existing trees and shrubs that you would like to keep
- Terraces, steps, walls, fences, etc.
- Sun/shade patterns, prevailing wind direction
- Surface water drainage and slope changes on your property
- Location of doors, windows, water faucets, utility meters, etc.
- Utility lines (water, gas, electric, sewer, or septic drain fields) including shut-off valves and easements) There are toll-free numbers to call to have utilities mark location of utilities free of charge. Contact your local utility for the number.
- Adjacent property uses (a neighbor’s yard, common area, busy road, etc.)
- Views to and from the house to be preserved or screened
- Existing irrigation system, if applicable
You will use the base map in the next steps by placing tracing paper over it to sketch out your new landscape design.
Draft a functional diagram
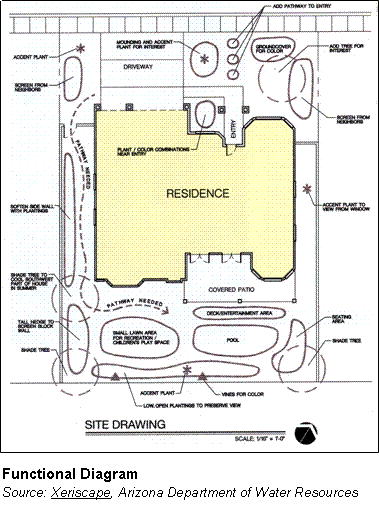
A functional diagram is the “outline” of your design. Functional diagrams use bubbles to indicate different spaces in your design such as lawn area, patios, and pathways. They use arrows, stars, or other symbols to indicate relationships between elements. These diagrams are important in helping you explore alternatives and ideas before setting anything in stone.
Use tracing paper to sketch a functional diagram over your base map. Organize your desired uses by drawing free form bubbles. As you do this, consider the relationship between spaces and existing features. Refer to your garden check list to include the things you really want.
- Consider Scale and Proportion – Vary bubble size and shape according to intended uses.
- Limit lawn area – Grass uses lots of water, so unless you plan to use a lawn for active play areas, keep it small, or even eliminate it. There are many alternatives to turfgrass. Check out the Garden Gallery Garden Gallery.
- Think About Relationships and Circulation – Arrange different uses appropriately in relationship to each other. Depict movement around, through, or meandering in a space.
- Know Size Requirements – Realistically consider size needs for all desired activity areas, and adjust your plan accordingly. The size of your property may limit the number of things you can do. Prioritize what you really want.
- Be General – Specifics such as patio dimensions and plant types will be dealt with later.

Continue to refine your functional diagram to a level that visualizes (1) desired division of spaces and uses, (2) textures and height, and (3) views and focal points.
Layout your design
Once you have a functional diagram with the general design elements, place another sheet of tracing paper on top and begin to sketch out different possible designs. Follow your functional diagram, filling in the details and drawing each element to scale (e.g., patios, walkways, and planting beds). Use a scale where 1/4-inch equals 1-foot.
 Don’t select specific plant varieties yet (Advice for selecting climate and site adapted plants will be discussed in STEP 2). General plant types are sufficient to denote plants in your design such as “Shade Tree,” “Tall shrubs” or “Perennial flower Bed.”
The additional tips below will help you lay out your garden design:
- Keep it simple – Complex designs result in more maintenance and overcrowding. They also usually look busy or cluttered. Group plant types to create well-defined areas. Consult Design Principles for advice on aesthetics and design details.
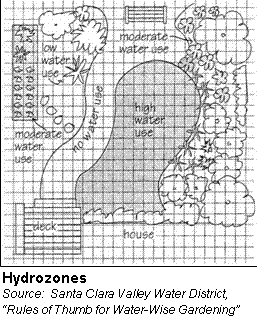
- Group plants in your design according to their water needs- Think about how you will water your new landscape. Even native low water using plants will require regular watering for the first couple of years to get their roots established. You can either hand water or install an irrigation system. Group plants into “high,” “medium” and “low” water use zones in your plan. This is essential for plant health and efficient irrigation.
- Provide adequate width for bed and border planting areas – A generous width will give plants spreading room to grow into their natural shape, reducing maintenance.
- Perennials and small shrubs should be planted in beds at least 3-feet wide.
- Taller shrubs and hedges should be planted in beds at least 6-feet wide.
- Avoid using turf in narrow strips or oddly shaped areas, as they are difficult to irrigate.
- Use plants to screen unsightly views and create privacy – A naturalized hedge or trellis with vines can be used to provide privacy from neighbors, buffer busy roads, create outdoor rooms, or direct foot traffic in your landscape.
- Pay attention to setback lines or restrictions – These are areas where city/county codes dictate that no permanent structures are to be constructed.
- Pools and hot tubs require safety fencing – Check with your city/county for codes and restrictions.
- Consider safety when locating children’s play areas – Play areas should be in clear view from indoor rooms you spend time in.
- Place outdoor cooking areas near the kitchen – The outdoor grill and dining areas should be close to the kitchen.
If you are having trouble drawing what your prospective garden plan might look like, mock up a fake version of the real thing. Use garden hoses to outline borders of planting beds. Tall stakes can stand in for trees or for elements such as an arbor.
Large pieces of cardboard can indicate paving, decks or stepping stones. Leave the stakes, cardboard, and hoses in place for a few days to see how it influences traffic patterns, views, privacy, and access. You’ll see whether your plan needs adjustment.
Once you’ve completed a design layout, it’s time to choose the specific plantings. STEP 2 provides tips on selecting beautiful water-wise plants for your new design.
- Hiring a Landscape Professional - January 19, 2017
- Water-Wise Plant Materials - January 13, 2017
- Water-Wise Plants Timing and Seasonality - January 13, 2017
