One of the most common household plumbing projects is replacing a water heater. Normally, the first sign of a heater problem is water dripping from the bottom of the jacket. This indicates that the tank has corroded through.
The cure may be installation of a new heater. If you have any doubt about the condition of your water heater and if it needs to be replaced or not, contact a professional plumber.
This information below covers replacing of natural gas, LP-gas, and electric water heaters, the most common kinds.
Don’t forget, you will need …
TOOLS
- Hacksaw or pipe cutter
- Pipe wrenches
- Screwdrivers
- Adjustable open-end wrench
- Drill and 1/8 inch bit
- Soldering torch
- Appliance cart, dolly, or hand truck
MATERIALS
- Water heater
- T&P relief valve
- Vent pipe fittings
- Gate valve
- Flex-connectors–water, gas
- 240-volt neon test light
- 1/2 inch flare adapter
- Teflon plumber’s tape
- Stick pipe dope
- Sweat soldering supplies
- Hand cleaner
Removing Your Old Water Heater
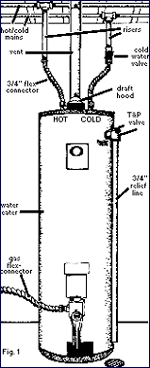
The typical overhead-plumbed water heater hookup is shown in Fig. 1. Before you can connect the new heater, though, the old one must be taken out.
Begin heater removal by turning off the gas or electricity to the heater.
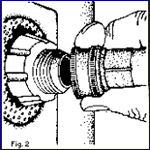 Drain the heater (Fig. 2). Opening a hot water faucet will let air into the system.On a gas heater, separate the vent pipe from the draft hood. It should lift off after removing the sheet metal screw that holds it. After making sure the pilot light is out, disconnect the gas line at the heater and cap it.
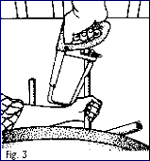
Next, remove the heater from its water piping. If connected with unions–removable threaded fittings–take them apart with a pair of pipe wrenches. Pipes without unions will have to be sawed off with a hacksaw (Fig. 3). Or a pipe/tubing cutter will do the job. The old heater can now be taken away and disposed of at a dumpsite or approved recycling facility.
Installing the New Heater
Take your new heater to its location by “walking” it or using an appliance cart, dolly, or hand truck.
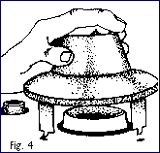
Position the new heater so your piping–particularly a gas vent pipe–will reach most easily. Install the heater’s new draft hood (gas heater). Many have legs that insert into holes on the heater’s top (Fig. 4).
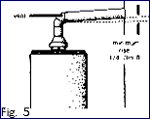 Every gas water heater needs proper venting that’s no smaller than the draft hood collar of the new heater. It’s a good idea to use new vent pipe elbows, as the old ones will probably be corroded at their present angles. The vent should go straight up as far as possible. Then any horizontal run should slope upward at least 1/4 inch per foot, as shown in Fig. 5.
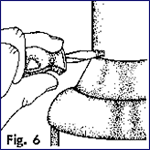
Connect the vent pipe with short sheet metal screws (Fig. 6).
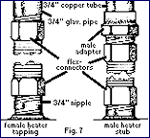 Now you can make the hot and cold water connections. The easiest way often is using copper flex-connectors, available from your dealer. Figure 7 shows how flex-connectors fit a heater’s female tapping (left side), or male stub (right side).
At the upper end, the flex connectors make up to a threaded metal pipe (left) and a sweat-soldered copper tube (right) using a male adapter. They range in length from 12 to 24 inches–the 18- and 24-inch lengths being most practical. Flex-connectors are easily bent to reach where you wish.
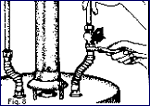 How the hot water piping is handled depends on whether your house has threaded metal, sweat-soldered copper, or thermoplastic piping, and whether it is 3/4 inch or 1/2 inch. No matter what, though, the old heater should be fitted with a cold water gate valve (Fig. 8). To keep it from becoming sediment-fouled, the valve should be placed in a vertical section of piping.
Use Teflon tape (but not pipe dope) on the male threads entering flex-connectors. If your water heater has female-threaded tapping, you’ll need a pair of short 3/4 inch nipples to accept the flex-connectors at the bottom. If the heater comes with 3/4-inch male-threaded stubs, the nipples are not needed.
At the top, the flex-connectors fit directly to the ends of threaded pipes (or a male adapter sweat-soldered to copper tubing). Some install to copper tubing without sweat-soldering, an advantage. If you sweat-solder, be sure to do this before installing the flex-connectors, as the heat from soldering would damage the connector gaskets.
Thermoplastic pipe. Flex-connectors are not necessary with CPVC or PB plastic pipe. Needed are what’s called “transition unions” to go between the metal heater threads and the plastic piping.
Some manufacturers of plastic fittings also call for the use of foot-long threaded steel nipples between the water heater and the transition unions to distance them from conducted burner heat. Two more transition unions are needed at the top end where the plastic risers will join the threaded metal water lines (not required if your house is plumbed with plastic tubing).
You can use rigid CPVC tubing, solvent welding the joints. Or use flexible PB, joining with mechanical couplings. PB cannot be solvent welded. And don’t try to hook up a water heater with PVC, PE, or ABS plastic piping, as these will not take hot water.
Relief System
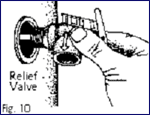 A vital part of water heater installation is the provision of a temperature and pressure relief valve and relief line. The relief system is designed to let off excess heat and pressure automatically (Fig. 10.)
With all the plumbing connected, you can close the heater’s drain valve and open the cold water inlet valve to fill the storage tank. Opening a hot water faucet will release trapped air in the top of the tank. Close the faucet soon so water flows readily from it. Check for leaks.
Energy Hookups
The very last thing to do is connect the gas or electric lines to your heater.
Gas connections. Install a 1/2 inch male flare adapter into the inlet opening of the heater’s gas valve. Connect the gas flex-connector collar to the flare adapter (no dope or tape) and tighten with an adjustable open-end wrench. Everything okay, see that the thermostat is in the off position. Then you can turn the gas on.
Electrical connections. The wires serving an electric water heater must be the right size, providing the voltage and amperage the heater is designed for. Unless you know how to work with wiring, a qualified electrician should be hired to wire the heater. When you turn the heater circuit on, check the electric meter to see whether it is spinning, indicating that the heater is working.
Water Heater Safety Tips
- Water draining from a heater may be quite hot, use care.
- While sweat soldering copper tubing, be careful not to start a fire. Wet any wood nearby. Use metal shielding. Make sure that no gas leaks. Have a fire extinguisher at hand.
- The cold water gate valve must be left open all the while a water heater is in use. Check the relief valve’s action periodically to make sure it opens and closes again. Remember that water coming from the relief pipe may be very hot.
Gas Heater Safety
- Use stick pipe dope (not Teflon tape) on gas connection threads. Don’t use oil-based compounds. Check to see that the type of gas you have is suited to the new heater.
- Check for the required clearances between the heater and combustible materials (see the heater’s owners manual).
- Verify that the heater’s combustion air needs will be met.
- It’s a good idea to put a garage-based water heater up on an 18-inch-high (minimum) platform, even though this calls for making plumbing changes. Some codes require it (for electric heaters, too). Make the platform of 2 x 4’s and 5/8 inch plywood.
- Apply stick pipe dope sparingly to the male threads of the heater’s flare adapter, keeping the dope back from the first two threads so it won’t get into the gas line. Then it cannot foul the gas controls.
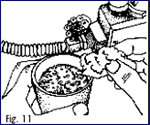
- Check for leaks with a dish detergent solution used on all gas connections you’ve either made or disturbed (Fig. 11). Never test for gas leaks with a flame. If any leaks are found, turn off the gas right away and fix them.
- Read and carefully follow the manufacturer’s lighting instructions. It may take some time for air to be purged from the gas lines, and a flame should be kept at the pilot orifice until the pilot lights.
- See that the main burner flame settles down, does not burn yellow but basically bluish, and doesn’t smoke. Some sizzling is okay with a cold storage tank. That’s caused by condensed water dripping onto the hot burner. But if a puddle of water forms under the heater, it’s from a leak. Read Rotate the reel clockwise as you unroll it and push the tape forward into the sewer pipes.
Electrical Safety
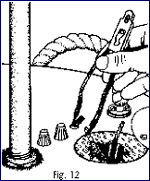
- Don’t assume a switch or circuit breaker has cut off the electric power. Before you touch any bare wires, with hands or tools, check the wires with a 240-volt neon test light. First be sure the test light is working by inserting its prods into a receptacle. It should glow.
- Then open the access cover to the heater junction box, removing the wire nuts or tape from the heater’s electrical connections carefully without touching them. Contact the test prods between the heater’s green grounding screw or other reliable ground and each of the exposed wires in turn (Fig. 12).
- Furthermore, touch the prods across the bare wires themselves. If the test light glows at any time, at least some of the wires are still “live,” indicating that power to the heater is not off.
- Call in an electrician before proceeding on your heater change. This is critically important, because electricity, water, and plumbing create a potentially hazardous combination. Only when you know the wires are dead is it safe to disconnect the electrical cable serving the heater and remove it.
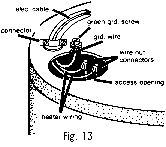
- Do not attach aluminum wires to copper ones inside the heater. See that the heater is properly grounded, electrically (Fig.13).
- Keep out of the reset and thermostat section of the heater, as they contain exposed live wiring.

- If You Have No Hot Water Pressure, Here’s What You Should Do - December 28, 2021
- What is the Right Shower Drain Pipe Size? - January 25, 2020
- Wet Vent Plumbing, What Is It? How Do You Utilize It? - November 17, 2019