Wet vent plumbing has been around since 1920. It’s been practiced since the first plumbing code was established. However, only recently was wet vent plumbing added to the plumbing code by the Uniform Plumbing Code.
As a result, people today still have a hard time understanding what it really is and how it works. If you’ve heard of wet vent plumbing, but you’re not really familiar with the specifics, you’re not alone. So, what is wet vent plumbing?
What is a wet vent?
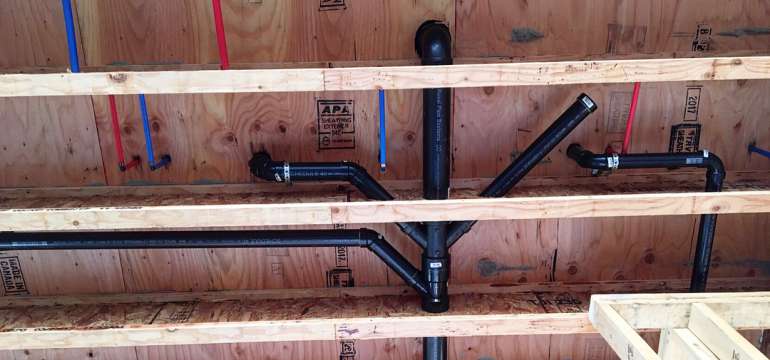
The official definition of a wet vent is a pipe that serves as a waste pipe and a vent at the same time. The wet vent also protects the drain’s trap for several fixtures, all connected to one system.
For those that don’t already know, every fixture in your bathroom needs to be vented. When a fixture doesn’t have a vent, a number of problems can occur. Some of these include:
- The water in the fixture may drain slowly.
- You’ll likely hear gurgling noises.
- You likely smell unpleasant odors.
- The odor created from a trap that’s not sealed might emit methane gas. This gas could pose a threat to your family’s health.
Dry vent vs. Wet vent
What’s the difference between a wet vent and a dry vent? A wet vent system drains the water from one fixture while venting the air from one or more other fixtures. A dry vent system only transports air. No water is carried.
In other words, wet vents may vent one fixture and drain another, whereas dry vents usually just vent air from one fixture at a time. The reason so many people choose a wet vent system over a dry vent one is that wet venting can save you time, money, and a lot of on materials.
For example, if someone is adding a new bathroom to their home, building new drain lines can be quite a hassle, especially if you have to go through a closet. This is where wet venting comes in.
How is wet venting used?
Typically, wet venting is used for a group of bathroom fixtures. A group may include the toilet, the sink, the shower, the lavatory, the water closet, and so on.
Basically, all the fixtures in a bathroom group will use the same vent when you utilize wet venting. Even though this method of plumbing can be used for several other applications, it’s typically only used for bathroom fixtures. This has a lot to do with the plumbing codes.
Wet vent rules and codes
Listed below are a few rules and codes you should take note of when incorporating wet venting in your home. It’s important to remember that codes will vary by city and state. The guidelines listed below are typically universal to both the United States and Canada.
- Although wet vent plumbing is used to vent two or more bathroom fixtures at the same time, the fixtures all have to be located on the same floor of a particular building. They cannot be on separate floors.
- If you’re connecting a toilet in your wet vent plumbing system, your toilet has to be lower than any of the other fixtures using the same vent. There are no exceptions to this rule.
- Every 4-feet of horizontal plastic pipe is required to have a pipe supporter. These clips will ensure your pipes are being securely held. They’re also really helpful for unusually pipe configurations. Most professionals recommend economical plastic pipe-hanging straps with the use of roofing nails.
- Wet vents can be as long as you need them to be, but most building codes have a minimum size for your wet vent. Why? Pipes that are too short can cause a hydraulic overload. Make sure you research your local plumbing codes before you start your project.
- The angle in which your wet vet connects to a horizontal drain is very specific. For a wet vent, the vent should enter the drain line at a minimum of a 45-degree angle.
- Make sure that your pipes are the right size. The size of your pipes will determine how much of a hydraulic load it can handle. Use the chart below as a reference guide:
|
Proper size of your wet vent |
|
|
Drainage Fixture Unload |
Wet Vent Pipe Size |
|
1 Unit Load |
2 Inches |
|
4 Unit Loads |
2 Inches |
|
6 Unit Loads |
2 ½ Inches |
|
12 Unit Loads |
3 Inches |
|
*Always remember, the more fixtures connected to your wet vent system, the more the load |
|
It’s important to make sure you have a large enough wet vent pipe, so unnecessary problems don’t occur. Having a wet vent pipe that’s too small could result in issues like clogging, hydraulic overload, leaking, and other problems. When in doubt, go with a 3-inch or larger wet vent pipe and a 4-inch horizontal waste line pipe. If you follow these wet venting rules, your plumbing system should pass inspection and work well for several years to come.
Wet venting tips
Listed below are a few rules you should follow to ensure that your wet venting system works well. If you utilize these rules, you’ll minimize your chances of issues.
✔ When you start to create your wet venting system, ensure you’re using the right kind of fittings permitted by your local plumbing codes.
✔ Before you begin, you’ll also want to be sure you know what the distance is from your trap arm to your vent pipe. This will allow you to purchase the proper materials for your project.
✔ Tubs and washbasins typically use a 1½ inch upper trap arm. Showers, dual washbasins, and laundry centers usually use a 2-inch trap arm, and toilets generally use a 3-inch trap arm.
✔ The maximum run, which is the length from the drainpipe to the vent pipe, is 42-inch for a 1½ trap arm, 60-inch run for a 2-inch trap arm, and a 72-inch run for a 3-inch trap arm.
✔ When using copper tubes or fittings, check for dents or flaws in the sides of them. If you see any, throw the fitting or tube away and use new ones. For your wet vent system to work properly, your copper fittings or tubes should be in good condition.
✔ If you are connecting a group of bathroom fixtures with a wet venting system, and the toilet is one of the fixtures, the toilet will have to be the very last fixture that’s connected to the wet vent. To accommodate this, you may have to use a symmetrical fitting. Most professionals suggest using a double wye.
✔ As a safety issue, make sure you always wear gloves and a mask when you’re soldering your pipes together. If you’re using plastic pipes, you don’t have to worry about this.
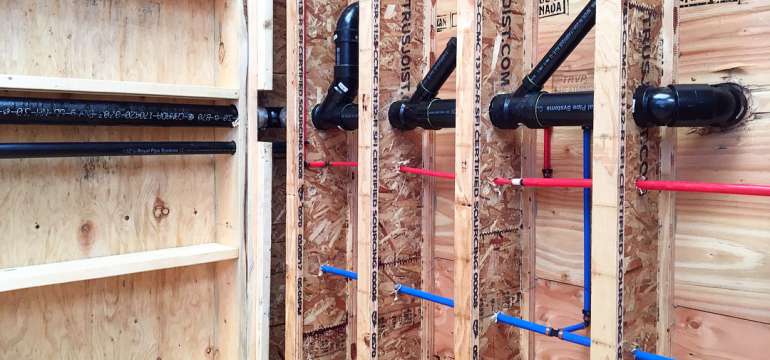
Wet venting: Toilet, sink, and tub or shower
If you’re setting up a wet venting system where the toilet is venting through the sink drain line, then you’ll want to make sure your toilet drain line should be at least 3 inches in diameter, and the sink drain line should be 1 ½ inches.
The shared drain/vent area between these two fixtures should be 2 inches in size, and the vent that heads upward, the vertical leg, should be at least 2-inches.
In this plumbing system, the wet vent will connect to a vertical drain leg beneath the toilet. The tub will connect in the same way. These two are both connected to the sink’s drain line. Both drain lines coming from the toilet and the tub should be at least 3 inches in diameter. The sink drain line can be 1 ½ inches in size, but it’s best to bump it up to 3 inches for extra protection.
When you design a wet venting system that connects the sink and the shower, just remember that it’s much like the sink and toilet combination, but you will not be able to connect the drain to the vertical leg. With this set-up, you’ll need a horizontal leg. As far as the measurements, they’re pretty much the same.
Wet vent plumbing inspections
After you have finished setting up your wet vent plumbing system, most plumbing codes require that you set up an appointment with your local plumbing inspector, so they can perform water and/or air tests.
When your local plumbing inspector comes over to your home, they’ll focus most of their attention on whether or not the water pressure is at a safe level. This is not only for your safety, but by having this test done, you might save yourself a lot of unnecessary problems in the future.
A final thought
When it comes to wet vent plumbing, the codes are very specific and need to be followed. This is why it’s best to make sure you review them and follow every detail.
Otherwise, your local plumbing inspector won’t approve your project, and you’ll more than likely have to redo it. This is not only expensive but also a major hassle. Save yourself the frustration and do your research prior to your wet venting project.

- If You Have No Hot Water Pressure, Here’s What You Should Do - December 28, 2021
- What is the Right Shower Drain Pipe Size? - January 25, 2020
- Wet Vent Plumbing, What Is It? How Do You Utilize It? - November 17, 2019