Following this step-by-step procedure will enable you to remove and install a standard toilet.
How to remove your old toilet
- Before performing the task of toilet removal, make sure the water supply is shut off. The water supply tap is normally located in the line leading to the underside of the tank. If your toilet does not have such a tap, you will have to shut off the main water line in the house. Turn the tap clockwise to close. Once the water supply is shut off, flush the toilet to drain the water out.
- The next step is to disconnect the water supply line from the tank. You will see a nylon or brass fitting connecting the line where it enters the bottom of the tank.
- Using a wrench, undo the fitting turning counter clockwise. When loose you should be able to turn the fitting by hand. When the fitting is unthreaded from the tank, gently pull down on the line separating it from the bottom of the tank.
- You are now ready to remove the tie down nuts at the base of the toilet bowl. Looking at the base of the bowl, you will see two ceramic or plastic caps located one on each side. Using a flat screwdriver, gently pry up on the caps and remove.
- Using a wrench, remove the exposed nuts. Once the nuts are removed you can now remove the toilet from the floor. With the tank lid off, lift up on the toilet detaching it from the floor.
- When lifted, try to hold the toilet level to prevent water trapped inside from spilling out and remove toilet from the bathroom. Inquire about local toilet recycling programs to dispose of your old toilet.
- Be sure to put a hole in your old toilet prior to disposal to prevent its reuse that way you ensure that the water savings from replacement are realized in more than your home.
How to install your new toilet
If you are installing a new toilet, it will have to be assembled and instructions are included with the product. Following the instructions, you will mount the toilet tank to the base using a rubber seal, two bolts with wing nuts, four metal washers and four rubber washers.
- To mount the tank, place the rubber seal around the hole on the bottom outside of the tank. The seal is flat on the tank side.
- Place the tank on the toilet base.
- Now put one metal washer and one rubber washer on each bolt. The rubber washer must be tight against the toilet. Insert the bolts through the inside of the tank and down through the base.
- Install the rubber washers, metal washers and wing nuts from underneath. Tighten the wing nuts alternately, being careful not to over tighten them as you could crack the toilet.
- Inspect the floor flange making sure it is free from all wax from the previous seal. Remove any old wax with a putty knife.
- Check to ensure the flange is tight to the floor. Tighten or replace loose or rusted flange screws. Install new flange bolts and position the new wax ring center on the flange, narrow side up.
- Some wax rings come with a rubber boot that fits downward into the flange. You can also warm the wax ring before installation making it easier to work with. Make sure not to over heat and melt the wax ring.
- Now carefully lower the toilet down onto the flange, guiding the bolts up through the holes in the base. Before installing the flange nuts, you will have to seat the toilet. Do this by pushing down on the toilet with one hand on each side of the bowl.
- Install the washers and nuts tightening by hand. Using a wrench, tighten the nuts alternately giving each side a few turns being careful not to over tighten them. As the nuts are tightened, the wax seal compresses and the gap between the base of the toilet and the floor will close.
- Install new caps to cover the exposed bolt ends. You may have to cut the bolts off if they are too long. Next, reconnect the water line to the bottom of the tank and tighten the fitting.
- Turn the water supply on and when the toilet fills with water, flush and check for any leaks. As a finishing touch you can run a bead of caulking around the base of the toilet where it meets the floor.
Removing an Old Toilet
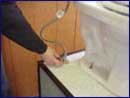
Figure 1: Turn off the water at the shut-off valve on the wall or floor behind the toilet.
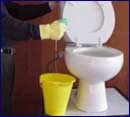
Figure 2: Flush the toilet and collect remaining water in the tank or bowl with a sponge.
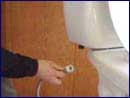
Figure 3: Disconnect the water supply line at the base of the tank.
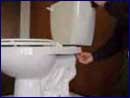
Figure 4: Remove the tank mounting nuts and bolts located on the back underside lip of the toilet bowl
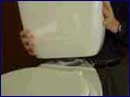
Figure 5: Remove the tank from the bowl.
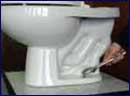
Figure 6: Remove the bolt caps/covers (if present) and then unscrew the nuts at the base of the bowl that secure the toilet to the floor. If they are corroded, break or won’t loosen, use a hacksaw to cut them off.
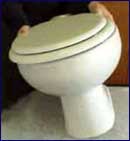
Figure 7: Remove the bowl from the floor by rocking it to break the seal until the toilet comes loose. Remove the bowl, being careful not to spill any water remaining inside.
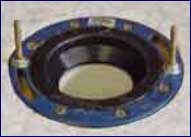
Figure 8: Scrape the old seal off the drain opening with a putty knife. Clean out the slots for the new bolts that will hold the new toilet.
Installing a New Toilet

Figure 9: Slip the heads of the two new T-bolts into the flange and center them on each side of the flange. You can fix them in an upright position by using a dab of plumber’s putty.
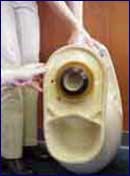
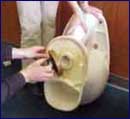
Figure 10 and 11: Turn the bowl of the new toilet upside down and press a new wax ring onto the drain of the toilet. If the wax ring has a plastic sleeve, the sleeve should extend an inch into the floor flange when the bowl is set on it.
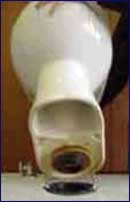
Figure 12 and 13: Turn the bowl upright and lower it over the bolts so that they slip through the holes on the sides of the toilet base. Put your weight into it and press down to make a seal, but don’t rock or lift the toilet once you have placed it. If you do you may break the seal you just made.
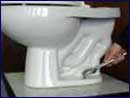
Figure 14: Install the washers and nuts onto the bolts and tighten them evenly one turn past hand-tight. Alternate the tightening from one bolt to the other so the toilet lowers slowly and evenly onto the flange. After securing the bolts, you may have to trim them.
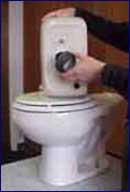
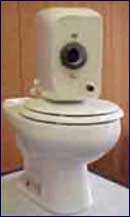
Figure 15 and 16: Place the thick rubber gasket over the threaded extension on the tank.
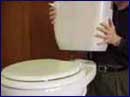
Figure 17: Lower the tank onto the bowl. Match up the holes in the bottom of the tank with the ones on the bowl.

Figure 18: Run the bolts with the rubber washers, through the holes in the tank and tighten the nuts located on the back underside lip of the toilet bowl just until the tank is level and stable. The rubber washers should be placed inside the tank to seal in the water.
Alternate the tightening from one bolt to the other so the tank lowers slowly and evenly onto the bowl. Be careful not to over-tighten, you may crack the tank.
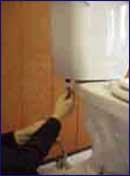
Figure 19: Connect the flex line to the underside of the tank and tighten. Turn on the water and check for leaks. Adjust toilet water line if necessary.

- If You Have No Hot Water Pressure, Here’s What You Should Do - December 28, 2021
- What is the Right Shower Drain Pipe Size? - January 25, 2020
- Wet Vent Plumbing, What Is It? How Do You Utilize It? - November 17, 2019