When your toilet flange is too high, your toilet may leak water and rock back and forth when used. Both the leaking and the rocking can warp or break the floor. A leaking flange can also rot the subfloor and lead to the accumulation of mildew and mold. So, what do you fix this?
When this problem occurs, there are three different methods you can use to fix this. You can raise your bathroom floor, you can use grout as a filler, and you can replace your old flange with a new one. Read more about the different options and choose the method that’s best for your situation.
Raising the bathroom floor
 The thing you should know before you start raising the bathroom floor is that this is a very time-consuming project. You may want to consider the other options first. However, if you do decide this is what you want to do, you’ll need to invest in a thicker kind of flooring.
The process of raising your floor is just a matter of adding thickness to it. To do this, you’ll want to first measure how much higher the toilet flange is currently sitting above your bathroom floor. Once you have an exact measurement, go to your local flooring or home improvement store and purchase tile with the thickness that you need. You can remove your old flooring and lay your new flooring down. Once laid, your toilet shouldn’t rock or leak.
Using grout fill the gap
![]()
![]()
Grout is an excellent tool to use when the flange is too high. To use grout to fix your flange:
- Start by mixing your grout. You don’t necessarily needed to follow the instructions on the package. Instead, put a small amount in a something that looks like a yogurt container and make the container a 6 to 1 grout to water ratio. This should give you enough grout for your project.
- Get your toilet in place and set your toilet on four rubber shims. These rubber shims will keep your toilet from moving while you’re working on the flange.
- Take your mixed grout and pack it into the gap. Make sure you do this all around the toilet.
- Wait 24-hours before the grout to dry.
- Once dried, remove the shims. Some of these might be a little hard to remove, but they will eventually come out.
- After you have removed the shims, grout the gaps where you pulled the shims out from.
- Now you can tighten the nuts located that hold the toilet down.
It’s important to note that when you’re leaving the gaps with the shims, the end of the grout bead should be curved inward towards the toilet. This curve will allow you to make a smooth overlap when you finally close the gap.
Another thing you should do is add moisture to the grout when it’s drying. Grout dries faster when it has moisture in it. Use a spray bottle to add moisture. This will help the grout become strong as it dries.
Replacing the flange
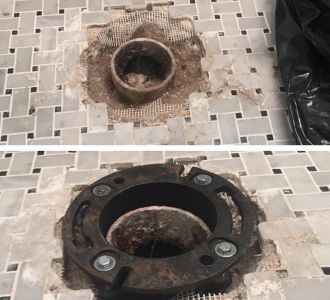
The last option when your flange is too high is to replace it. You’ll need to remove your old flange and the fitting from the pipe coming up from your bathroom floor to do this.
- Start by removing your toilet and breaking the outer flange portion off. You can use a hammer and a chisel. Make sure you don’t crack the pipe or you may be in trouble. You can also use a variable speed drill with a 4-in hole saw as well. This will cut the outer flange right off. If the pipe coming up from your floor is at a little bit of an angle, you’ll also need to make the necessary adjustments when you’re doing the cutting.
- To get the fitting out from the inside of the pipe, you’ll want to make two score cuts, less than an inch between each other, on the inside of the fitting. Use a blade of some sort to do this. Make sure when you’re cutting, you don’t go deeper than the fitting. Once you have made the two score cuts, you should be able to pop the fitting out with a screwdriver or another tool. It’ll probably break off in pieces.
- Once the outer portion of the flange and the fitting has been cut, grind down the top of the pipe until it’s flush with the floor. Use a PVC saw to do this.
- After the pipe has been cut flush with the floor, you can then insert your new flange into the pipe. The Twist N Set is one of the best flanges you can use. It has a water tight seal and goes into the pipe several inches.
- You’ll then want to drill 4 pilot holes into the floor. If your bathroom floor is concrete, make sure you use concrete screws.
- Set your toilet onto the flange and tighten up the screws on your toilet.
Your flange should now be lower than where it was, and your toilet should sit level and not leak or rock.

- Painting Over Powder Coat and What You Need to Know - February 1, 2022
- How to Get Rid of Humidity in a Basement Without a Dehumidifier - December 17, 2021
- How to Fix a Crack in Drywall That Keeps Coming Back - September 22, 2021