Rainwater harvesting is an ancient technology used by many cultures to capture rainfall and use the water for irrigation and drinking. More specifically it is the “capture, diversion, and storage of rainwater for irrigation and, in some cases, for use as a potable water supply”.
Most frequently, rainwater is collected from the roof runoff. After all, it’s a shame to let runoff go to waste when it can be used indoors and/or for irrigation.
The benefits of rainwater harvesting can include:
- Save money on utility bills
- Relief of strain on other water supply
- Ability to build or farm in areas with no other water supply
- Increased independence and water security
- Improved plant growth
- Greater sensitivity to and connection with natural cycles
A rain barrel is one of the easiest and least expensive rainwater harvesting systems. However, rainwater harvesting for landscape irrigation may only be practical in locations where rainwater can be collected in sufficient quantities during the time that it is needed. If most rainfall is seasonal, covered storage may be required which can increase costs.
Rainwater is usually stored in barrels, cisterns, or storage tanks. In some places, like the U.S. Virgin Islands, rainwater is regularly used for drinking and bathing.
Rainwater harvesting systems range in complexity from a barrel at the bottom of a downspout to extensive systems with covered storage tanks, pumps, and water treatment.
System Components
There are six basic components of all rainwater harvesting systems – from “Texas Manual on Rainwater Harvesting”, 2005.
- Catchment area/roof – the surface on which the rain falls
- Gutters and downspouts – for transport from catchment to storage
- Leaf screens and roofwashers – used to remove debris and contaminants
- Cisterns or storage tanks – for storing collected rainwater
- Conveyance – the delivery system (gravity or pump)
- Treatment – filters, additives, etc. to settle, filter, and disinfect
System Design and Installation (Courtesy of the University of Arizona College of Agriculture and Life Sciences)
Basic Systems
A basic rainwater harvesting system does not utilize storage or treatment. These systems typically move rainwater directly from the roof onto the landscape, which may or may not have specially designed holding areas.
By observing your landscape during a rain, you can locate the existing drainage patterns on your site to your advantage. Identify low points and high points. Utilize these drainage patterns and gravity flows to move water from catchment areas to planted areas.
If you are harvesting rainwater from the roof, extend downspouts to reach planted areas or provide a path, drainage, or hose to move the water where it is needed. Take advantage of existing sloped paving to catch water and redistribute it to planted areas.
The placement and slope of new paving can be designed to increase runoff. If sidewalks, terraces, or driveways are not yet constructed, slope them two percent (1/4 inch per foot) toward planting areas and utilize the runoff for irrigation. Bare dirt can also serve as a catchment area by grading the surface to increase and direct runoff.
Next locate and size your landscape holding areas. Locate landscape depressions that can hold water or create new depressions where you want to locate new plants. Rather than digging a basin around existing plants, construct berms or moats on the existing surface to avoid damaging roots.
Do not mound soil at the base of trees or other plants. Holding areas around existing plants should extend beyond the “drip line” to accommodate and encourage extensive root systems.
The more developed a plant’s root system, the more drought tolerant the plant becomes because the roots have a larger area to find water. For new plantings, locate the plants at the upper edge of concave holding areas to encourage extensive rooting and avoid extended inundation (flooding). With either existing or new landscapes you may want to connect several holding areas with spillways or channels to distribute the water throughout the site.
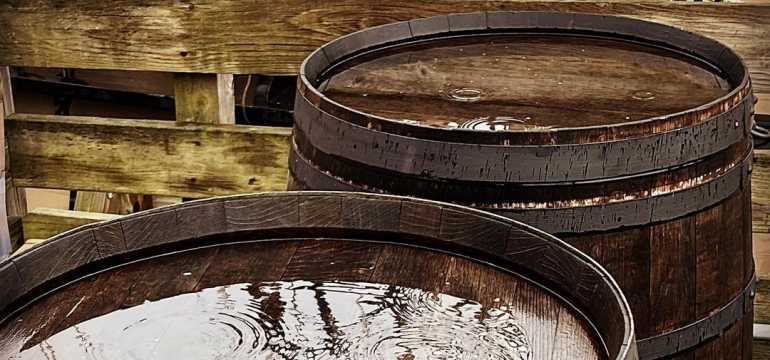
Rain Barrels
Rain barrels are a great way to collect rainwater and distribute them across your landscape. The rain barrel is placed under a downspout and when it rains, water automatically fills the barrel.
In areas with more rain, two or more barrels can be linked together to collect water from a single down spout. Often a hose bib is incorporated into the bottom of the rain barrel, which makes it easy to distribute the collected rainwater across the landscape.
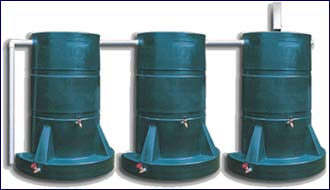
A series of linked rain barrels
For information on making your own rain barrel visit: Here
Extended Systems
If you are designing a more complex water harvesting system, draw your system on paper before you begin to construct it to save time and effort. You may not want to do any calculations, but if you do, a more functional and efficient system will result.
However, doing the calculations does not eliminate the need to field test the system. The steps involved in designing a complex water harvesting system include site analysis, calculation, design, and construction. If the project is complicated, divide the site into sub-drainage areas and repeat the following steps for each sub-area.
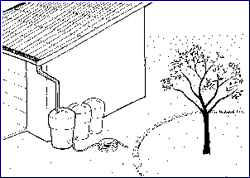
Roof catchment with multiple storage cans connected to a hose adjacent to a landscape area. (Courtesy of the University of Arizona College of Agriculture and Life Sciences – permission granted)
Site Analysis
If you are starting with a new landscape or working with an existing one, draw your site and all the site elements to scale. Plot the existing drainage flow patterns by observing your property during a rain. Show the direction of the water flow with arrows. Also, indicate high and low areas on your plan. Look for catchment areas to harvest water; for example, paved areas, roof surfaces, and bare earth.
Next, find planted areas or potential planting areas that require irrigation. Also, locate above or below ground storage near planted areas.
Decide how you are going to move water from the catchment area to the holding area or storage container. Rely on gravity to move water whenever you can. Also decide how you are going to move the water through the site from one landscaped area to another landscaped area.
Calculations
Calculate the monthly supply (rainfall harvest potential) and the monthly demand (plant water requirement) for a year. Next, calculate your monthly storage requirement if you are designing a more complex system. Some useful conversions:
| 1 cubic foot (CF) | = 7.48 gallons | |
| 100 cubic feet (CCF) | = 748 gallons |
The equation for calculating supply measures the amount of water (in gallons) capable of being harvested from a catchment area.
The catchment area is expressed in square feet, for example a 10 x 20 ft. catchment area is 200 SF (square feet). Measure a sloped roof by measuring the area that is covered by the roof, usually the length and width of the building.The catchment area is multiplied by the amount of rainfall converted to feet to get the volume of water, which is expressed in cubic feet.
The runoff coefficient tells what percent of the rainfall can be harvested from specific surfaces. For a list of runoff coefficients, please see Table 1. The higher numbers represent a smoother surface than the lower numbers.
Table 1 – Runoff Coefficients
| Surface | High | Low |
| Roof: Metal, gravel, asphalt shingle, fiber glass, mineral paper |
0.95 | 0.90 |
| Paving: Concrete, asphalt |
1.00 | 0.90 |
| Gravel | 0.70 | 0.25 |
| Soil: Flat, bare |
0.75 | 0.20 |
| Flat, with vegetation | 0.60 | 0.10 |
| Lawns | ||
| Flat, sandy soil | 0.10 | 0.05 |
| Flat, heavy soil | 0.17 | 0.13 |
Note: For systems intended as potable drinking water sources, no lead should be used a roof flashing or as gutter solder. The slightly acid quality of rain can dissolve the lead and thereby contaminate the water supply. Existing houses should be fully examined for any lead content in the planning stages of any rainwater collection project.
Calculate demand
The demand equation tells you how much water is required for a given landscaped area. Hint: Grouping plants with similar water requirements simplifies the system by making the amount of water needed to maintain those plants easier to calculate.
The equation for calculating demand for new or established landscapes is based on monthly evapotranspiration (ETo) information. Evapotranspiration (ET) is a measure of the amount of water required to maximize plant growth. For this equation use ETo values in feet. You should be able to find ETo for your area on the internet.
The crop coefficients, taken from Table 2, represent the percent of ETo that is needed by the plant. Select these coefficients by the type of plant — high, medium, or low water use. These values approximate what is needed to maintain plant health and acceptable appearance.
| Plant Type | Percent Range | |
| High | Low | |
| Low water use (Xeriscape) | 0.26 | 0.13 |
| Medium water use (shrubs, trees, etc.) | 0.45 | 0.26 |
| High water Use (turf grass) | 0.64 | 0.45 |
The irrigated area refers to how much area is planted and is expressed in square feet. The conversion factor 7.48 converts cubic feet into gallons.
Final design and construction
Use your site analysis information and your potential supply and demand calculations to size and locate catchment areas. For new construction, it should be possible to size the catchment area to accommodate the maximum landscape water requirement.
If you cannot do this you may want to reduce plant water demand by either lowering planting density or selecting lower water use plants.
Roofs or shade structures can be designed or retrofitted to maximize the size of the catchment area. If you are planning a new landscape, create a landscape that can live on the amount of water harvested from the existing roof catchment area.
This can be accomplished by careful plant selection and control of the number of plants used. For the most efficient use of the harvested water, group plants with similar water requirements together.
Remember that new plantings, even native plants, require special care and will need supplemental irrigation during the establishment period which can range between one and three years. (Use the supply and demand calculations to determine this.) Use gutters and downspouts to convey the water from the roof to the storage area. Check out the tips below before selecting and installing gutters and downspouts.
Gutter Guidelines
- Select gutters that are 5 inches wide.
- Select galvanized steel (26 gauge minimum) or aluminum (.025 inch minimum) gutters.
- Slope gutters 1/16″ per 1′ of gutter, to enhance flow.
- Use an expansion joint at the connection, if a straight run of gutter exceeds 40 feet.
- Keep the front of the gutter one-half inch lower than the back.
- Provide gutter hangers every 3 feet.
- Do not exceed 45 degree angle bends in horizontal pipe runs.
- Select elbows in 45, 60, 75, or 90 degree sizes.
Downspout Guidelines
- Space downspouts a minimum of 20 feet apart, a maximum of 50 feet apart.
- Provide 1 square inch of downspout area, for every 100 square feet of roof area.
- Select downspouts in different configurations — square, round, and corrugated round, depending on your needs.
- Use 4-inch diameter Schedule 40 PVC to convey water to the storage container or filter.
Size your storage container(s) large enough to hold your calculated supply. Provide for distribution to all planted areas. Water collected from any catchment area can be distributed to any landscaped area; however, to save effort and money, locate storage close to plants needing water and higher than the planted area to take advantage of gravity flow. Pipes (Schedule 40), hoses, channels, and drip systems can distribute water where it is needed.
If you do not have gravity flow or if you are distributing through a drip system you will need to use a small 1/2 HP pump to move the water through the lines. Select drip irrigation system filters with 200 mesh screens. The screen should be cleaned regularly.

- Rain Harvest System Application Options (automatic vs. manual) - January 12, 2017
- Rain Harvest System Timing and Seasonality - January 12, 2017
- Rain Harvest System Installation Tips - January 12, 2017