Your thermostat plays a really crucial role in making sure that your home remains at the right temperature. But sometimes, issues can arise, and the thermostat won’t actually reach the temperature that you set.
If your thermostat isn’t reaching the set temperature, it could need to be calibrated or cleaned. You may also need to adjust the thermostat, redo its wiring, or even relocate it.
There is no need to panic right away. The issue may not be a difficult one to fix at all.
That’s why we’ve put together this article. It gives you step-by-step instructions for fixing a thermostat that doesn’t reach the desired temperature. Keep reading to learn more.
Check your thermostat’s calibration
You should always check your thermostat’s calibration at least once a year. It’s generally best to do so in the fall before winter brings cold temperatures.
You can begin this process by getting a thermometer that you know is accurate. Then, tape that on the wall directly beside your thermostat.
Wait about 15 minutes, and then look at the reading on both devices. It’s okay to have a variance of plus or minus about 3 degrees Fahrenheit. But if your variance is larger than that, your thermostat may need service.
Clean the thermostat
You also sometimes need to clean your thermostat to get it working properly. Accumulation of dust or dirt on your thermostat sensors can interfere with readings.
Also, these devices feature mechanical contacts that can get dirty from time to time and impact your reading.
Thankfully, you can clean your thermostat at home without having to hire a professional.
The process starts by removing the cover of the thermostat. Then, brush away the dirt and dust that you see with a soft cloth.
You may need to use some electrical contact cleaner if you see any corrosion on the surface. You can pick this up at most hardware stores.
Adjust the thermostat
If neither of the previous two steps fixed your problem, then you may need to adjust some of your thermostat parts. There are a few things to try here.
First, you can move the heat anticipator. This may be your answer if your furnace cycles on and off more than it should.
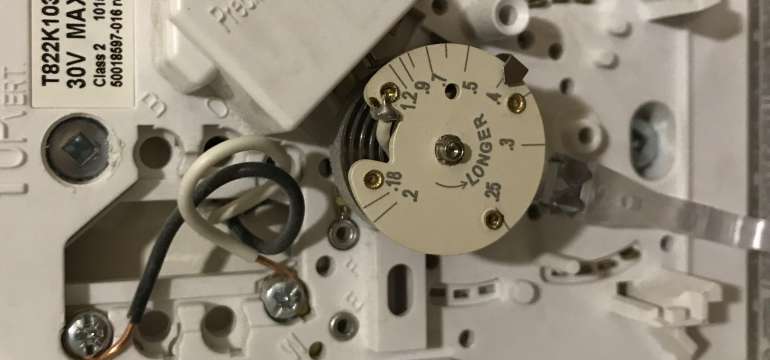
To do this, look for the arrow marked “LONGER.” Then, move the level in the direction that will increase your HVAC unit’s cycling time.
You may also need to check the level. Some thermostats have vials of mercury in them that regulate temperature control.
You may need to adjust the placement of the thermostat if the liquid in this vial isn’t level. You can check that with a standard carpenter’s level.
If you don’t have a thermostat with a mercury vial in it, you may want to try adjusting the calibration screw. This is typically located on a coil inside the unit. But you’ll want to consult your owner’s manual to make sure you adjust yours properly.
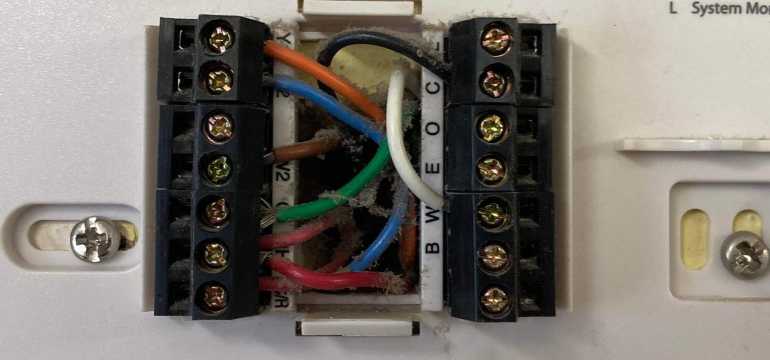
Rewire the thermostat
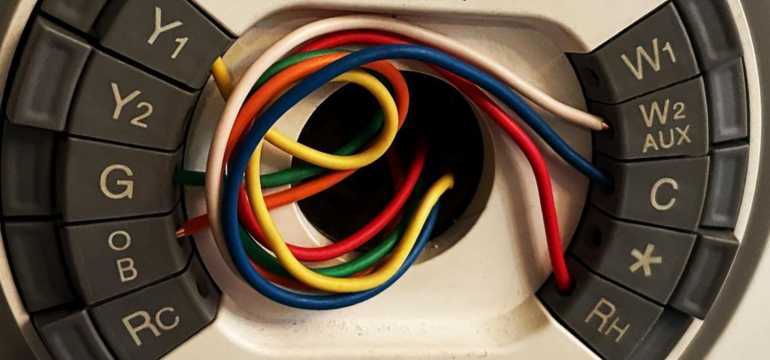
Maybe you just got a new thermostat, and it’s never worked correctly. In that case, you may have an issue with your wiring. This is fairly common after a DIY installation.
If you need a refresher, here are the industry standard colors for each different type of wire in your system:
- (W) White connects to your heating system
- (Y) Yellow connects to your air conditioning compressor
- (G) Green connects to your fan
- (R) Red wires are the power source for your thermostat. You may have two of these. Note: these aren’t interchangeable. They need to correct to the appropriate terminal to function. (Rc: Power for cooling, Rh: Power for heating)
- (C) Blue, black, brown, and purpose wires are called common wires. These are what provide smart thermostats with continuous power.
- Orange wires connect to your heat pump. You may or may not have one of these in your system.
Relocate the thermostat
If all else fails, it’s possible that you just need to move your thermostat to another location. If it’s in a location that receives a lot of direct sunlight, it could trick the sensor into displaying an inaccurate reading.
The right location should be somewhere in the central part of your home. This can be difficult if your house is too large.
It should be located on an interior wall, so it is less susceptible to the fluctuations of the outside temperature. You don’t want it to be too close to any areas of the home with high humidity or steam such as bathrooms and kitchens. Ideally, it would be in an area exposed to high levels of air circulation instead of a closed-off space.
Locations to avoid placing your thermostat
If you think relocating your thermostat is the answer, you need to make sure you put yours in the proper place.
- You should avoid putting it near any windows and doors. Because these may let drafts in that impact the reading.
- You should also avoid placing your thermostat near exterior walls. These tend to have higher temperatures than the rest of your house in summer and lower ones in winter.
- Don’t place your thermostat near any supply vents, either. Because the air coming out of this will be significantly warmer or cooler than the air in the rest of your home.
- Finally, don’t put your thermostat in hallways and less-used areas. These are typically long, narrow spaces. And that means they have decreased airflow and circulation, which can mess with your reading.
Need a zoned system
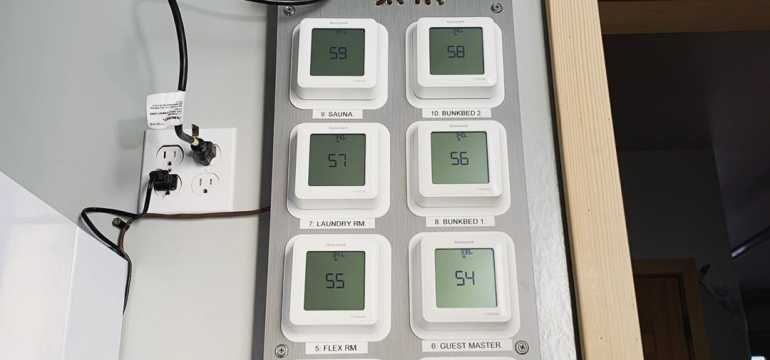
Homeowners who live in fairly large houses may have too much square footage for a single thermostat to control their temperature. There is no single spot that is going to be an accurate reading of all the temperatures throughout your home, particularly if you have an upstairs and downstairs.
A zoned system allows you to control the temperature for different parts of the home separately. For example, you can tie all of the bedrooms to one thermostat and all of the main living areas to another. This allows you to set two different temperatures throughout the day and gives your furnace a better chance of keeping up.
If your technician does not feel that a zoned system is right for your home, he or she may still recommend installing multiple thermostats. You can install multiple thermostats around your home and connect them so that your furnace reads the average temperature across all rooms. This will help you to reach a more consistent temperature in every room of your home.
Bad thermostat
A faulty thermostat may not be reading the correct temperature in the home. There might be a problem with the heating sensor or the fan’s relay switch. Many of these problems can be fixed. If you have a fairly old thermostat, you should consider upgrading to a newer one.
When it comes time to replace an old thermostat, consider installing a smart thermostat instead. This allows you to have more control over the temperature of your home, automatically adjusting the temperatures for different times of the day. You can even gain access to your thermostat settings from your smartphone so that you can warm up your home in the hours leading up to your arrival and keep it cool while you’re away.
Iced over unit
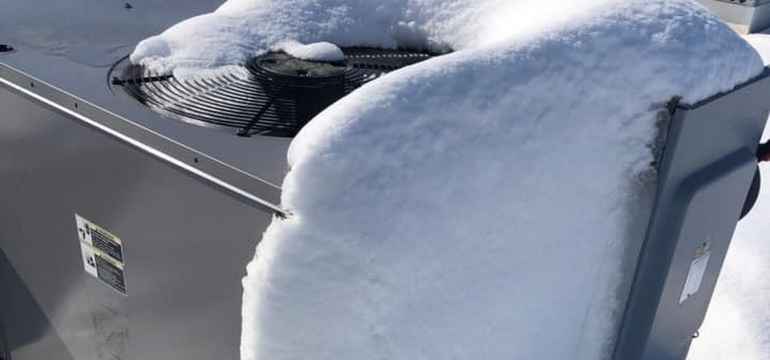
If your system utilizes a heat pump to keep your home warm and cozy, you may want to head outside and take a closer look. When the temperature dips below 35 °F, the heat pump loses its ability to heat up the home effectively. It instead relies on the auxiliary heat that is usually an electric resistance heater. Once the temperature is restored, the supplemental heat turns off, and the heat pump returns to working on its own.
You might find that the temperature quickly drops again after the supplemental heat turns off, starting the cycle all over again.
Colder temperatures might cause your heat pump to actually freeze over. Until the ice thaws, there is little that you can do to get things moving again. This is not something that an HVAC technician is going to be able to correct for you until the temperatures rise again. Simply be aware of the situation and continue to monitor it until it thaws.
Other reasons – Why is my furnace not keeping up with the thermostat?
A dirty air filter
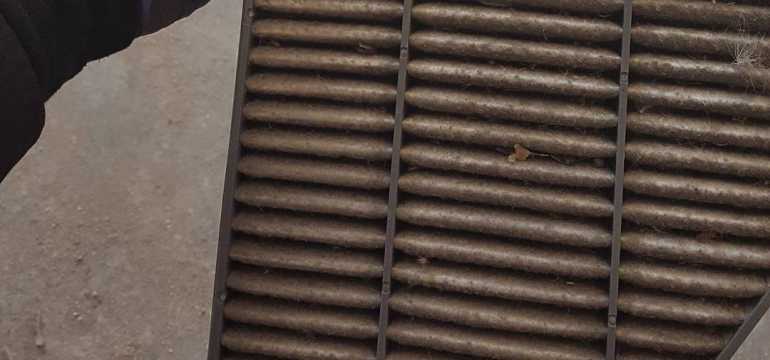
Firstly, make sure to open your air registers and inspect your filters. You might find that they are completely clogged with dust, pet hair, and other allergens that have been pulled from the air of your home.
This dirty filter can block the airflow into your home, preventing the furnace from heating up all the way. Make sure that you are routinely changing these out with high-quality pleated air filters.
Most people find that they need to replace their air filters once every ninety days or so. However, this number can certainly change if you live in a crowded home, have several pets, or are more sensitive to allergens. Some people change their air filters on a monthly basis to keep them from becoming clogged. Stay on top of this chore to prevent major issues with your thermostat.
A broken or dirty flame sensor
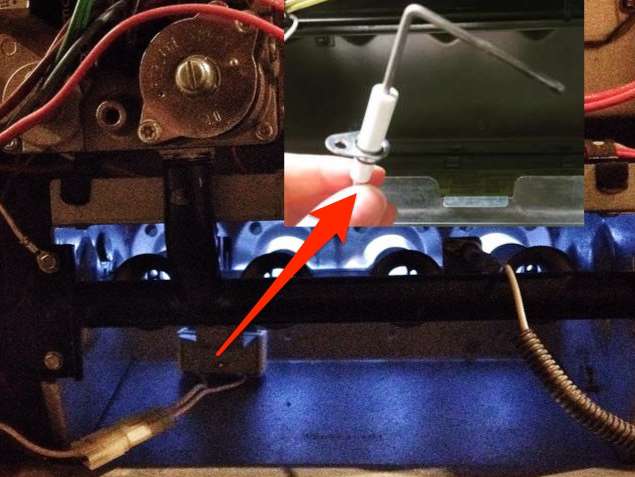
In most cases, the flame sensor is more likely to be dirty than broken.
Carbon buildup can interfere with the way the furnace reads the temperature. Unfortunately, most people have a furnace that is located somewhere with lots of dust, such as laundry rooms, basements, or attics. If you have not been diligent about changing your air filters, this can also contribute to the amount of dust that has built up in your system.
Over time, the dust particles make their way into the furnace and stick to the sensor. It heats up and burns them onto it, creating carbon buildup.
Fortunately, this is a problem that you can solve all on your own. First, make sure that you turn off all power to the furnace. This is an absolutely critical step that you cannot afford to miss. If you are unsure how to turn off the power to your furnace, then you need to leave this job to the professionals.
Following the guidelines laid out in your owner’s manual, carefully remove the sensor from the furnace. You may have to disconnect a wire in order to remove it from the furnace entirely. Once it is out, you can take very light grit sandpaper and gently rub it all over the sensor. Keep in mind that the goal is not to do a full sanding. You simply want to knock off any carbon buildup that has developed.
When finished, wipe it down with a clean paper towel and replace the sensor back in the unit. Turn the power to the furnace back on and give it a few moments to start up again. Give it a while to see if your furnace is suddenly able to keep up with the temperature set by the thermostat. If not, it may need to be replaced altogether.
Wrong Size Unit
There is a specific formula used to determine the size of your furnace. It incorporates the square footage of your home, the number of occupants, the number of windows, and many more small details. It isn’t as simple as heading to your local home improvement store to pick one out.
Many homeowners are led to believe that a bigger furnace is always the better option. Unfortunately, this is simply not the truth, and it could be the reason that your furnace won’t reach the set temperature. A furnace that is too big will run quickly and heat up the air right next to the thermostat. However, it never warms up the air in the rest of the house quite enough, and it shuts off frequently.
It would be far better for your unit to be slightly smaller and run more consistently to actually heat up your home instead of cycling on and off again frequently.
On the other hand, some people try to scrimp and save on the purchase of an expensive new furnace. You can try to live with a unit that is too small, but you might be facing some pretty chilly winters.
Overheated Furnace
There is a possibility that there is something majorly wrong lurking within your unit. The furnace itself may be becoming too hot to continue to run. It has a failsafe built into the unit that allows it to shut off if it begins to overheat. This is an extremely dangerous situation that should be taken quite seriously.
If your furnace is overheating, then it is likely turning off before the thermostat is able to reach the set temperature.
Poor Insulation
Many people find that their homes are colder in rooms that have a lot of windows and doors. It can be a good choice to install new weatherstripping or caulking around these areas to keep the outdoor air outside instead of allowing it to filter in and chill your home.
Adding new weatherstripping may not be enough to keep the cold air from coming in through your windows. Make sure to shut them as tightly as possible, but then consider shrink wrapping your windows to insulate them further. This is a surefire way to keep chilly air outside where it belongs. Keep in mind that this means you will not be able to open the windows for any reason, so think it through before you take this drastic measure.
Of course, you might have a more extensive issue with poor insulation. If you think that you might want to explore installing better insulation in your walls or crawl space, it might be time to consult a professional.

- What to Do if Your House Smells Like Gas but There’s No Leak - February 6, 2023
- Why Is There a Burning Smell Coming From My Vents? - August 16, 2022
- How to Remove the Musty Smell From Your Air Conditioner - August 16, 2022
John
Monday 27th of February 2023
This article was helpful!