We don’t usually think of our toilets as items requiring regular maintenance aside from cleaning. While toilets generally are not a high maintenance item, it is important to understand how they work and what we can do to keep them working properly and efficiently.
Cleaning
Recent research has shown that many common toilet cleaning products can damage the rubber flapper causing significant leakage. Dropping certain toilet bowl cleaners (usually in the form of large white tablets) into your toilet tank may result in damage to the parts within the tank, especially if you do not flush your toilet at least once a day.
Some manufacturers may even void the warranty on those parts. If you chose to use these cleaners, the toilet must be flushed at least once per day. As an alternative, use the in-bowl toilet cleaner rather than the in-tank cleaners.
Toilet parts
Tank — The tank is the top portion which holds either the freestanding water to be flushed (gravity-fed) or the pressure-assist cylinder (pressure-assist). On a gravity-fed toilet the tank houses the fill valve (frequently called a “ballcock”), the flush valve (usually including an overflow tube with a flapper and flapper seat) and the flush or trip lever. These parts are called “trim.”
Tank Lid — It’s the top most part of your toilet tank and covers the mechanisms inside your tank.
Bowl — The bowl is the lower half of the toilet used to hold liquid and solid wastes prior to flushing.
Water Spot/Sanitary Seal — This is the water surface that you see inside the toilet bowl after the flush is completed. This water in the bowl assists with the movement of solids into the trapway and provides a liquid seal in the trapway so that sewer gasses don’t pass from the waste line into your home.
Evacuation – In toilet talk, this is the flushing process that removes liquids and solids from your bowl.
Tank to Bowl Seal – This is the round “donut-shaped” seal between the tank and bowl in a two-piece toilet. This seal provides a cushion upon which the tank rests and acts to prevent water leaks around the coupling between the tank and the bowl.
Shut-off/Supply Valve – The valve on your wall near the base of the toilet with a round or oval handle that allows you to shut your water off while servicing the toilet.
Supply Line – This is the solid or flexible line between the shut-off/supply valve and the connection on the bottom of your tank (fill valve fitting).
Billy Bolt Set – A package of “T” shaped bolts, flat and dome nuts, and round and/or oval washers used to connect the toilet bowl to the closet ring.
Closet Ring – The metal or plastic flange that is permanently installed at the end of your waste line (at floor level) and has slots for the “T” bolts/Billy-Bolts. The inside diameter is normally three to four inches. The closet ring mates with the outlet on the bottom of your bowl and provides the means for evacuation.
Wax Ring – The yellowish beeswax (or beeswax type material) ring between the bottom of your toilet bowl and the mating closet-ring (flange). It is “donut” shaped, about one inch thick. A seal is achieved when the wax ring is squeezed between the bottom of your toilet bowl and the top of the closet-ring.
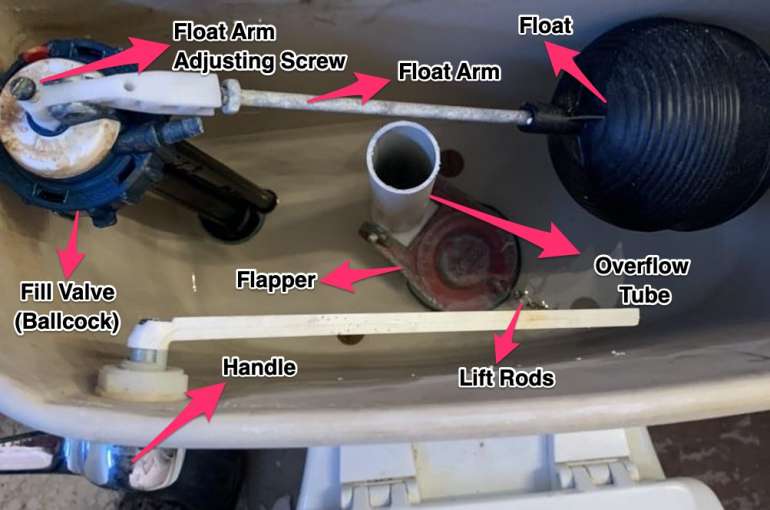
Fill Valve (Ballcock) – You will only find this in a gravity-fed toilet. It is the tall mechanism you see inside your tank (left-hand side) with a float connected to it by means of a metal rod or plastic arm. Or, instead of a float mounted at the end of a rod, it can have the float sliding up and down the tube/barrel of the mechanism itself.
Float – The bulb-shaped sphere on the outer end of the float rod/arm OR the can-shaped float that slides up and down over the fill valve tube.
Float Arm – The metal rod or plastic arm that connects the ballcock’s float to the shut-off lever on the ballcock valve itself. On those fill valves without the float at the end of a rod or arm, a rod-like stiff-heavy wire link with an adjusting clip connects the shut-off lever to the float, performing the same shut-off function.
Float Arm Adjusting Screw – This screw is normally only found where the float is connected to the shut-off lever by means of the metal rod or plastic arm. When turned clockwise, this screw causes the water flowing into the tank to shut off earlier. The same effect is accomplished by moving the stiff wire link downward using the adjusting clip for the slide-type float mechanism.
Douglas Flush Valve – You will find this in most gravity-fed toilets. It is the mechanism you see directly in the center, inside your tank. On one side of it, you will see a hollow tube approximately one inch in diameter (the overflow tube). Connected to the tube by means of “trunion mounting ears” is the flapper. The flapper regulates the amount of water that passes from the tank into your bowl during the flush cycle.
Overflow Tube – This is the approximately one-inch diameter hollow tube to which the refill tube is connected. This is the passageway for the water making up the water spot/sanitary seal to enter the bowl. When the water level is adjusted too high, then water will flow from the inside of the tank into this tube and into the toilet bowl.
Refill Tube – This is the small plastic tube (approximately 1/8-inch in diameter) that is connected near the top of the ballcock mechanism on one end and to the inside of the overflow tube on the other end. Water only flows through this tube during the flush cycle and is the water that replenishes the toilet’s water spot/sanitary seal.
Trunion and Trunion-ring – Trunion “mounting ears” are the approximately 1/8-inch diameter by 3/8-inch long shafts protruding out from the overflow tube near its base. These are the “ears” to which the flapper connects. In some cases the overflow tube is void of these ears in which case, a “rubber” type round “trunion-ring” with two mounting ears slides down over the tube to provide the connecting points for the flapper.
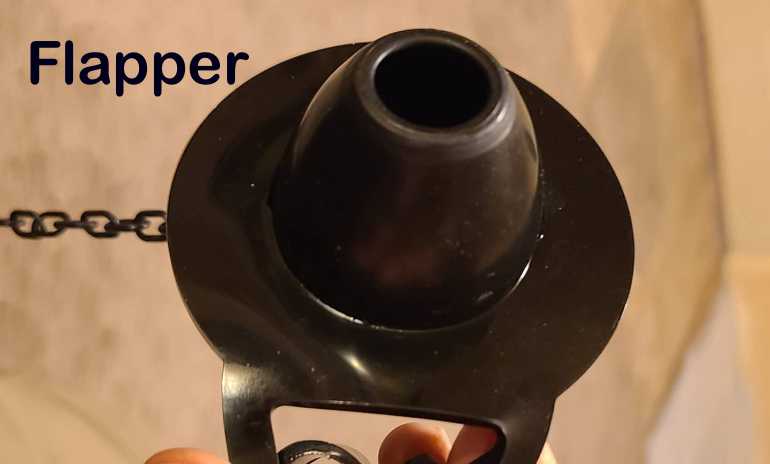
Flapper – The flapper is the flush valve seal and serves to control the volume of water passing from the tank to the bowl during the flush cycle. It mates with the seat on the Douglas flush valve to complete the seal and prevent water leaking from the tank into the bowl between flushes.
Almost all flappers are shaped, in part, like a “flying saucer,” that is, slight “dome” on top, flat like a “pancake” in the center and then (not like a flying saucer) a “funnel” or “bulb” shape on the bottom.
This whole assembly is usually one molded part and is made of flexible rubber-like material. The center or pancake shaped mid-section is approximately three inches in diameter. Other flappers (or seals) are of a flat washer-like design.
There are four common types of flappers:
- Non-air bled – Most always found in 3.5 gallon to 7 gallon toilets and occasionally in some ultra-low-flush toilets (ULFTs). The non-air bled or “standard” flapper has an air chamber in the funnel shaped section. In the small end is an opening approximately 1/2-inch in diameter. This small end faces down and there is no way for the air caught inside to escape, therefore, it floats on top of the water in the tank until the force of the water going through the opening in the Douglas flush valve causes the flapper to close and seal.
- Air bled with calibrated orifice – Often called an “early closing” flapper. This flapper is sometimes used to achieve the 1.6 gallon flush volume in a number of ULFTs where tanks are much larger than 1.6 gallons in capacity. This flapper also has an air chamber, but in the upper portion of the funnel is a round “air-bleed” hole approximately 1/4-inch in diameter. In the small 1/2-inch section of the funnel is a snugly fit insert. In the middle of the insert is an orifice. There are a number of different size orifices to accommodate different toilet manufacturers’ requirements. (In some cases, the orifice size is adjusted through a “dial” type insert, thereby making it an “adjustable” flapper.) The size of the orifice determines how quickly water enters the funnel shaped chamber to displace the air that escapes through the 1/4-inch air-bleed hole near the top. When enough air is displaced with water, the flapper is no longer buoyant and sinks to seal off the escaping water long before all of the water can evacuate the tank; thus, the term “early closing.”
- Air bled with float – Also known as an “early closing” type and is used to achieve the 1.6 gallon flush volume in a number of ULFTs. It also has an air chamber with a round air-bleed hole approximately 1/4-inch in diameter in the upper portion of the funnel shaped chamber. There is no insert in the small 1/2-inch section of the funnel to regulate how quickly the water displaces the air in the chamber. Instead, a float is connected to the top of the flapper by means of a chain. The float remains on top of the water in the tank and the length of the chain connected to the flapper determines how quickly the flapper (which has quickly filled with water) will reach the flapper seat and shut off the flow of water between the tank and bowl.
- Flat seal – A washer-like disk with a flat surface and a hole in the center. The flat seal is common to all toilets that use a piston-type flush valve (as opposed to the Douglas flush valve) as well as being used in some with unique flush valve designs. The flat seal is between 2 1/2-inches and 3 1/2-inches in diameter, of flexible rubber-like synthetic material, and is easily installed on the body of the flush valve.
Flapper Seat – The hard, round surface at the base (or seat) of the Douglas flush valve. The flapper rests on the seat when the valve is closed. The seat surrounds the two-inch opening at the base of the Douglas flush valve, which is almost always made of PVC material although some older toilets were equipped with brass valves. All water used during the flush cycle passes through the valve.
Water Level – The water level inside the tank of a gravity-fed toilet. Some manufacturers cast a porcelain “fill line” inside the tank, while other manufacturers put a fill mark on the overflow tube. In some cases, no fill line is indicated. In such circumstances, a good rule of thumb is to adjust the water level to one inch below the top of the overflow tube.
Flush or Trip Handle – This is the handle normally found on the upper left front of the tank or on the upper left side of the tank. It is the mechanism pushed or pulled to effect the flush.
Flush or Trip Lever Arm – This is the metal or plastic extension connected to the flush valve. It is on the inside of the tank and can be up to six inches long. It reaches from the handle directly to the flush valve or to a location over the top of the flapper.
Flush or Trip Lever Chain/Tail – This is the connecting link between the flush/trip lever arm and the flapper. When adjusted properly, this connecting link allows the arm to pull the flapper open to initiate the flush cycle.
Water level adjustment
Even a new toilet needs its water level adjusted within 30 days of toilet installation. That is because there are rubber diaphragms in most all ballcock mechanisms and those diaphragms stretch like a rubber band.
Also, an increase in water pressure (usually in early morning hours) can cause the water level inside the tank to rise. For example, a 15 to 20 pound pressure increase can cause the water level in your tank to rise by up to 1/2- inch, and it is not uncommon for your water pressure to rise that much during the very early morning hours. To lower the water level in your tank, find the adjusting screw on the top of your fill valve.
A screwdriver (or even a dime) will be all you need to turn the screw. If you want to lower the level, turn the screw clockwise on those ballcock-type mechanisms with floats hanging off the end of metal rods or plastic arms. If your fill valve has the float sliding up and down the barrel or shaft, then you will need to lower the stiff wire-like link using the “V” shaped clip. With either type, it might take you several tries to get the water to the level recommended by the manufacturer.
On some toilets, the water level is shown as a line inscribed in the porcelain, others will have the line indicated on the overflow tube. If you are unable to find a water level mark then a good rule of thumb is to adjust the level to 1-inch below the top of the overflow tube and then check the level every three months.
In isolated cases the water will creep up on the overflow tube even though the adjustment is correct. If you find water is escaping through the overflow tube, your ballcock diaphragm is likely the culprit. If you value your time, you are probably better off to replace the entire fill valve, instead of replacing just the diaphragm.
The replacement of the fill valve is relatively simple. Turn the water off at the shut-off/supply valve, remove the supply line from the fill valve, remove the flange nut on the underside of the tank that anchors the fill valve, disconnect the refill tube and pull out the old valve.
It’s probably a good idea to take the old valve to the hardware store and once there, check with their resident plumbing specialist regarding the best choice. There are now replacement fill valves available that are a great improvement over the old dinosaur you have with you. Install your new model following the manufacturer’s instructions.

- If You Have No Hot Water Pressure, Here’s What You Should Do - December 28, 2021
- What is the Right Shower Drain Pipe Size? - January 25, 2020
- Wet Vent Plumbing, What Is It? How Do You Utilize It? - November 17, 2019