When you’re building a shed or some other building and assembling the roof for it, you’ll need to learn some new terms and some new types of cuts. A birdsmouth cut is commonly used for a broad range of roofs, including basic gable roofs from homes, shed roofs, and other roof layouts involving rafters.
The term “birdsmouth cut” may seem odd and mysterious at first, but it’s actually a fairly simple joint to make. You’ll need to measure carefully and cut precisely, but once you’ve done a couple of these cuts, it won’t seem difficult at all.
In this guide, we’ll explore what a birdsmouth cut is, why it’s important, and how to make one. We’ll also offer some tips on securing the rafters in place once you’ve completed the birdsmouth cut.
What is a Birdsmouth Cut?
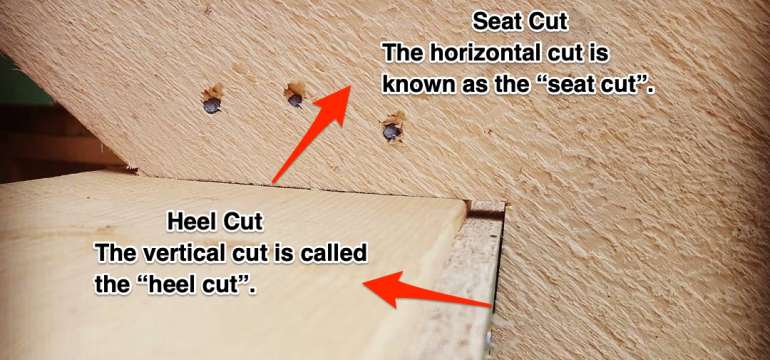
 A birdsmouth joint is a triangle-shaped notch, or groove cut into a rafter, allowing it to sit at the correct angle on top of a supporting timber, stud, or wall. This joint is also called a bird’s beak joint or a bird’s beak cut.
Think about it this way. You’ve got a stud standing upright. The stud has a flat part on top, maybe an inch by two inches. If you take another board, such as a rafter, and set it at an angle against the top of the stud, the two pieces of wood will only contact each other along one top edge. So you just have a single line of contact, and that’s not very stable.
But if you take the board, the rafter you want to add, and you cut the right kind of notch into it, the two pieces of wood can actually fit together. You have more surface area in contact, and the rafter can be secured more easily and durably at the correct angle.
Benefits of a Birdsmouth Rafter Cut
Whether you’re dealing with studs or an entire wall plate, using a birdsmouth cut for every rafter is a much more stable way of assembling a roof. Rather than balancing the rafters at angles on the very edge of the wall plate, you can hook each rafter onto the wall plate, thanks to those triangular birdsmouth notches.
This method of roof assembly also allows for better distribution of weight throughout the roof and the wall. The joint forms a solid connection, which permits weight, force, or stress to be evenly distributed and ensures a more durable structure.
The Tools You Need for a Birdsmouth Cut
You can make birdsmouth rafter cuts in a number of ways, but for this guide, we’re going to keep the process nice and simple. You’ll need a selection of basic tools.
First of all, you need a couple of saws. A circular saw and a hand saw work best for making birdsmouth rafter cuts. If you’re doing construction on your own home or on a shed for your property, you may already have one or both of these saws close at hand; but if not, you may want to consider purchasing them.
In addition to a circular saw and a hand saw, you’ll also need a tape measure. These measuring tools usually involve a stiff tape that you can extend and retract as needed. Most homes have one on hand. If you don’t have one, or you can’t find yours, purchase one at any store that sells home goods.
The last two items you’ll need are a carpenter’s square and a carpenter’s pencil. These items will help with accuracy and with marking the spots where you need to cut the wood to create a birdsmouth joint.
How to Cut a Birdsmouth Joint
To put it simply, we will follow this process:
- Calculating pitch of the roof & Using roof pitch to make ridge cut
- Measuring other parts of the structure
- Using ridge cut as a reference point to mark birdsmouth location
- Making the seat & heel and tail cut
1. Thinking About Roof Pitch and Making Ridge Cut
For most residential buildings, the roof pitch won’t be any steeper than 9/12. Typically it’s between 4/12 and 9/12. If you’re not sure what that means, think of it this way. The first number is the “rise,” or the amount of height the roof gains over the horizontal “run,” usually measured in inches. So a roof with a pitch of 8/12 would gain eight inches of “rise” for every 12 inches of horizontal “run.”
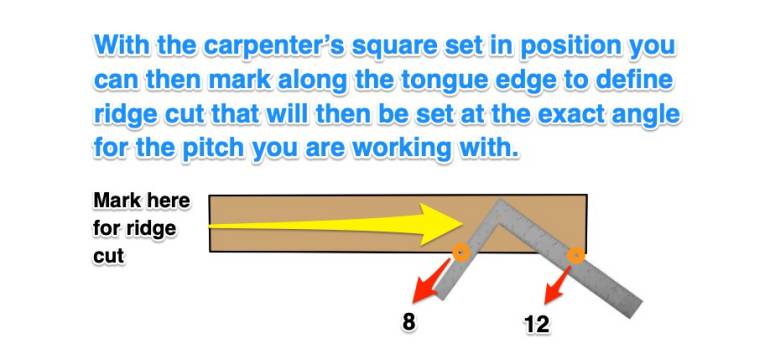
Using carpenter’s square, place the short side (tongue) so that the bottom edge of the rafter is level with the 8 (a roof with a pitch of 8/12). Next, move the long side (body) so that the 12 is level with the bottom edge of the rafter. Then you can mark along the short side to define ridge cut. Finally, you can cut it with a circular saw or hand saw.
2. Measuring Other Parts of the Structure
You should be able to calculate the pitch from your roof plans or blueprints. If you don’t have blueprints, you need to sketch out some plans and determine the pitch, as well as a couple of other important measurements.
You need to know the distance from the top of the building’s wall to the topmost ridge plate of the roof and the exact distance from one outer wall to the opposite wall.
You also must know the full width of the ridge beam from the building width.
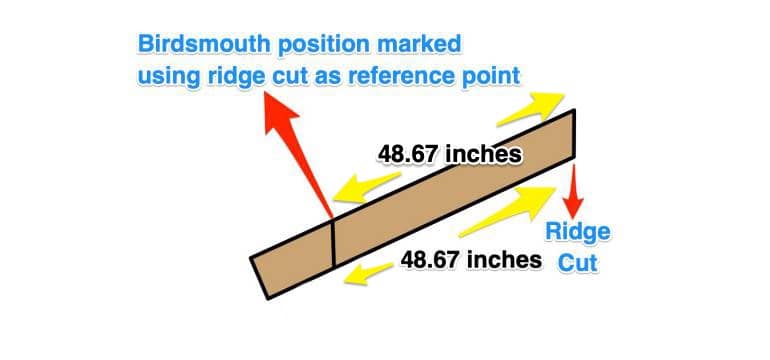
3. Using Ridge Cut as a Reference Point to Mark Birdsmouth Location
After making your ridge cut, you’re ready to mark out your birdsmouth location.
Now we’re getting down to the math. We will be using Pythagoras Theorem. Yes, it can get tricky, but hang in there.
Remember that measurement you took or calculated from the top of the wall plate to the top of the roof ridge beam? Multiply this figure by itself. Write down the number you get, and we’ll call that Result A.
Remember when you determined the distance from one wall to the opposite wall? Divide this figure (width of building) by 2. Subtract half the width of the ridge plate, and then multiply that number by itself. Now you’ve got Result B.
Finally, add Result A and Result B together and find their square root. This figure will be the length of your rafter where your birdsmouth will be cut.
To make things clearer, let’s make an example.
The height to the top of the ridge = 27 inches
Result A: 27 x 27 = 729 (squared in inches)
The width of building = 82 inches, The width of the ridge beam = 1 inches
82 / 2 = 41 (half-width in inches)
41 – 0.5 = 40.5 (subtracting half-width in inches)
Result B: 40.5 x 40.5 = 1640.25 (squared in inches)
Result A + Result B = 1640.25 + 729 = 2369.25
Square root of 2369.25 = 48.6749 inches
Length = 48.67 inches (or 4.06 feet)
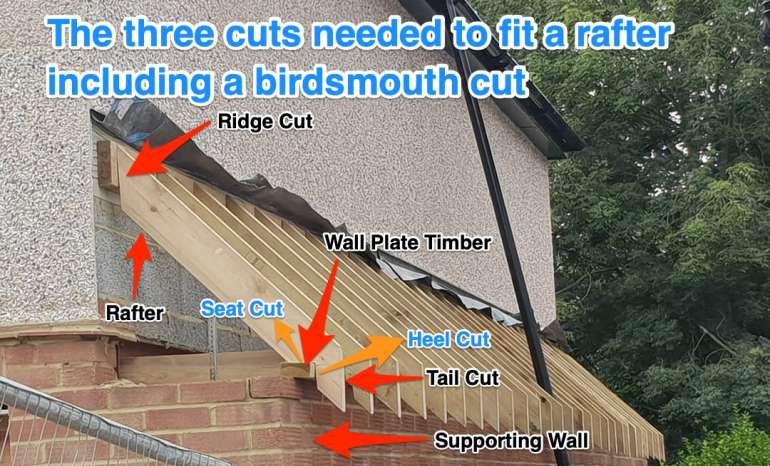
4. Making the Seat & Heel and Tail Cut
You have to be careful to make sure that the birdsmouth will not be more than half of the total depth of the rafter. You don’t want your birdsmouth cut to go so deep into the rafter that it weakens the board too much.
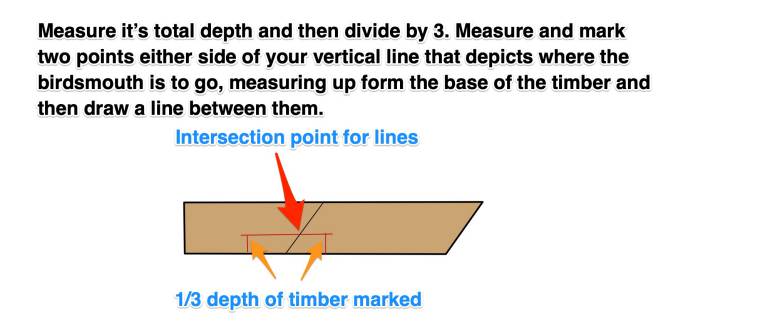
On the rafter, you want to cut, measure its overall depth, and divide it by 3. Using this figure, measure and mark two points on each side of the vertical line, which indicates where the birdsmouth will be cut. With your carpenter’s square, draw a straight line between the two points you just marked. It is going to intersect with the plumb line that specifies the location where the heels and seat cuts intersect at 90 degrees.
With the help of your carpenter’s square, you should be able to sketch the neat little right-angled triangle you need for the birdsmouth cut.
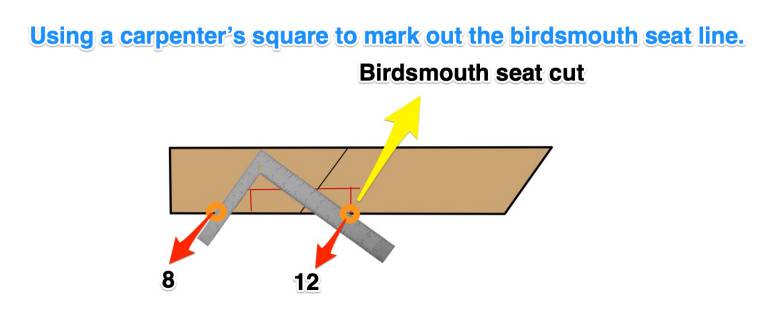
Flip the square over so that the short side is to the left. Set the square so that the 8 (a roof with a pitch of 8/12) on the short side is level with the rafter, and then position the long side so that the 12 is level with the rafter.
Marking the Tail Cut
One thing to be cautious of is that a roof’s maximum overhang is around 24 inches; anything above that would most likely need additional support.
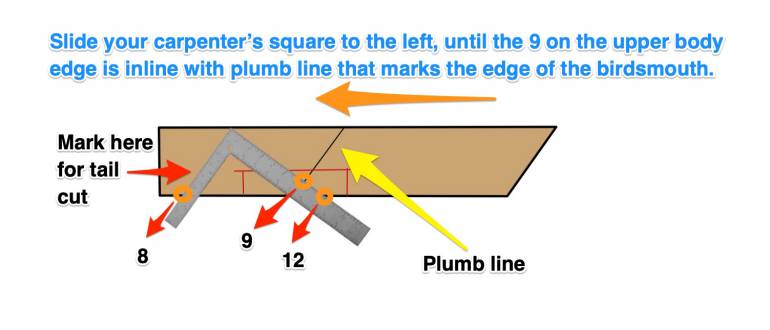
We will leave an overhang of 9 inches in this example, so slide it to the left with your framing square in the same position as it was in the step above, making sure that the 8 and 12 marks stay on the bottom edge of the rafter until the 9 on the long side is inline with the plumb line.
Cutting the Birdsmouth Joint
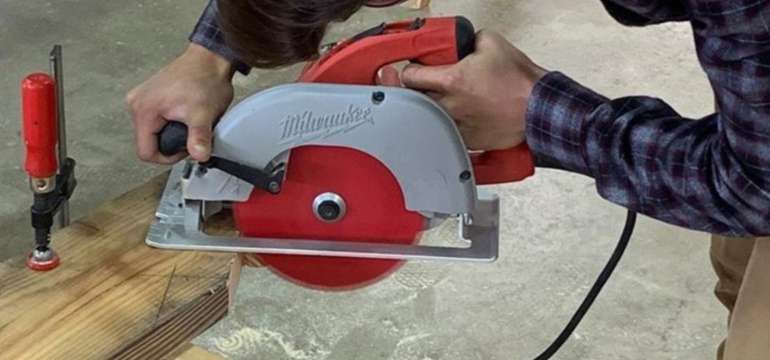 Using your circular saw, cut along the plumb and horizontal lines. Be careful not to cut too deeply. If your circular saw can’t reach all the way to the triangle of the birdsmouth joint, use the handsaw or jigsaw to finish the cuts. Remove the little triangle of wood and admire your new birdsmouth cut.
Next, test the birdsmouth cut by setting the rafter in place. Does it have the correct angle for the roof pitch you want? Does the rafter’s top-end reach the peak of the roof precisely? After double-checking everything, you may need to adjust your calculations and cuts. However, if the birdsmouth seems like a perfect fit, you can use it as a template to cut birdsmouth joints in the rest of the rafters you’ll be using.
As with any project involving saws, make sure you follow all safety protocols. Keep power tools like the saws away from children, pets, and adults who don’t know how to use them properly. Depending on the size of the roof you’re constructing, you may also need a friend or two to help you lift the rafters into place.
Toenailing and Other Methods for Securing Birdsmouth Rafter Joints
When affixing rafters to wall plates, builders often use a process called “toenailing.” They drive in nails on either side of the rafter, angling those nails so that they bite through part of the rafter and into the wooden beam at the top of the wall. Sometimes this technique is called side-nailing or skew-nailing. If you prefer, you can use rafter tie-down straps, joist hangers, or some other type of hardware that’s specifically engineered to keep rafters in place.
Though birdsmouth joints may seem like a daunting part of the roofing process, the only difficult part is really the mathematical calculations involved. If you’re unsure about that part of the process, use an online calculator tool or recruit a math-savvy friend to help you ensure that you’re getting the numbers right. After that, it’s a simple matter of marking and measuring correctly for that first birdsmouth. Once you make those first cuts, if the birdsmouth joint is right, you can use that first rafter as a template. Just lay it on top of each subsequent rafter and trace the birdsmouth notch with your carpenter’s pencil.
After you’ve traced the joint outline on all rafters, move on to the cutting phase. You’ll have a stack of prepared rafters, ready to be lifted into place and attached to form the framework of your new roof.

- Painting Over Powder Coat and What You Need to Know - February 1, 2022
- How to Get Rid of Humidity in a Basement Without a Dehumidifier - December 17, 2021
- How to Fix a Crack in Drywall That Keeps Coming Back - September 22, 2021