Is your lawn mower starting up just fine and then quitting? When your lawn mower starts then dies, it not only delays the completion of your lawn care chores—it can also be kind of embarrassing. Imagine your neighbors glancing over curiously, wondering what on earth is up with you and your problematic mower.
Worse still, a lawn mower is a complicated machine, so at first glance, you might not have any idea how on earth to solve the problem. You might be tempted to just write the whole thing off and buy a new one. However, you shouldn’t throw in the towel yet, because there are a number of possible causes for why a lawn mower starts then dies—and you can actually resolve some of them fairly easily, giving you plenty more mowing sessions with that lawn care machine.
Determine the Fuel Status
 First—and this may seem like a no-brainer, but bear with us—check the fuel levels. You may have been absolutely certain that the mower still had gas in it the last time you started it up, but perhaps someone else has run the mower since then, or maybe there just wasn’t as much fuel in the tank as you thought.
Whether you’ve got a Briggs and Stratton lawn mower, a Toro lawn mower, or some other type of gas mower, checking the fuel should be fairly simple. Some lawn mowers have an actual fuel gauge, while others do not. For those that don’t, you can take a quick peek inside the tank. You should also check the fuel line for clogs and take a look into the carburetor bowl to ensure that fuel is reaching that part of the engine.
If there appears to be enough fuel, and it’s flowing through the fuel line, you would move on to other potential sources of the problem. However, if your fuel is low or it looks thick and sludgy, your first step is to drain off the old fuel (being mindful of local regulations for disposal of such waste products) and add fresh fuel. You may find that a gas refill or replacement solves the problem.
Gasoline can go “stale” and start to “varnish” or sour within just two or three weeks of being left idle, so it’s a good idea to drain it off whenever you plan to stop using your mower for a while.
Check for a Clogged Carburetor
 Has it been a while since you last started up your lawn mower? Maybe it’s been sitting in the garage or in a shed for a while, unused, while you were on vacation or over the cold winter months. That period of disuse can be one reason for the lawn mower’s malfunction.
As time passes and the mower sits idle, some of the more watery components within the fuel can evaporate. That means the rest of the fuel congeals into a sticky, thick mess. When you finally start up the lawn mower again, that thick, gooey fuel does not flow through the engine properly or burn as it should. Instead, it clogs up the carburetor. So the engine starts, but then it stalls.
It is not possible to thoroughly clean a carburetor without removing it. But still, if you want to try, you can skip to the next part.
Removing the Carburetor to Clean It
If the problem with your lawn mower is the carburetor, you may need to take it out of the machine in order to clean it. The location of the carburetor can vary depending on the type of lawn mower. However, it is typically attached to the engine’s side or top. It is also generally located below or behind the air filter and linked to the gas tank.
Before you start, you’ll want to gather the following tools:
- 3/8 and 5/16 socket
- Socket wrench and screwdriver
- Pliers
When you’re working over the carburetor, be sure to follow proper safety protocols by wearing gloves and safety glasses.
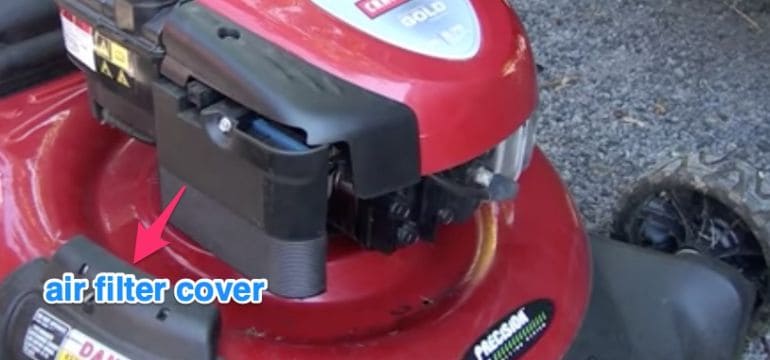
Step #1
Remove the air filter cover and filter.
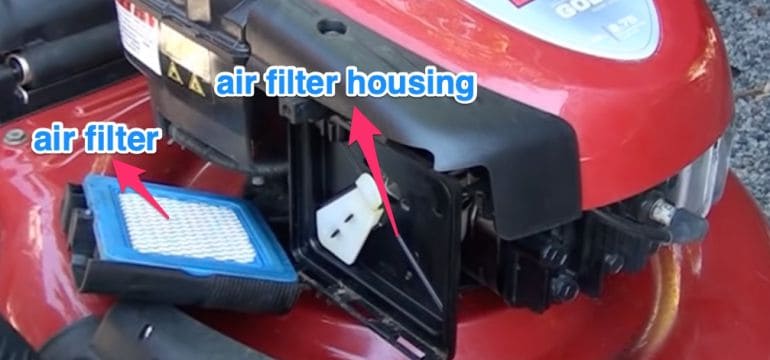
Step #2
Remove the air filter housing.
Step #3
Remove the fuel hose from the carburetor and then take off the screws, nuts and clamps holding the carburetor in place.
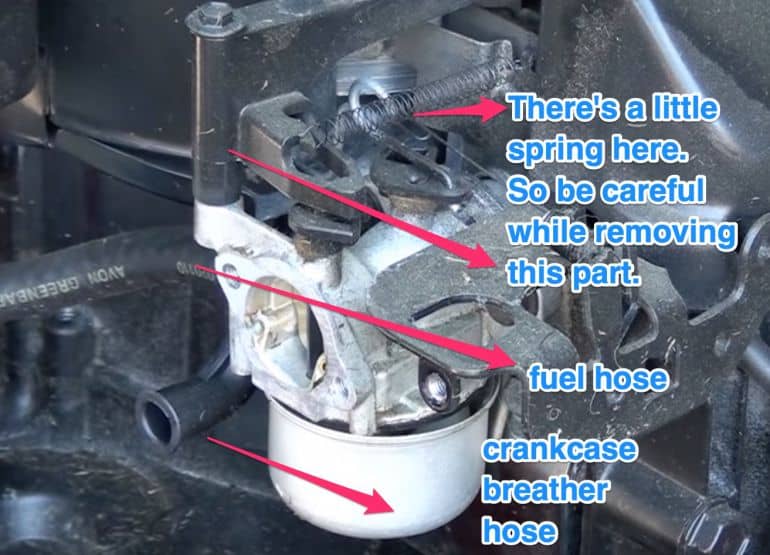
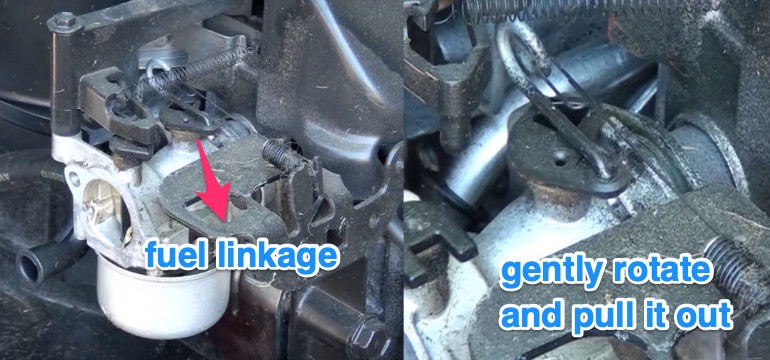
Step #4
Remove the fuel linkage. Carefully rotate and pull the carburetor until you are able to get it free.
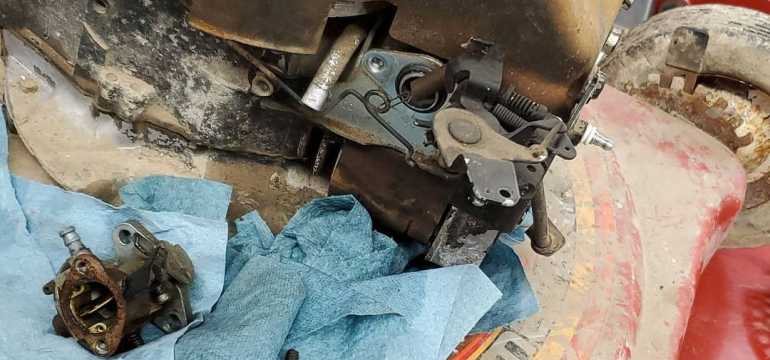
Step #5
Now you’ve got a detached carburetor. You’ll need to remove the screws and pin that secure the float valve; take it easy on them since they could become stripped. The gasket can also be fragile, so you should be careful while working with it.

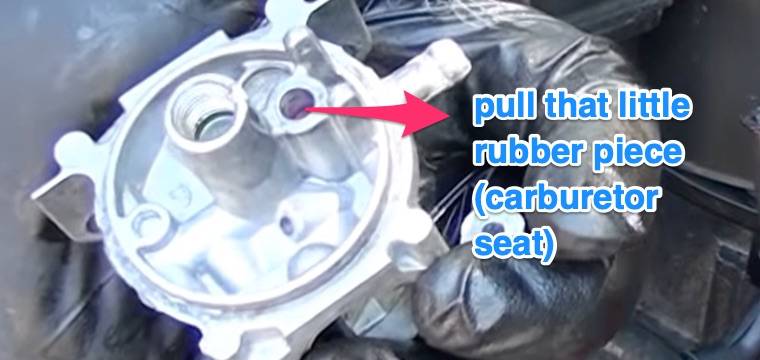
At this point, some carburetors will have splash plates you need to disconnect and set aside. Take off any other screws, gaskets, O-rings, or hardware remaining on the unit, including the choke if it is removable.
If it is a Quantum mower, typically there are three parts that you will want to replace:
- Float bowl O-ring
- Carburetor seat
- Float valve needle
Step #6
Now you’ll need a can of carburetor cleaner or a can of Coke. Coca-Cola is great at removing rust because of its citric acid. You can pour it into a basin and soak the carburetor and its components in the Coke for a few hours. Before using any harsh chemicals, you should try this method first. You will be impressed with the result!
Then you should scrub with a brush. Some compressed air is also helpful for blowing gunk out of hard-to-clean areas.
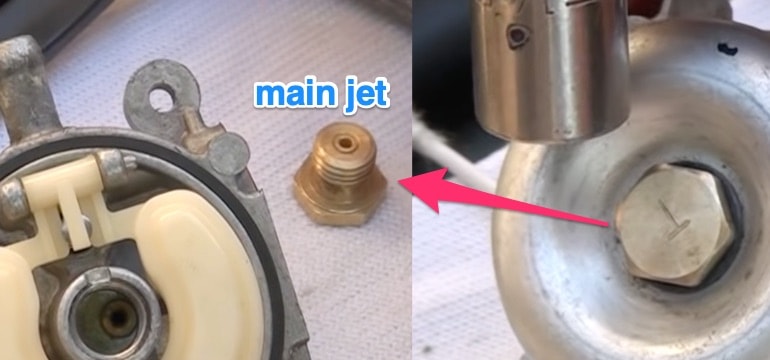
Step #7
An important part to mention is main jet. It is the most common reason a lawn mower starts and then dies. That is why you should carefully clean it. Poke a bread tie wire through the small hole of the main jet and clean it up. Also, you need to be careful not to overtighten this bolt.
Step #8
It’s worth double-checking to make sure the hose doesn’t have any leaks or cracks. If you do find damage or wear, it’s important to replace that fuel line. You’ll also need to clear out and replace the old fuel within the machine’s tank before you start up the mower again.
After you’ve thoroughly cleaned the carburetor, put it back together as it was. If you don’t have instructions for the lawn mower, be sure to take photos throughout the disassembly process, so you know exactly how everything is supposed to fit back on.
Using Spray Cleaner for the Carburetor
 You could also try a spray version of the cleaner. If you’re hoping to resolve the problem without removing the entire carburetor, you can try the carburetor aerosol spray cleaner with the carburetor still installed.
Before you start cleaning, be sure that the lawn mower’s engine has cooled down. Once that’s done, take off the machine’s air filter cover and the filter itself, along with the external cover of the carburetor. Leave these parts aside and wait until the carburetor’s parts have all dried out thoroughly.
Now that the carburetor is dry, start up the engine again. You’ll be able to see the moving parts inside the carburetor. Be very careful as you place the spray tip of the cleaner can into the carburetor and begin to spray. The natural movement of the carburetor as it’s running should help to carry the cleaner throughout. Keep spraying until you feel that you’ve added enough cleaner.
Turn off the engine again and then find the choke shaft of the carburetor. Spray some extra cleaner there. If, at any point, the instructions on the spray cleaner contradict these steps, follow the manufacturer’s recommendations for use.
Once you’ve completed the cleaning steps, put the exterior cover of the carburetor back on, and reattach the air filter and its cover. You may need to swap out the air filter for a new one if it looks dirty or damaged. Before you try running the engine again, make sure that you’ve drained the old fuel and introduced fresh fuel into the tank.
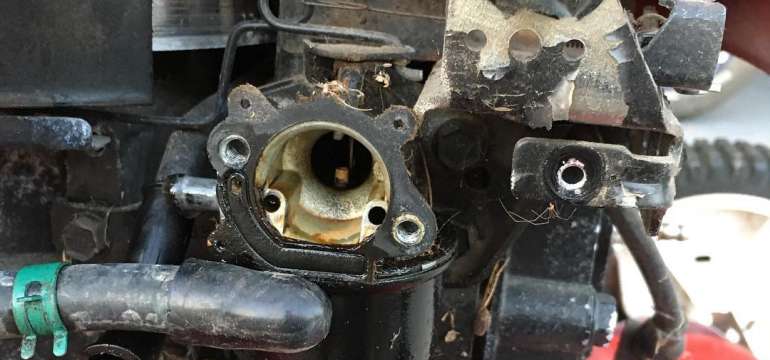
Identifying Carburetor Corrosion
 There’s one other thing that might be wrong with the carburetor besides a clogging issue. When you check the carburetor, do you notice a powdery or chalky residue all through the inside? That white corrosion is a very bad sign. In fact, it usually means that you will need to replace the carburetor entirely.
Some users suggest that you may be able to revive the carburetor for cases of mild corrosion by boiling it in vinegar for about 30 minutes to cleanse the corrosion. There will still be pitting and damage afterward, but if the damage isn’t too extensive and the corrosion hasn’t progressed too far, you may still be able to reinstall the unit and continue to use it without having to purchase a replacement.
Test the Fuel Cap
 As the fuel level within the lawn mower’s tank drops naturally during use, the air is allowed to seep into the tank through a tiny vent in the fuel cap. The inflow of air into the tank is important to prevent a vacuum from forming inside the tank since that could hamper its correct function. This type of vacuum is known as a vapor lock.
If the fuel cap vent becomes clogged or blocked, air can’t get into the tank and the vapor lock forms. So when you try to run your gas mower, it starts and then shuts down.
It’s easy to test whether or not the fuel cap is at fault. Just loosen it a bit to allow a small amount of air to seep in. Then restart the engine again and see if it keeps running. If the lawn mower continues to function well as long as the cap is loosened, the problem is a blocked or damaged vent in the fuel cap. All you need to do is replace the fuel cap, and your mower should start functioning properly again without any more issues.
Replace the Spark Plug
 If your lawn mower starts then dies right away, another possible culprit for the issue is the spark plug. A spark plug problem will result in the mower being more difficult to get going, and in some cases, the faulty spark plug may prevent it from starting at all. Signs of spark plug issues include the following:
- A stuttering motor
- The mower requiring multiple cords pulls to get going
- The repeated key turns to start
- Engine function cutting out unexpectedly
- Power loss requiring a restart
- Slow acceleration
- Excessive consumption of fuel by the mower
- A strong smell of burning fuel
If you’re noticing any of these signs, in addition to the mower being hard to start, the spark plug is likely the culprit. The spark plug enables that initial ignition spark that lights the fuel and gets the engine going.
How Often to Replace a Spark Plug
Some lawn care experts recommend changing a lawn mower’s spark plug once a year, or once per season, or once per 25 hours of use. You can push these boundaries a bit in order to get more use out of each new spark plug and cut down on replacement costs, but you definitely need to keep a close eye on how well your mower is functioning as you near that season’s end mark, or as you get closer to a full 25 hours of use.
Cleaning the Spark Plug
 Sometimes, all you need to do is clean the spark plug. Maybe it has simply gotten gunk on it from regular use, and it’s too wet to do its job of sparking and igniting the fuel. Check it for gas or oil buildup before you buy a replacement.
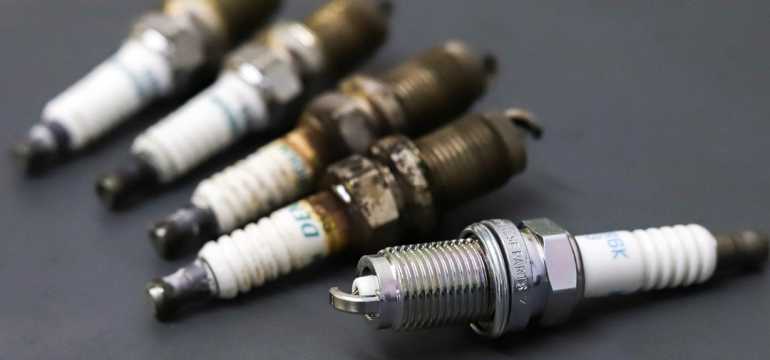
Take a careful look at the plug’s center electrode, which is the bit that yields the spark. Its tip should be a flat, even surface. If you notice that it is more round than flat, or if it looks worn down or corroded, you need a replacement.
However, if the structure of the center electrode is intact and the plug simply looks messy or dark and oily, try cleaning it up. You can clean a spark plug with a little bit of starter fluid or brake cleaner. Let it soak in that fluid for 10-15 minutes, and then use a rag to wipe off any excess and polish it up.
Check it again for corrosion or wear and tear before putting the plug back into the mower. You can also take a look at the spark plug threads to ensure that they look clean and undamaged.
Replacing the Spark Plug
 If your spark plug is beyond repair, take a photo of it or take the actual device along with you to your local hardware store or tool supply shop, so you can be sure you’re getting an exact replacement.
The same principle applies if you’re ordering a new plug online; you must be sure that the replacement spark plug is precisely the same as the original. The wrong kind of spark plug can actually damage your lawn mower’s engine, necessitating a serious and costly repair or possibly forcing you to replace the entire unit, so make sure you get it right.
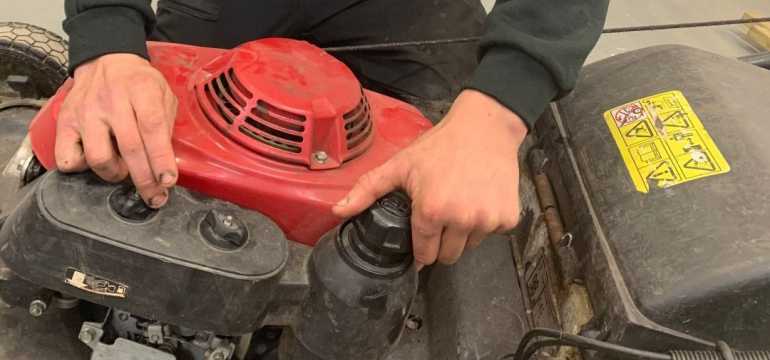
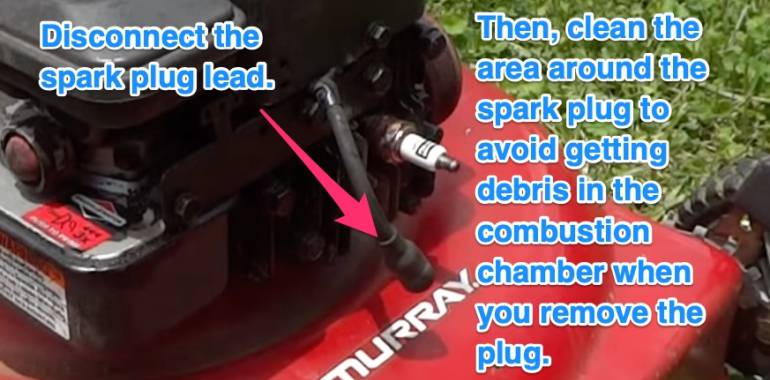
When you’re replacing the spark plug, be sure you clean the entire area where it connects so the new plug is seated correctly. If you have trouble removing the old plug, use some lubricant and let it rest for about 10 minutes, then take out the old worn plug with a wrench or a socket driver.
Double-check the electrode behind the plug to make sure it doesn’t look too damp or corroded since those signs could indicate an engine choke problem or a carburetor issue, respectively. When you place the new spark plug into the correct spot, be careful not to overtighten it. You just want it to fit snugly before you reattach the spark plug wire.
Causes of Spark Plug Failure
It’s worth noting that you should also think about the reason behind the spark plug’s failure. Why did your mower’s spark plug fail in the first place? Was it just because of regular wear and tear and use, or could there have been another reason?
Sometimes these spark plugs can become worn or damaged due to other problems with the mower’s engine. If that’s the case, and you replace the plug without identifying the root cause of the damage, your new spark plug is likely to suffer the same fate.
Think about possible root causes of the spark plug failure, such as a dirty air filter, a faulty or filthy fuel injector, damage to the distributor case, or some problem with the mixture of fuel and air within the gas mower tank.
Check all of these potential issues to ensure that your mower is in good shape. Just like your car, the mower needs an occasional tune-up, and this is as good a time as any to make that happen.
Final Thoughts
If you don’t want to go through the entire process of troubleshooting the problem, cleaning the carburetor, or enacting any of the other fixes or repairs, you don’t have to do any of it.
You could take the lawn mower to a repair and maintenance shop and have the experts take a look. They can identify why the lawn mower starts but then dies and then fix the issue for a fee. However, before you visit a lawn mower repair shop, be sure to check online and ensure that they have good ratings and reviews and that they are known for being fair and honest with their customers and not overcharging for unnecessary services.

- Is a Hot Water Heater In the Attic a Good or Bad Idea? - July 18, 2021
- Lawn Mower Starts Then Dies – Here’s the Fix! - June 21, 2021
- Can You Mix Pine-Sol and Bleach? - September 9, 2020