A DIY lawn striper is essentially something that gives your lawn that striped appearance that you often see on baseball fields and sometimes golf courses and football fields.
While you might think that this look is due to the grass being cut at different heights or simply that there are two different kinds of grass that are growing there, this is actually not the case.
Building a DIY yard striper can allow you to achieve that same look for your own yard, and you don’t have to stick with stripes either, you can do swirls, checkerboard patterns or anything else you want.
The way that lawn stripers work is that they cause the grass to lie down in specific directions. When the grass is lying away from you, it catches more sunlight and looks lighter in color. When the grass is lying towards you it is easier to see the shadows underneath making it look darker in color.
Even simply mowing in one direction will sometimes give the faint impression of lines, but a lawn striper is something that will go behind the mower and smooth the grass to lay in a specific direction.
How to Make a Lawn Homemade Lawn Striper
The first step to your DIY lawn striper is knowing the width of your mower, so take a measuring tape and measure the distance from the outside of one wheel to the outside of the other.
Whichever option you choose to go with for your homemade grass striper you will want it to be as close to this width as possible. A good DIY lawn striper for zero turn mowers should be attached as close to the mower as possible in order for the striper to turn with the mower more easily.
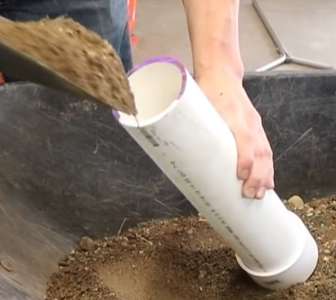
Fill PVC with sand
Perhaps one of the simplest and most popular DIY lawn stripers is the sand-filled PVC option. Cut a piece of PVC – a 2″ wide should be fine – to be the same length as the measurement of the width of the mower. Then drill holes in two end caps that will fit your PVC, placing bolts with washers on them into the holes from the outside of the end caps inward and attaching them on the inside with nuts.
Attach one of the end caps to your PVC and then fill it with sand, attaching the other end cap once that is done. Connect your new lawn striper to your mower by tying ropes or small chains to the bolts on the ends of the sand-filled PVC and fastening the other ends to the hitch on the back of your mower. As you mow the weighted PVC will be dragged along behind you, smoothing the grass down in the direction you are mowing in. Here is a video with detailed instructions.
Other options for making a DIY yard striper can be anything from weighing down one side of a rubber welcome mat and attaching that to your mower or even breaking the handle off of long brooms or mops like you might see at a store and attaching those. With endless options you can choose from you are almost bound to have something on hand that will work for you.
How to Use a Homemade Grass Striper
Even if you already know how to build a lawn striper, or already have a homemade grass striper, you could still no doubt use some helpful tips as to how to use it. The first thing to remember is that in order for the grass to ‘lay’ in a certain direction the grass has to actually be tall enough to bend over.
Short grass will never show stripes as well because they don’t have enough top and tend to bounce back to sticking straight up. As a rule of thumb, if you plan on striping your lawn, keep your grass at around 2″-3″ for the best effect.
When doing straight lines, go off of the grass and onto the sidewalk or path in order to turn so that the edges of your design look tidy. Also, try to keep your wheels going straight by using the line of the row next to you as a guide.
If you have a tree trunk or other obstacle that you have to mow around, mow generally until you get to it and then mow around it on the side where the grass has not been cut. Then when you turn and come back the other way simply resume the same line that you were following before you deviated so that your lines will still be perfectly straight.
Cool-season grasses tend to be healthier at a taller height and bend well, staying the way you want them too much better than warm-season grasses sometimes do. Lastly, healthy thick grass will show stripes much better than thin and sickly grass, so make sure that you fertilize and take good care of your lawn.

- Using Borax in the Dishwasher - May 27, 2020
- Towel Ring Height and Other Fixtures: Proper Measurements - May 1, 2020
- Homemade Paint Removers for Every Surface - April 27, 2020