If your water heater quits producing hot water, there could multiple reasons why this could be happening including a faulty element to your unit. The first thing you should consider doing is testing the element in your tank and making sure that it’s not faulty.
You’ll want to equip yourself with a simple continuity tester. This is different than a voltage tester. There are 4 tests that you’ll want to complete. They are the continuity, the ground and the two different thermostats. However, before you test your water heater’s elements, you’ll want to make sure you turn your water off, shut down the breaker for your home’s hot water heater and then take off the cover plates on the outside of your unit. This will more than likely require that you remove a few screws.
Once this has all been completed, you can then test the electric water heater’s elements. If after testing the elements you realize that they’re in fact faulty, you’ll then want to complete a replacement, so your household can have access to hot water again. To replace your water heater element, follow the steps below.
Remove the water from your tank
After you turn off all the power, make sure you empty the water out of the tank. On the top of your tank, you’ll find a cold-water inlet valve. Attach your home’s garden hose to the drain valve located at the end of the bottom of your tank. You will want to drain the level of your tank just below the element. However, it’s recommended that you flush and refill the water in your tank after every repair you make.
Disconnect the wires to the element(s)
Many water heaters have both an element on top and on bottom. This is why it’s important to test both the top and the bottom element, so you’ll know specifically which element to take out. The steps listed here can be used to remove either one.
To start, locate the access panel and then open it up. Next, take off the plastic safety cover. It’s important to note that some water heaters will not have this plastic cover. You’ll now want to begin detaching the wires that are connected to the element(s).
Remove the element(s)
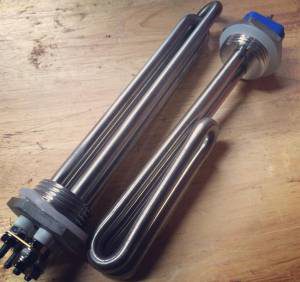
To remove the element, you will need to equip yourself with a water heater element wrench. You can purchase these at most hardware stores. Now use the element wrench to remove the element. Make sure you turn it counter-clockwise. Some water heaters use a flange element. If you have a water heater that uses this device, you will also need to remove the 4 bolts holding it in.
Install your new element(s)
 To keep from having to deal with unnecessary leaks, it’s essential that you invest in a rubber gasket and lay it over the threads of the screw before you install your new element(s). If you’re replacing 2 elements, you’ll need two gaskets.
Fill your tank back up
The drain valve at the bottom will now need to be closed and the cold-water inlet on top of the tank will need to be opened. You can now fill your tank up to its appropriate level.
Reattach the wires and turn back on the power
The wires that you dissembled will need to be reattached to the element(s) and the power to your water heater tank will be reestablished. You now have replaced your water heater’s element.

- If You Have No Hot Water Pressure, Here’s What You Should Do - December 28, 2021
- What is the Right Shower Drain Pipe Size? - January 25, 2020
- Wet Vent Plumbing, What Is It? How Do You Utilize It? - November 17, 2019