There are several benefits to replacing the old fan in your bathroom for a new and improved model. Well running bathroom fans circulate air, help remove unpleasant odors, and some can even lower the overall room temperature as well. If you’re planning on replacing your old, rickety bathroom fan for a newer model, then you’ll want to take the proper precautions to ensure the project gets completed right.
Now, installing a bathroom fan in a home with an attic will be a little different than installing a fan in a home without an attic. What’s the difference? When you replace a bathroom fan in a home with an attic, the job will usually be a lot easier. For instance, if your home has an attic, you can get to the fan from above. This makes removing the old housing and installing the new housing a much less complicated job.
On the other hand, if your house has no attic, then you’ll need to replace the housing and the fan from below it. This can get a little difficult sometimes. Not all homeowners are lucky enough to have attic space. If you’re one of these individuals, then use the information below to help you install a bathroom fan with no attic space.
Figure out the size of the fan
Before you can start replacing your old bathroom fan, you’ll need to determine what the fan size is. To make things easy, it’s best to choose a fan that’s about the same size as the one you’re replacing. This will eliminate the need of enlarging the ceiling hole. Enlarging a ceiling hole can sometimes be a lot of work.
Most all fans sold today are rated by CMFs. For those people who don’t know what CFM stands for, it’s cubic feet per minute. CMFs essentially measure airflow. By knowing the size of your bathroom, you’ll be able to figure out the amount of CMFs your bathroom will require. To properly select the right sized fan, use the formula below:
It’s important to note that you should always round to the nearest 10. For example, if you have a length of 8.5 feet, a width of 9.5 feet, a height of 8 feet, and you follow the formula listed above, you’ll have a CMF of 83.89. As a result, your bathroom would require a fan with a CMF rating of 90 or larger.
It’s important to remember that most smaller bathrooms will need a fan with around 50 CMFs while a larger bathroom usually require 100 CMFs.
Where is the exhaust going?
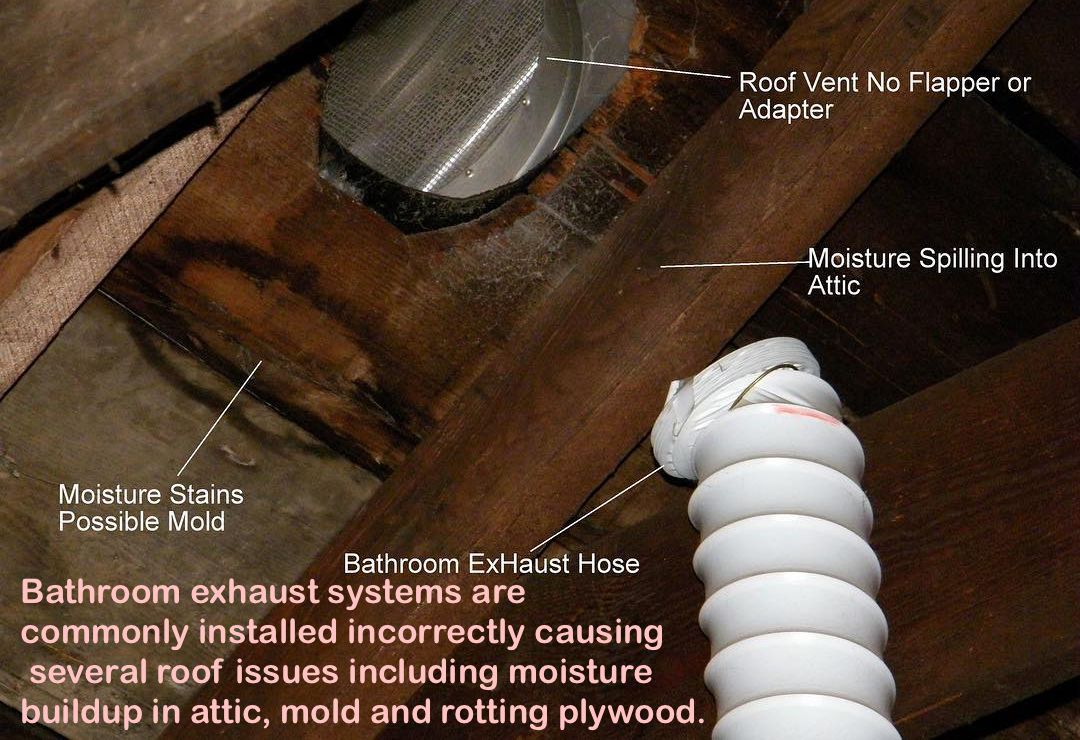
The next thing you need to do is make sure the exhaust is successfully making its way out of your home. Allowing the exhaust to vent into your attic can potentially cause several moisture problems. The exhaust needs to vent outdoors. If you’re simply replacing the fan, the ducts should already be set up for you.
If, on the other hand, however you’re putting in a new fan, you’ll probably want to call a professional company to create a duck or sidewall where the exhaust can travel through. Once you know the exhaust will safely travel out of your home, you can move on.
Inspect your electrical options
Inspect the area to see what your electrical options are. If you can use an existing switch to power your new fan, that would be ideal. However, there are several fans sold today that come with a light. These lights usually require an additional switch. If this isn’t available to you, then you’ll need to install another switch. It’s important to call an experienced electrician if you don’t know how to properly do this yourself.
Remove your old exhaust fan
Now that you have the right sized fan, you know the exhaust will vent properly, and you have the right electrical setup for your fan, you can go ahead and remove the old exhaust fan. To do this, you’ll want to:
- Turn off the breaker box.
- Remove the grill cover.
- Use a circuit tester to ensure that the power is turned off. These are easy to use and can be purchased at most home improvement stores.
- Remove the motor. You might have to remove a few screws to get it out. You’ll also have to disconnect the wiring from the motor.
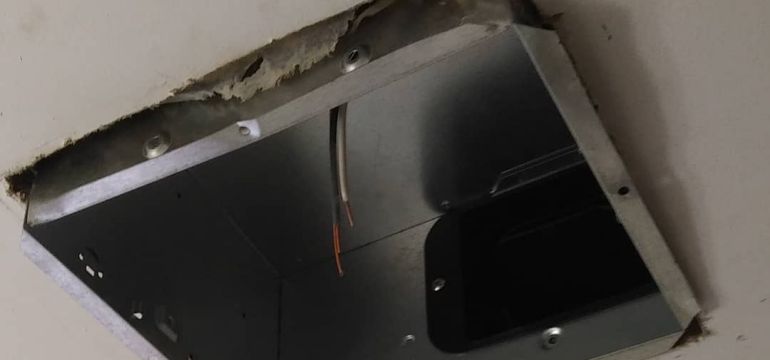
- Remove the fan’s housing. Depending on how your old fan was designed, you may have to remove brackets, mounting screws, or other hardware. Typically, the fan’s housing is attached to the ceiling joists. For those homeowners who don’t have access to the bathroom fan from the attic, the brackets or mounting screws will need to be removed from below. When cutting brackets, it’s advised that you use either a reciprocating saw or an oscillating saw.
After you have successfully removed your old bathroom fan, you can now install your new one. It’s best to read the specifications listed in the instructions before you start.
Installing a bathroom fan without attic access
Those individuals who are installing a bathroom exhaust fan without attic access will want to first measure the hole in the ceiling to make sure your new fan will fit in.
If the hole is too small, then you’ll need to increase the dimensions. How do you do this? You’ll first want to hold your new fan’s housing up to the ceiling hole and with a pencil, trace lightly around it. With a keyhole saw, cut the excess ceiling out. You’ll really want to make sure you have your dimensions correct before you begin to cut the excess ceiling out.
On the other hand, if the hole is too large, you’ll need to patch it up with extra drywall. Again, make sure you measure correctly and when you have cut the right sized piece of drywall for the ceiling hole, attach it to a nice-sized piece of wood and set the two inside the hole. You’ll now want to attach it by driving screws through the ceiling and into the wood. Later down the line, you can use spackling to make the ceiling look better.
Mounting your new bathroom exhaust fan
Another thing you’ll want to do is to make sure you have the ability to mount your new bathroom exhaust fan to a ceiling joist. By chance that there’s a large space between the ceiling hole and the ceiling joist, which may prevent you from mounting your new fan to it, you can take a piece of lumber and attach it to the joist. What you’re trying to do here is build it out, so mounting your new fan is possible.
It’s also smart to attach a piece of 1x lumber on the side of the ceiling hole that’s directly opposite of the joist. Use quality screws and drive them through the ceiling. This will provide you with another side to secure your fan’s housing to.
Attach the duct connector to the duct
Once all this is done, take HVAC tape or a clamp and attach the duct connector directly to the duct located in the ceiling. It’s important to read the instructions for your new fan and fully understand what position the duct should be in to install the housing correctly.
If the duct is not positioned right, the housing will not line up the way it’s suppose to. You’ll also want to make sure you use a screw to fully secure the duct connector to the edge of the ceiling hole. This will also need to line up right with the housing. For more information on this, reference the instructions that came with your new fan.
Connect the electrical wires
The electrical wires will now need to be connected. To do this, you’ll need to remove the wiring cover located on your fan’s housing. Once you remove the cover, equip yourself with a screwdriver and remove the knockout plug. You’ll also want to fasten the cable clamp to the wiring cover and then pull the wires coming from your house through the clamp. Tighten the screws on the clamp with a screwdriver and then using either wire nuts or quick connectors, connect the fan wires to the house wires.
It’s very important to match the wire colors properly. For your reference:
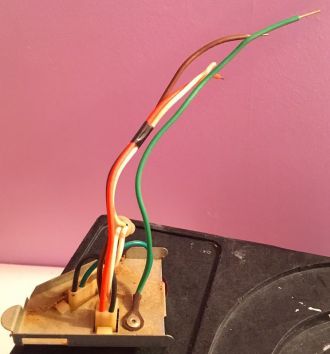 Green wires: These are the ground wires and connect to the other green or bare copper house wires.
White wires: White wires are neutral wires and connect to the other white wires.
Black wires: The wires are a hot wire and connect top other black wires.
Don’t fret if you’ve never used quick connectors or wire nuts. They’re extremely easy. To properly use quick connectors, take the connector and push the bare wire into it. It’s that easy. To use wire nuts, take the two ends of the wires, hold them together, and twist the nut onto the wires using a clockwise motion.
You’ll now want to lightly push all the wires inside of your fan’s housing. Once all the wires are in, use a screw driver to screw shut the wiring cover and insert the fan into the hole of the ceiling. It’s important to make sure that you properly line up the exhaust with the duct connector and then secure the fan to the wood supports or at least one joist. Make sure you drive the screws securely through the mounting flange.
Test out your new bathroom exhaust fan
Now that the bathroom exhaust fan has been fully installed, turn the power back on and ensure that it properly works. If your fan is quiet, you might not hear it at first, so make sure you turn down any noise and listen carefully. If it’s not running, the first thing you’ll want to check is the wiring. However, if you do hear your new fan running, then you know you’re in the clear.
Lastly, attach the grill. To do this, squeeze the springs into the little slots and shove the cover towards the fan. This may take a little force. Other than adding a little spackle, your new bathroom exhaust fan has been successfully installed.

- If You Have No Hot Water Pressure, Here’s What You Should Do - December 28, 2021
- What is the Right Shower Drain Pipe Size? - January 25, 2020
- Wet Vent Plumbing, What Is It? How Do You Utilize It? - November 17, 2019
Kevin
Wednesday 31st of August 2022
Hi, my bathroom is on the second floor with a fully exposed ceiling and a gambrel style roof. I am trying to find ideas for exhaust fans and how they are installed/mounted but cant find anything. Are there any ideas out there that I am missing?