Is there anything more frustrating than finishing up a beautiful wooden table only to realize that the ends are bowed? Warped wood can easily ruin a gorgeous finished project, but it doesn’t have to be the end of the world. Many woodworking professionals have already tapped into the secrets of learning how to unwarp wood.
Understanding why wood warps in the first place and how you can correct it is the key to making sure every project turns out perfectly. Here are just a few of the things that you need to know before you toss your latest project back into the scrap heap.
Why Does Wood Warp?
Wood is known for its hygroscopic properties, which means that water moves throughout the wood cells. When wood is exposed to water, the fibers begin to swell and expand. They do the opposite as they dry out, causing the same piece of wood to shrink accordingly. Whenever you have a piece of wood that has uneven moisture distribution, it is going to warp and bow out from its normal position.
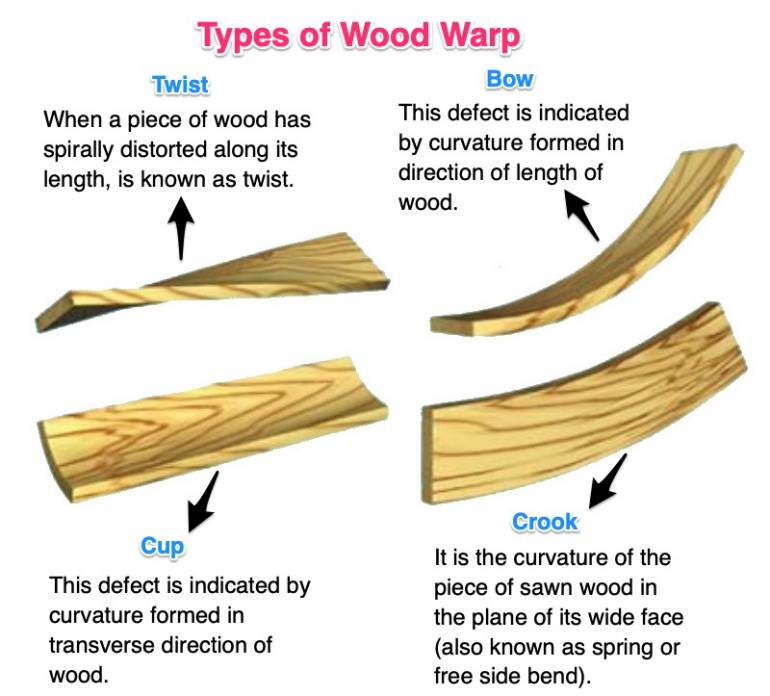
There are several different types of warping that are possible. Cupped boards occur when the moisture is coming from beneath the wood, forcing the edges of the board upward. You will see each individual board form a slight U-shape. This type of moisture problem is often seen in hardwood flooring when there is too much moisture in the crawl space beneath your home or when there is no moisture vapor barrier installed in the crawl space.
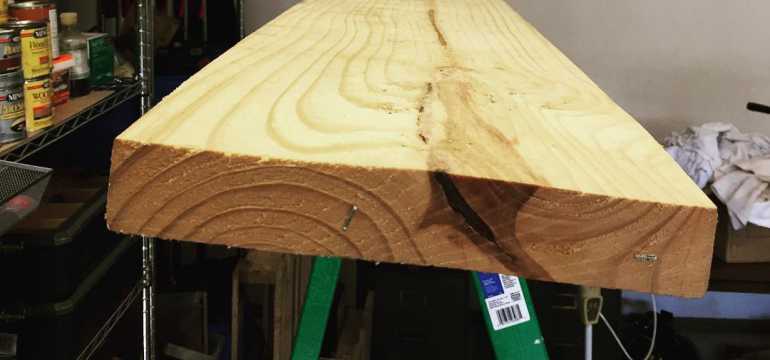
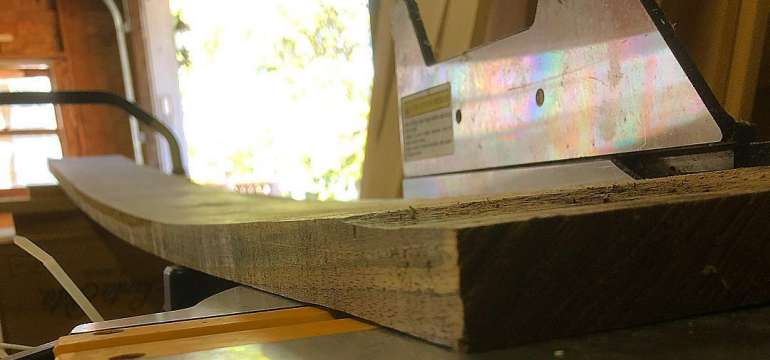
Alternatively, the wood may be bowed where the ends curl up toward the sky. This type of bowing is common in furniture like dining room tables, particularly when the piece is constructed of heartwood on one side and sapwood on the other. Heartwood shrinks less than sapwood, causing the piece to contract unevenly and to warp.
Crooking occurs when one end of the wood curls more towards one side than another. It can also twist or kink just slightly at one end. The type of deformity in the wood can be influenced by the drying method used, the type of wood, and even the way the wood was cut.
If the moisture problem is corrected quickly, you can often undo the damage caused by the uneven moisture levels. It may take a little bit of hard work and some time, but flattening the wood back out is entirely possible.
Allowing the Wood to Dry
Now that you know that warped wood is typically caused by uneven moisture distribution, it is important to make sure that you let your project dry out entirely. It may appear that your wood is warped, but it could still be in the process of drying. Give it enough time to see if it is going to dry out naturally before you take any of these other steps to attempt to flatten it.
The best way to allow the wood to dry is to put all of your bent pieces onto a flat surface and drag them into the sunlight. Allow them to sit here for a few days and then reexamine them to determine if they are still warped.
How to Unwarp Wood with Moisture and Steam
Unwarping wood really means that you need to get to the bottom of your moisture issue. Until the moisture issue is corrected, you will always have wood that returns to this warped state. Once you get things under control, you will need to follow a few of these tips to learn how to remove warp from the wood for good.
If your wood table is bowing, you can easily correct the shape by introducing more moisture to the wood cells. Adding moisture into the wood gives it more flexibility so that it can be bent back into its normal position.
Once the wood is completely pliable, you can push the bowed ends back down and flatten out the table. To ensure that it dries properly, clamp it to something straight and flat so that it holds the right shape.
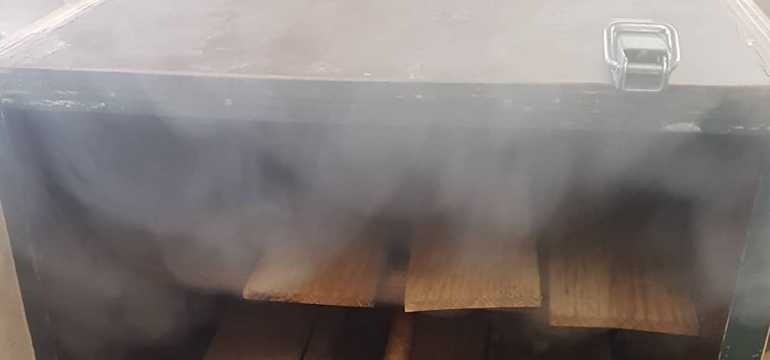
You may need to steam the boards first because they tend to move better and hold onto water better when they are warmer. If it is a small table or piece of wood that needs to be flattened, you can hold it over a pot of boiling water on your stovetop for a few minutes.
Alternatively, you can build a fire in a large drum and hold the wood over the top of the drum. When you are finished steaming the wood, make sure to use your metal clamps to clip it to something sturdy and rigid to allow it to dry thoroughly.
How to Unwarp Wood with an Iron
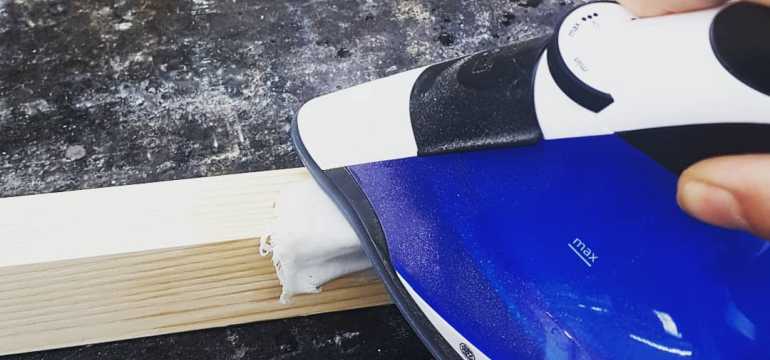
Another handy technique for learning how to flatten warped wood is to use a small iron like what you use to iron your clothes. All you will need to flatten your wood is this iron, an ironing board, and a wet towel. In comparison to building a fire in a drum to steam your wood, this method is relatively simple.
Begin by dipping your towel in water and draining the excess. The towel should be big enough to cover the entire surface area of the warped wood that needs to be flattened. Place the wet towel over the wooden tabletop, wood cabinet door, or other item and wait for the iron to reach its maximum heat.
Place the wood onto your ironing board with the towel on top of it. Begin to iron the towel as you usually would. Keep going until the entire piece is no longer warped. If you can, make sure to clamp the freshly-flattened wood onto your ironing board or another flat surface until it dries. Keep it in a low-humidity area while it dries to prevent it from bowing or warping a second time.
Instead of using an iron, you could also use a lighting bulb to apply heat to the wood. Most wood experts recommend using a yellow light bulb because it gets warmer than a white lightbulb. Simply place the wood with the towels wrapped around it underneath the lighting bulb. Keep it there until it is sufficiently warmed to be moldable back into a flat shape.
Weighing it Down
If the issue is bowing, you do have one more potential course of action to correct the shape of the wood. For this method, you will need:
- A damp towel
- Nylon paper
- Weights (can be bricks, logs, or actual exercise weights)
First, you will need to take the damp towel and securely wrap it around the ends of the wood that are bowed. Cover the damp towel up with the nylon paper to secure everything and keep the wood moist for a little while longer.
Situate the piece of wood so that the ends that are curled up are face-down on the ground, and the center of the wood is elevated upward. Place your weights on the center of the board to force it downward. This action ensures that your boards will dry flat, but it may take some time. Be prepared to wait for two days or even up to a week for your board to flatten out and naturally dry this way.
Preventing Future Warping
Once you know how to flatten your wood back down, it is important that you take every precaution not to cause it to warp again. The best and most obvious thing you can do for your wood is to properly clean and care for it on a regular basis.
Use a dry cloth or a towel to wipe away crumbs and debris. You might even choose to use the suction power of your vacuum. No matter how you choose to clean it, steer clear of damp cloths that can reintroduce moisture into your hardwood.
Avoid spills and wipe them up as quickly as possible when they occur. The sooner that you can get the water off the wood, the less likely it is that you will encounter warping in the future. You may consider using coasters to keep the condensation from beverages from ruining your wooden table, countertops, or other projects.
Make sure to seal your wood with a protective barrier that keeps water out. For many projects, this means that you need to apply a layer of sealer or a final coat of polyurethane to the surface of the wood. This keeps spilled water from being absorbed so quickly by the wood and prevents water stains as well as offers protection against warping.
Don’t store any heavy objects on your wood shelves or tables. The weight of these items can also cause wood to warp in the center, but it will be much more difficult to correct if this is the case. Be sure to keep heavy items on the ground instead of high up on wooden shelves and tables.
Conclusion
Wood tables and other furniture items with large wooden surfaces are the most prone to seeing bowing and warped wood. However, you can easily correct these issues and put your favorite pieces back to good use again. All you need to do is try a couple of these simple home remedies, and your projects will be flat as a board is supposed to be!

- How to Cut Lexan - September 25, 2020
- Mineral Spirits vs. Mineral Oil - September 25, 2020
- Shellac vs. Polyurethane - September 24, 2020
Christine
Thursday 23rd of June 2022
What if the wood is painted? What is the best method in that case?