Many people love curling up on the couch during a good thunderstorm, but it may be a source of stress for some homeowners. Do rainstorms leave you running for the mop because your windows are pouring water in from the great outdoors? Leaking windows are a common household problem that doesn’t have to be difficult to resolve. Fixing leaky windows can often be done with just a few simple tips and tricks.
If you have ever wondered how to seal windows from water leaks, here is the comprehensive guide to help. We can help you figure out where the water is coming from and what you can do to be proactive about stopping it.
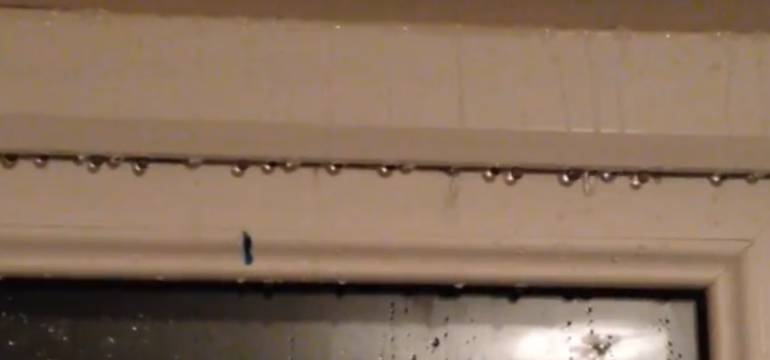
Leaking Windows During Heavy Rain
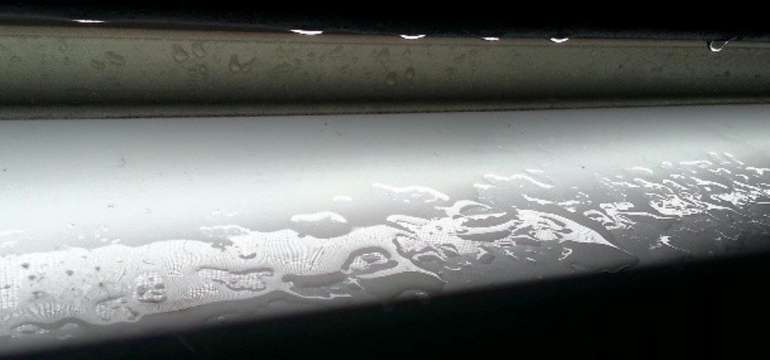
When it rains, it pours – both inside and outside your home! If you have leaking windows during heavy rain and the water comes in from every angle, you might need to take some proactive steps to prevent damage. Keep in mind that there is a continuum of leak issues that range from mild to more severe. You may be able to handle mild leaks on your own, but more extensive ones might require the help of a professional.
A mild case usually sees a few spots where water comes in, typically around the sides or the bottom of the window. If this describes your window, then you might just need to redo your sealant or caulking. Over time and with exposure to fluctuations in the weather and humidity levels, your caulking can easily crack or peel away from the exterior of your home. Water slides right into these places and infiltrates your home.
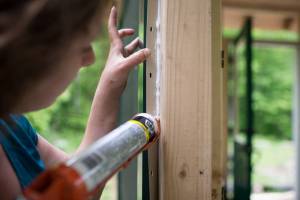 All you have to do to correct the problem is to remove the old layer of cracked and peeling caulking. Take yourself to your local home improvement store, and purchase a new bottle of caulking to redo these areas. It is an extremely inexpensive repair that takes just a few minutes to handle on your own.
Weatherstripping
An alternative to caulking the window is to install a new layer of weatherstripping. Over time, this can become old and can actually allow water to seep into your home. Depending on the type of window you have, installing weatherstripping can be just as easy as caulking your window, if not more so.
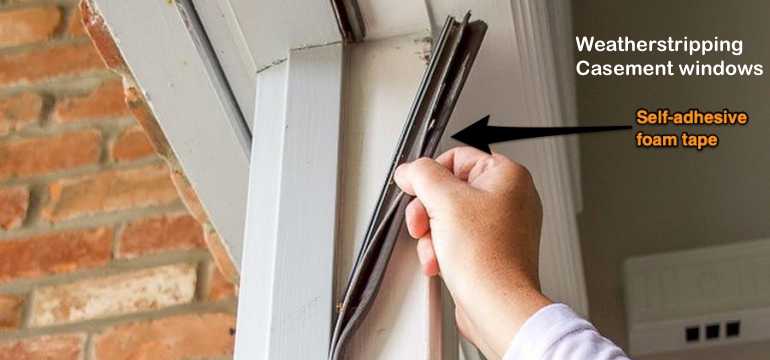
Casement windows will use self-adhesive foam tape and can be applied in three easy steps.
- First, you need to open the window and clean all of the stops with soapy water. Let these areas dry completely.
- Next, you can cut your foam tape to fit the top, bottom, and sides of the stops.
- Last, you remove the back from each piece of foam and press it into the outside of the stops.
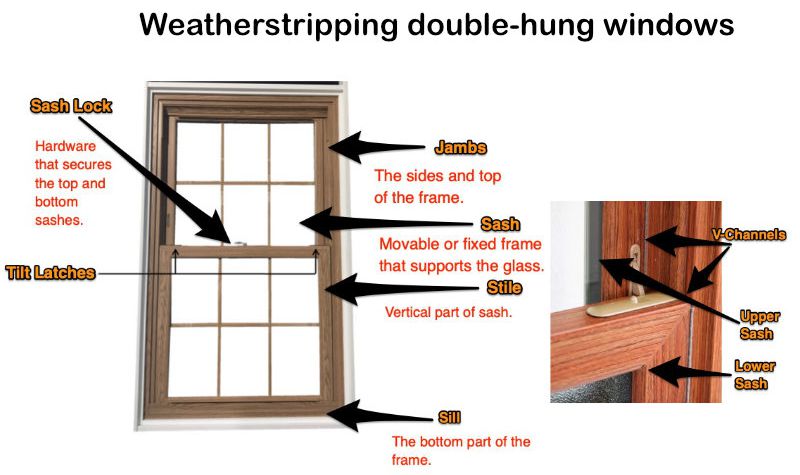
Weatherstripping double-hung windows is a bit more complicated, but it is still manageable for a handy homeowner.
- Follow the first two steps for the casement window.
- Then, you will want to press your foam adhesive against the sash first. Clean the jamb using soapy water and allow it to dry completely.
- Here is where things get a little bit different. For this part of the window, you will want to use V-channel weatherstripping. Cut your pieces approximately one inch longer than the sash height.
- Peel the back from the weatherstripping and tuck it between the stiles and the jamb. Use finish nails through the stripping and into the jamb to hold it in place. The sash should not catch on these nails.
- Finally, you will clean the back of the bottom sash with soapy water and allow it to dry. Cut a V-channel the width of the sash and press it in even with the top. The V should be facing up to allow the weatherstripping to compress itself when the window is closed.
Water Leaking Through the Window Frame
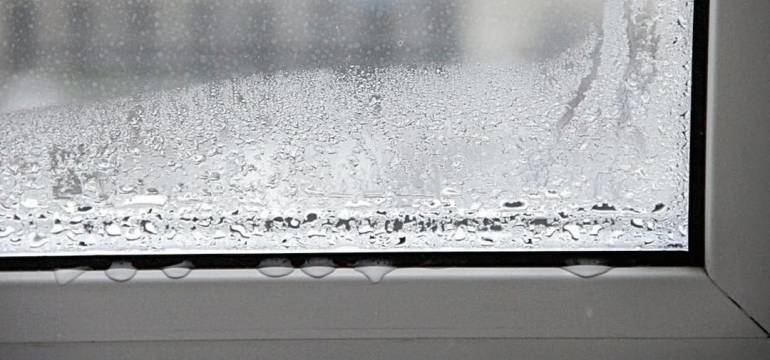
Sometimes, homeowners notice that the issue is not that they have water coming in from around their window. They may actually have water building up between the panes of their window.
For the most part, this is actually great news compared to those who have leaking windows that threaten to flood their home. The window is unlikely to develop an indoor leak anytime soon, even though it looks like the panes are leaking.
When you see water between the panes, it is usually a sign of a bad glass seal.
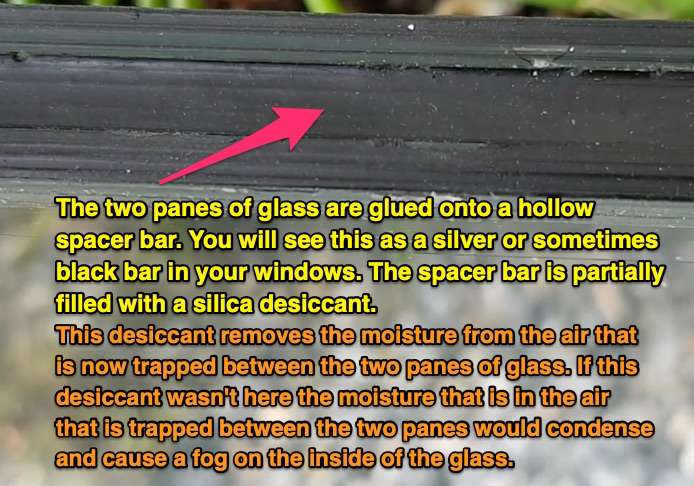
A glass seal is designed to maintain a layer of gas between in the indoor and outdoor panes of your window. This gas helps to keep your home more energy-efficient by blocking hot air in the summer and cold air in the winter. Like all things, the glass seal can become less efficient over time with exposure to the elements. The energy-efficiency of your windows lessens as this seal breaks down.
Unfortunately, when the seal has broken down the only real solution is to replace it.
However, If you are thinking about replacing the window altogether, you might consider a last-ditch effort to save it first. Some homeowners are successful at using clear caulking to reseal this area. Wait until the panes are completely dry and see if you can seal the glass back to the gasket.
Keep in mind that it is not really necessary to replace your window just because the glass seal is bad. Replacing it can improve the energy-efficiency of your home again, but it may not be of paramount importance to you. It could help you to reduce the costs of heating and cooling your home.
Water Leaking at the Bottom Corner
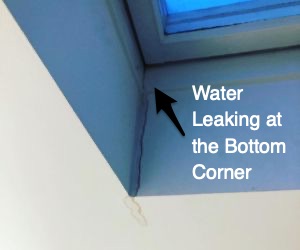 When you look at your window sills, do you notice a thick brown stain instead of your glossy white paint? This is a clear indicator that your window is leaking water from the bottom. Not only does it create these unsightly brown stains, but it can also spill over the edge of the sill and onto the floor.
For those with hard surface floors, extended exposure to moisture can cause even further problems. Laminate floors can often bubble and peel when water is spilled on them, particularly if there is any standing water from storms that happen when you are not home. Wood floors are also prone to developing dark stains from standing water. In more extreme circumstances, you may see them change shape as the boards bow or even buckle up off the subfloor.
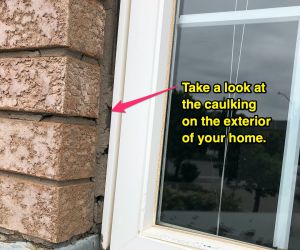 The first step to try to resolve the issue is to look at the caulking on the exterior of your building. There is a small chance that you may find that all you need to do is remove a damaged layer or caulking, clean the window frame, and install a new layer. Unfortunately, this may not be the case for water leaking from the bottom.
Unlike water leaks that can be resolved with a quick coat of caulking, a window leak from the bottom is typically a sign of a much bigger issue. The problem is often with the window itself instead of anything that you might be able to do to prevent water from coming in. Many people find that the shape of their window may have warped slightly over the years or that the panes no longer fit appropriately.
It may hurt your wallet to admit it, but this is a sign that you need to replace the entire window. If you want to be sure there is nothing you can do before replacing the window, contact a professional to conduct a brief inspection. They might be able to make a suggestion for a repair that could save you hundreds or thousands of dollars.
Water Leaking from the Top
Most people see watermarks surrounding their window near the top and automatically assume that the window is to blame. This is the explanation that makes the most sense, but it is actually not true. Homes with water stains near the top of the window are more likely indicating that there is a leak within your walls.
Here is how it typically works: The water finds a point of entry somewhere higher up in your home. It may be near your roof or through a hole in the siding midway down your house. The water makes its way down the wall until it finds a place to settle. A window frame is a great place for water to enter in and settle along the top, eventually leading to water stains surrounding this window.
Instead of caulking your window or installing a new layer of weatherstripping, you need to find out where the water is actually entering your home. Doing this on your own can be extremely difficult. You may want to consider hiring a window expert to survey your home and help you find the root cause of the problem.
In some cases, a window expert may not have the tools or knowledge necessary to pinpoint the cause of a leak within your walls. If this is the case, then you will need someone with more specialized training. A plumber may be able to help if it could be caused by a leak from the pipes within your walls. They can run special tests to find the source of the leak and stop it from happening in the future.
If a plumbing professional can’t pinpoint the issue either, then you may need to hire a waterproofing professional. They can take an overall look at the exterior of your home to determine where the issue lies and what can be done about it.
When you have water leaking from the top of the window, you need to determine its source. If you replace the window without first identifying where the water is coming from, you will simply have the issue repeat itself. Ultimately, you will end up doing major damage to the walls of your home until you can get the water leak under control.
Water Without Rain
Maybe you have the opposite problem of many homeowners. You might have water on the inside of your windows even when the weather outside is perfectly sunny. While this might be an annoying problem to have, it does not indicate that anything is wrong with your windows. On the contrary, it actually can be a good problem to have because it means that your windows don’t leak at all.
Water droplet formation on the inside of the window is a form of condensation. This is caused by the moisture levels inside your home. When you adjust the humidity levels down using a dehumidifier, you can easily reduce the water you find on your window.
While condensation does mean there is nothing wrong with your windows, the problem should still concern you. Having any extra moisture in your home can always lead to mold growth over time. In turn, this affects your indoor air quality and can lead to an increase in respiratory symptoms and allergy or asthma-related illnesses.
Do I Need to Replace My Windows?
When you are thinking about fixing leaky windows, one of the things you really need to evaluate is whether it can be repaired or not. Many homeowners wish that something as simple as a new layer of caulking can correct the issue, but they really need to consider a more extensive approach to their window leak repair. The whole window may need to be replaced.
Unfortunately, you may need to do more than replacing the window. If you have been having moisture issues for quite some time, you need to check for damp or softwood first. Using a screwdriver, gently press it around the frame of the window and the sash. If you feel it start to give way at all, especially under very light pressure, then you are looking at wood decay that is going to need to be corrected.
Sometimes, you might be looking at significant interior damage to the drywall, such as puckering or peeling paint. If the water in your home has left damage to any of these areas, then there is a chance that the structure surrounding the window has been compromised. A window professional can tell you what, if anything, needs to be done to these areas before a new window can be safely installed.
Replacing the Windows
If you find that you have to or want to replace your windows, there are a few things you should keep in mind. First, you must inspect the surrounding area to ensure that there is no damage. If there is, then you need to take care of that damage before placing a new window. Otherwise, you will continue to see the same old problems. New problems can even crop up if the situation gets worse over time.
Once you settle the area surrounding the window, you need to select new windows. Many people are currently leaning away from the wooden windows that were used in the past. Wood is much more sensitive to the fluctuations in temperature and humidity that occur throughout the year. As a result, it can be more fragile and susceptible to warping.
Instead, you might want to consider selecting windows made of a more weather-resistant material such as vinyl, fiberglass, a composite of wood and fiberglass, aluminum, or steel. Many homeowners balk at the initial price of some of these materials because it does cost more to manufacture than wood. However, they require less maintenance in the long run and can last significantly longer than their wooden counterparts.
Keep in mind that choosing your new windows is only half the battle. Having them properly installed makes a huge difference in the overall performance of the window. While some people do opt to install the windows on their own, it is almost always recommended that you hire a professional to do the work for you. This gives you peace of mind that it was done correctly and can continue to work well for your home for years to come. New windows are an investment in your home.
Managing Your Window Leak Repair
Leaking windows are bound to happen to your home at some point. It is normal for them to change shape or for the sealant to come loose after many years of use. The key is to be prepared for anything that might be thrown at you. Whether you need to replace your weatherstripping or replace the entire window, it helps to be educated about what to expect.
If you are uncertain whether you can make the repairs on your own, don’t hesitate to reach out to a professional. They can take a closer look at your window to make sure that there is nothing you are missing before making a seemingly minor repair!

- How to Cut Lexan - September 25, 2020
- Mineral Spirits vs. Mineral Oil - September 25, 2020
- Shellac vs. Polyurethane - September 24, 2020
Steve
Thursday 15th of December 2022
In installed 2 new Anderson double hung windows. One window indicates a leak on the bottom left corner on the inside, around the trim and down the wall to the floor. There is no indication of water above the indoor sill. At installation I flashed the window properly. I installed flexible flashing around the rough opening and when the window was installed a six inch seal around the window covering the flange. The leak is minor. I inspected the sill on the outside, the weather stripping on the bottom of the window, joints in the window at each adjoining angle and as a preventative applied clear silicone.
Any observations would be greatly appreciated. I have arrived at the point to which I am considering cutting a 6" opening from the bottom of the interior sill to the floor to see if there are any obvious flaws.
Thank you very much