Repairing your old Delta shower faucet is a somewhat easy job, even if you’re not very skilled with home improvement projects. As long as you have the right tools and you follow the steps here, you’ll get your shower faucet working right in no time.
Delta shower faucets are one of the most popular brands on the market due to their simple design, their performance, and their lifetime warranty. The best part? Acquiring spare parts is inexpensive and fairly easy to do. In fact, most home improvement stores carry Delta shower faucet parts. Otherwise, they’re also easily found online on sites like Amazon and Ebay.
Before you purchase the parts you need, make sure you know specifically what brand and model you have in your shower. If you can’t find the parts in stores or online, you’ll have to purchase a whole new faucet kit.
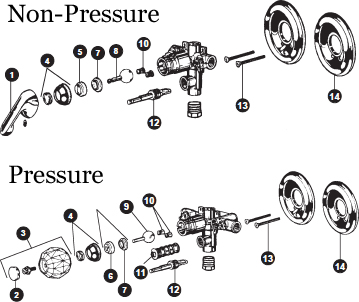
1 ➜ Handle
2 ➜ Handle Button
3 ➜ Handle
4 ➜ Cap Assembly
5 ➜ Rectangular Cam
6 ➜ Triangular Cam
7 ➜ Packing
8 ➜ Steel Ball with Round Pin
9 ➜ Steel Ball with Diamond Shaped Pin
10 ➜ Seats & Springs
11 ➜ Balancing Spool
12 ➜ Push Button Diverter
13 ➜ Screws
14 ➜ Escutheon
Repairing your old Delta faucet
For homeowners who have an old Delta shower faucet that’s giving them problems, it’s better just to go ahead and purchase a whole new Delta faucet kit. Once you have your kit, follow these directions.
- Turn off the water supply to your shower. Most showers don’t have single supply valves. As a result, the water to the entire house will need to be turned off. You can do this by locating the entrance valve and turning it off.
- Go outside and turn on any of your home’s wall hydrants or faucets. Let it run for a few minutes. This will drain your home’s water supply. Head back inside and turn on the shower faucet. This will also help drain the last of the leftover water. You’ll now want to remove the handle. Typically, you’ll need an Allen wrench to remove the handle (1 & 2). If you’re unsure how to do this, read the owner’s manual.
- After you have removed this screw, the bonnet nut will also have to be removed. Use a strap wrench to do this. If your faucet is old, the bonnet nut may be tough to get off. You can use a little lubricant to loosen it up. After the nut is off, remove the bonnet. Now take off the cam (5 & 6) and ball (8 & 9) assembly which is located under the bonnet.
- Equip yourself with a pair of fine tweezers. You can also use a sharp pick too. With either of these tools, remove both the springs and the rubber seats (10). You’ll find these located inside the faucet housing.
- Once you have removed both the springs and the seats, inspect the inside of the housing. What you want to look for are cracks or calcium build-ups. The calcium build-up can be removed with the picks. Take the new seats and lubricate them up. It’s important to note that you should never use petroleum jelly. Vegetable oil and silicone grease are both effective lubricants.
- Insert the springs into the seats. Make sure that you insert the springs with the small side in. With either your screwdriver or your pick, insert both the seat and the spring into the housing of the faucet.
- Take the ball assembly and lubricate it up. Once lubricated, insert it into the housing and make sure it’s aligned properly. The cam will now need to be placed on the ball assembly. Make sure the little tab located on the side is completely inserted into the housing slot.
- While holding the cam down with your finger, you’ll want to thread the bonnet back on and then tighten it with your strap wrench. Reconnect the handle. Turn off the faucet you’re working on.
- Next, turn on your home’s water approximately one-third of the way. This will allow your pipes to slowly fill up. It’s very important not to turn the water on full blast at first. Doing so could cause the calcium that’s built up on the inside of the pipes to break off and form a clog. After all the air has been removed from the pipes, you can turn it on all the way. Inspect your shower faucet for leaks and other issues.
Replacing an old Delta valve cartridge
A change in water pressure, sudden changes from hot to cold, and consistent leaking can all be a result of a faulty valve cartridge. If you know this is the problem, then instead of replacing the whole unit, you can simply just change the valve cartridge. So, how do you do this?
- With the handle removed, remove the trim sleeve and then the spacer. These both should come off pretty easy.
- Now you’ll want to remove the bonnet nut with s strap wrench.
- Grab onto the valve cartridge and wiggle it back and forth while also pulling on it. With a little effort, it should come right out.
- Take your new cartridge and insert it. However, when inserting this piece, install the new cartridge making sure the side marking labeled “hot” is on the side of the valve where the hot water comes from.
- You’ll now want to line up the keys on the side with the slots found in the valve.
- Take the bonnet nut and hand screw it back on until it’s snug.
- Put the handle back on.
- You have now replaced your valve cartridge. Again, turn your water on slowly, get out all the air, and check for leaks.

- Painting Over Powder Coat and What You Need to Know - February 1, 2022
- How to Get Rid of Humidity in a Basement Without a Dehumidifier - December 17, 2021
- How to Fix a Crack in Drywall That Keeps Coming Back - September 22, 2021
GORDON PORTER
Thursday 30th of January 2025
The cold water flows pretty well. The hot water just trickles . 2 showers are doing that.
FRED SMITH
Wednesday 29th of December 2021
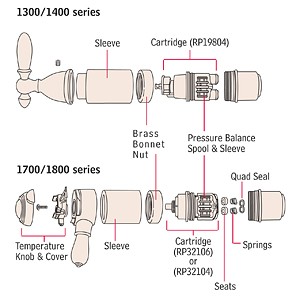
My 1300/1400 series shower valve is stuck and I tried everything to get it out. Even harsh language didn't work! Is there a valve puller? Anyway it's too late I tried cutting it with a Dremel but no luck. Please help!!! Fred in Charlotte NC
M Tucker
Sunday 29th of January 2023
@FRED SMITH, We used superzilla and left on overnight. It loosened it up enough for us to pull out. Not sure if you are still able to do this.