You have just finished installing your new water heater, saving hundreds of dollars by doing it on your own. You head to check the heater one last time and discover that the pilot light is out. Surely there must be a mistake, so you reset the pilot light. Only a few minutes pass, and it goes out again. You get the blinking red code that lets you know that means thermopile voltage low.
The most common situation that causes this problem is a bad thermopile. Check to see if it is bad. Otherwise, if you live in a high windy area, you might have this problem.
What does this technical term mean, and how can you resolve it? This is a known issue for many Honeywell water heaters. Here’s how you can resolve it.
What Does Thermopile Voltage Low Mean?
Having a basic understanding of how your unit works can be extremely helpful. Let’s dig in deep to explain what it means to encounter low thermopile voltage.
When it comes to your hot water heater, the pilot light heats up the thermopile. As this occurs, they produce a small voltage of electricity that passes over to the gas control valve. A pilot light can go out. When this happens, there is no electricity, so it shuts down the gas control valve until the light is relit. The mechanism required to relight your pilot light depends on how new or old your unit is.
The thermopile is the compilation of several thermocouples together. They produce enough current to power up a small circuit board, used in conjunction with a more modern electronic gas valve.
Thermopiles are used to provide something like an output in response to temperature. This is important in a hot water heater where you want the water to come out at a certain temperature standard. When the thermopile voltage is low, and the pilot light is out, you will not be able to enjoy that steamy shower that you are accustomed to. So, what do you do when your water heater thermopile voltage is low?
Testing a Thermopile
If you want to test your own thermopile to see whether it is bad, the process is relatively simple. Even if you have very limited experience working with gas and electric, you can test your thermopile in just a few minutes with the right tools. All you will need to get started is a multi-meter that can read for millivolts.
- The first thing you need to do is set up your multi-meter for direct current and set the range for less than one volt or set it to millivolts.
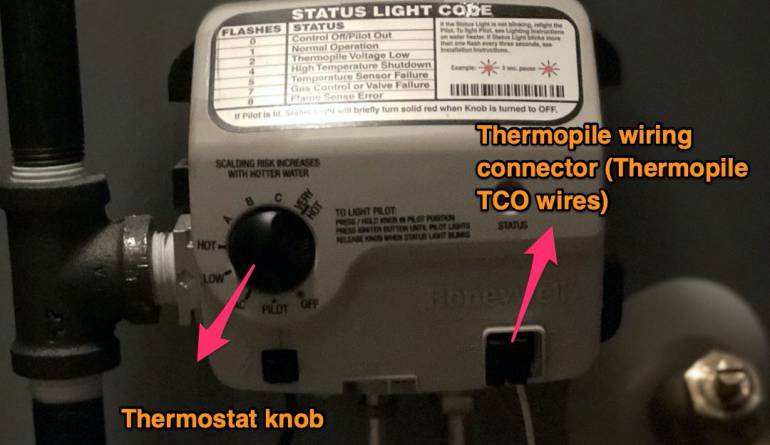
- Remove the thermopile wiring connector from the gas control. You may have to wiggle it a bit before it comes loose.
- Connect the red positive lead to the red thermopile wire, and the black lead to the white wire.
- Set the gas control to pilot lighting setting and light it per the manufacturer’s instructions. Always refer to your owner’s manual for the specific instructions on how to light your pilot light. Every make and model may be slightly different. At this point, the voltage on your meter will start to climb.
- Hold down the gas control’s thermostat knob until the maximum voltage is reached, which may take three minutes or so. You will notice that it is done when the reading on your multi-meter slows down.
A healthy thermopile in an open circuit test will read between 650 to 850 millivolts or somewhere in between. If the open-circuit test reads below 400 millivolts, then the thermopile likely requires service or replacement. Be sure to check your manufacturer’s instruction manual to verify this specification before moving ahead with a thermopile replacement.
Replacing a Thermopile
When it comes to replacing a thermopile, the process is simple but fairly lengthy. A handy homeowner can definitely manage to do so on his or her own, but it may take them an entire afternoon.
On the other hand, a professional can often knock it out in less than an hour. Decide how much time you would like to devote to this type of problem and how confident you feel working with gas. If you don’t feel confident in dealing with your own gas lines, please call in a professional to help.
Here are the steps you need to follow to replace a thermopile:
- Turn off the Gas Supply. The first thing you need to do is turn off the gas supply to the water heater and turn the gas on the controller to the off position. Remove the protection cover to expose the component.
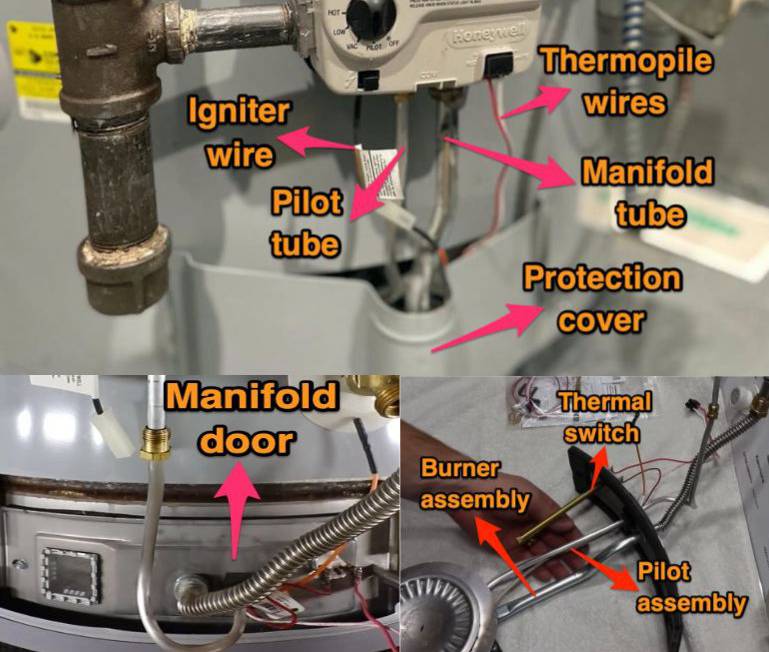
- Disconnect the Wires. From here, you will need to disconnect the ignitor and thermopile wires. It may take a bit of wriggling to remove. Remove the manifold and pilot tube, but do so carefully. The connections can be easily stripped, so take precautions to use the correct size tools for the job. Make sure that you do not kink the tubes and wires during this process.
- Remove the Manifold Door. From here, you will remove the two screws that hold the manifold door assembly in place. The burner assembly should be removed from the chamber so that you have access to the thermopile. Pay attention to the order that the wires and tubes are plugged into the manifold door. This is essential when replacing the thermopile.
- Remove the Pilot Assembly and Thermopile Wire. Remove the retaining clip from the manifold door. Remove the screw that holds the pilot assembly and shield in place. Disconnect the wiring to the thermal switch. Now, you can remove the pilot assembly by feeding it through the manifold. Depending on your model, you can now remove the thermopile wire by rocking it back and forth. It should slide out.
- Place the New Thermopile Wire. Unravel the new thermopile wire and thread it into place, ensuring that it is fully seated in the manifold door. Once seated, click the retaining clip in place and make sure it is secure in there.
- Feed the Wires Through the Manifold Door. Feed the pilot tube and the new thermopile wire through the manifold door. Do not bend the pilot tube during this process, or you may have problems with reconnection later on.
- Install the Manifold Component Block. Screw the pilot assembly and shield back in place. Do not pinch any of the wiring when installing the manifold component block. The block will be fed through the door, and then the component block will slide into place. Make sure that the insulation on each wire is flush with this component block.
- Reconnect the Thermal Switch Wiring. The shortest wire goes on the left-hand side. Inspect the manifold door gasket for damage. If it is damaged, do not reinstall. It must be replaced in this type of situation.
- Secure the Manifold Door. There is a tab on the bottom of the burner plate that must slide into the slot of the bracket at the bottom of the burner chamber. Once the burner is in place, move it in place from left to right. You should be able to hear and feel it hit the bracket. If you can move the whole burner, you are not within the slot. Secure the manifold door back in place with the two screws you initially removed.
- Connect the Pilot Tube and Turn the Gas Back On. Connect the pilot tube back first and then the manifold tube. Plug the ignitor wire back into place and push the thermopile wiring connector back in place. Turn the gas back on and turn the thermostat knob to the pilot position. Press the knob and push the ignitor switch until you can see the pilot light. If you smell gas when you press the knob, then your pilot tube has not been hooked up properly. Redo this connection before moving any further.
- Adjust the Temperature. If you do not smell gas, then hold the knob in for approximately one full minute. The light on the gas control should start to blink before you let go. From here, you can adjust the temperature as you would like to.
Make sure to test for gas leaks using the soap method. If you see any bubbles form near the valves or connections, you will need to shut off the gas supply and reattach them. If you cannot seem to get them to connect without the aroma or output of gas, please do not hesitate to call in a professional. It can be dangerous to play with gas in your own home.
Dealing with Low Thermopile Voltage
Dealing with a low Honeywell thermopile voltage can be a real pain. It takes quite a bit of technical skill and know-how. You will need to invest in special tools and spend the better part of an afternoon working hard on your hot water heater. While you might find that the time investment is worth the money that you saved from a professional repair, you want to ensure that you do not accidentally cause damage to the unit.
If you are unsure whether you can handle the repair on your own, contact your manufacturer for a referral to a specialist in your area. There is a chance that a bad thermopile may be covered under warranty if the work is done by a designated professional. Be sure to call and check before you start handling this on your own!

- What to Do if Your House Smells Like Gas but There’s No Leak - February 6, 2023
- Why Is There a Burning Smell Coming From My Vents? - August 16, 2022
- How to Remove the Musty Smell From Your Air Conditioner - August 16, 2022
Scott Bledsoe
Friday 13th of November 2020
If the high winds cause this issue, what can be done to avoid this issue in the future? I’m currently in a high wind impact (65 mph wind gusts) and having this issue. Thank you.
Randy
Saturday 4th of September 2021
You probably need to buy a special cap with a baffle to go on top of your outside flue. It’s not that much more than the normal flue cap that most people use to keep out rain and critters and it will stop your problem of the wind extinguishing your pilot with every windstorm.