When a compression fitting is leaking, not only is it a hassle, it should be fixed as soon as possible to avoid unnecessary damage. If you are unfamiliar with what a compression fitting is, it’s a little device that’s designed to connect two pipes together or connect a pipe to a fixture.
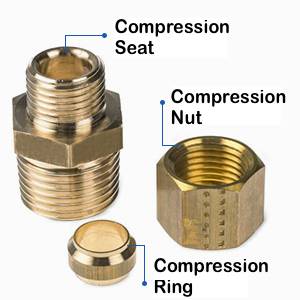 A compression fitting is a kind of coupling and has three distinct parts: the compression nut, the compression ring, and the compression seat. When one of these pieces becomes worn, broken, or wasn’t put on properly, you’ll have a leaking problem on your hands. So, what specifically causes a leaky compression fitting under your sink?
The causes of a compression fitting copper pipe leak
There are quite a few different reasons why your compression fitting maybe leaking. The first is improper use. Here are a few tips. First, you should only use compression fittings on stationary connections. Another words, compression fittings do not allow the pipe connected to it to move back and forth. The pipe must remain stationary. If the pipe gets bent back and forth, the compression fitting could eventually spring a leak.
Another thing that’ll you’ll want to avoid is using a double compression fitting to lengthen a pipe unless you’re using it under your kitchen sink. The reason being is because there’s minimal movement and stress. If you do suspect that there will be movement or stress, it’s better to use a solder or “sweat” connection.
Over tightening a compression fitting can also cause the fitting to leak. When tightening up the compression fitting, only turn your tool until you feel resistance. From there, you shouldn’t turn it anymore than a half a turn. By doing this, you can ensure you’ll prevent your compression fitting from leaking.
Do you have a compression fitting copper pipe leak? You may be able to fix it
The first thing you’ll want to try when your compression fitting copper pipe is leaking is to loosen the nut and then retighten it. This is a trick used by professional plumbers all over. The reason why this method sometimes will stop the leaking is because when you’re loosening up and retightening the nut, you’re also breaks up the corrosion on the nut threads. By removing this corrosion, you can tighten the compression nut more than you did before. This results in a tighter seal.
Before you attempt this, make sure that you turn off your water supply by closing the inlet valve. Failing to do this could result in a wet mess. You’ll also want to lay a dry towel down or a bucket to collect any water that might leak out when you loosen the nut.
Once you have retightened the nut, turn your water back on and see if your compression fitting is still leaking. If it is, then you’ll probably have to replace it.
Replacing your compression fitting
Before you replace your compression fitting, turn your water back off by closing the inlet valve. Once the water has been turned off, you can start to remove your old compression fitting. With a pair of standard pliers, grasp and hold the male end of the compression fitting.
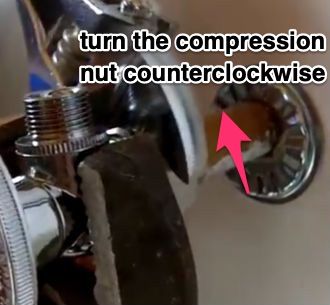
While keeping it steady, take another pair of pliers and turn the compression nut counterclockwise with your other hand. After the nut has become loose, unscrew it the rest of the way by hand until the fitting completely separates.

With a pair of pliers, grasp onto the compression ring or also commonly known as the ferrule. Carefully turn it with the pliers to loosen it up. Once loose, pull it off. However, sometimes it’s not that easy, and the nut will need to be physically cut off. If this is the case, equip yourself with a hacksaw. With the hacksaw, you’ll need to cut through the pipe. Make sure you cut as close to the back of the nut as you can get.
After you have removed the nut, take a file and deburr the end of the pipe until it has a smooth finish. Now, you’ll want to take off the compression nut and slide on your new nut, your new ring, and your new seat onto the end of the pipe. Tighten everything up and then turn your water back on.
It’s important to note that it’s not advised to reuse your old compression nut. Some people choose to reuse them, because the nut is too hard to remove. Reusing an old nut will most likely result in leakage. Avoid this issue by using a new one. This will prevent any chance of leakage.
Another tip you should consider utilizing is using either a plumber’s grease or a pipe dope when replacing your compression fitting. These two products will help you screw your compression nut on while also improving the overall seal.
Do compression fittings need Teflon tape?
Although many people believe that Teflon tape can help your compression fitting to have a better seal, that’s just not true. In fact, Teflon tape can actually cause a leak. The problem is, when you use this tape, it can keep the compression nut from screwing down enough to successfully form a waterproof seal.
In addition to this, little pieces of Teflon tape can get stuck in the sealing surface. As a result, the compression fitting will eventually start to leak. The only time you should use Teflon tape is when you’re using tapered pipe joints. This is when the threads themselves are designed to be the physical sealing surfaces.
What if I can’t turn off my water to replace my compression fitting?
If you are unable to turn off your home’s water source, then you can always freeze the pipe just long enough to replace the compression fitting. There are several products sold on the market these days including both aerosols and electrical kits.
The way these products work is they use a coolant to quickly freeze the pipe and the water inside. By doing this, you don’t have to turn off the water as long as you keep your pipes frozen while you replace the compression fitting. When using any one of these products, make sure you ready and follow the directions properly. This will eliminate any unnecessary issues.

- If You Have No Hot Water Pressure, Here’s What You Should Do - December 28, 2021
- What is the Right Shower Drain Pipe Size? - January 25, 2020
- Wet Vent Plumbing, What Is It? How Do You Utilize It? - November 17, 2019