Having low water pressure in your kitchen sink is not only a hassle, but it also makes doing your household chores are much more difficult job. When you find yourself in a situation like this, take advantage of the easy-to-follow steps listed below so you can get back to your normal routine.
You don’t have to be a professional or have years of plumbing experience to get the water pressure in your kitchen sink back up where it belongs. So, what should you do when you have low water pressure coming from the kitchen faucet?
Clean the aerator when you have low water pressure coming from your kitchen sink
The first thing you’ll want to do is to check and see if the other faucets in your home are experiencing low pressure as well. This is important. Once you have checked all the other faucets, and you know for a fact that the kitchen sink is the only faucet experiencing low water pressure issues, then you can move on.
A dirty aerator can not only cause low water pressure problems, but it can also cause your faucet to spit and splatter as well. What happens is the aerator gets clogged up with sand and grime over time and will give you problems. To fix this issue:
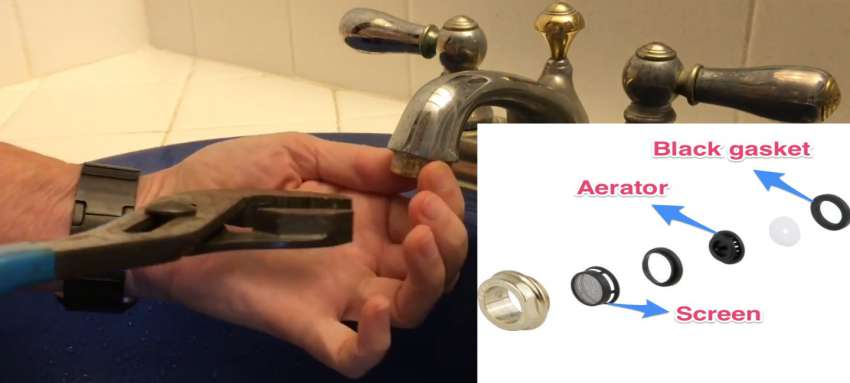
- Start by unscrewing the aerator. It should come off fairly easily. If you are having problems loosening it up, you can use adjustable pliers.
- After you unscrew the aerator, you’ll see a black gasket. It looks like a ring. You’ll need to take this out. Use either the point of a knife or some tweezers to get it out.
- Next, you’ll want to take out the aerator. This piece is usually easy to get out. However, if it’s stuck, then you can again use the point of a knife or the tweezers to remove it.
- Once the aerator has been removed, remove the screen from the housing. You can usually just push this out.
- Now that you have removed the screen, you’ll want to rinse off the filth and sand that has accumulated in there. Start by rinsing it from the inside and then flip it over and rinse it from the outside.
- Inspect the screen to make sure that all debris has been washed away.
- Put the screen on a side and pick up the aerator. If you notice, the aerator has little holes in it. You’ll want to take a sewing needle and use it to remove any debris that has got stuck in these holes. When you’re done, rinse off the aerator.
- Now, put everything back together. Remember, first put the screen in the housing, then put the aerator back in, and finally insert the gasket back in as well.
- Screw the whole device back into the faucet. Lastly, turn off your faucet and see if it works better now.
The cartridge might be the reason why you have low water pressure in your kitchen sink

Since the aerator is not the issue, you’ll want to do a few other tests. Does your kitchen sink have a side sprayer? If so, try it and see if the water pressure is the same as usual.
Next, turn on the faucet and see if the water pressure remains low when you separately run both the hot water and the cold water. The purpose of these tests is to see if grime and other debris have plugged up the inlet ports in the cartridge. Here is a video on how to replace your cartridge.
To solve this issue, you will need to start by turning off the water to your kitchen faucets. You can usually do this with the valves that are positioned under the sink.
After you have turned off the water, remove the cartridge and fully clean it out. Make sure you remove all the debris. Once it’s clean, you can put the cartridge back in. However, before you put the faucet back together, turn the water back on and turn on the faucet. See if the water pressure is where it’s supposed to be. If it’s not, then you just might need to replace the cartridge.
This part can be purchased at most home improvement stores and is fairly inexpensive. It’s important to note that you should always take your broken cartridge to the store with you, so you can make sure you purchase the right model for your specific faucet.
Another thing you can do to help the situation since you already have the faucet apart is to flush your supply lines. If you are unsure how to go about doing this, you’ll want to start by putting a washcloth, a cup, or another useful item directly over the base of your kitchen faucet.
Once you have the faucet covered, slowly turn both of the water valves back on. When you do this, the water will forcefully be shot out of your faucet along with the debris and other particles that are on the inside of your pipes. This is why it’s so important to put something over the base of your faucet. Following this tip will save you a lot of time and effort.
Corroded galvanized pipes could be causing your low-pressure issues
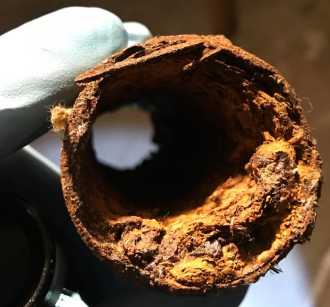
Severely corroded galvanized steel pipe.
If you’re still having low water pressure problems in your kitchen sink, then the problem might be that your galvanized steel pipes have become corroded. Homes that have this type of plumbing often experience these problems. If you’re unsure whether your pipes are galvanized, remember this rule. Galvanized steel pipes have fittings that are threaded, while copper pipes, on the other hand, have soldered joints.
Over time, these galvanized pipes will corrode, and after the corrosion begins to build up, water will have a harder time flowing through the pipes. To fix this issue, if you haven’t already, turn off the water using the valves. You’ll now want to remove these valves. This will require the use of two pipe wrenches. Once you are equipped with these tools, use one of the wrenches to turn the valve. With the other wrench, you’ll want to attach it to the pipe to prevent it from moving. After you have physically removed the valves, use a small flashlight to gaze into the pipe and at the corroded material.
To remove this corrosion, you’ll now need a screwdriver and a small hammer. With these tools, you’ll want to chip away at the corrosion until it is completely gone. Once you’re satisfied with what you see, reattach the valves, turn on the faucet, and run water down the drain for a few minutes. This will wash down any loose debris still sitting in the pipes.
Leaky pipes may be the issue
If you still find that there’s no water pressure in the sink, you could have a leaky pipe. The best thing you can do is turn on your faucet, grab a flashlight, and start inspecting your pipes, both under your sink and in other areas of your home. If you do find that one of your pipes is leaking, call a professional to handle the job unless you have plumbing experience yourself.
Using your water meter, you can perform a simple leak check: Water Meter Leak Detection
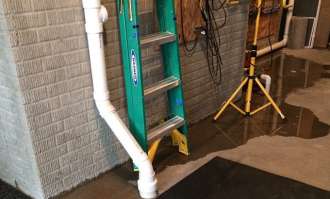
An undetected leak can mean water damage to your home.
It’s also important to note that fixing the leak as soon as possible is extremely important. The longer you wait to fix that leak, the more damage it can cause to the surrounding area. An undetected leak can rot floors, walls and result in mildew too.
Replacing a leaky pipe is both time consuming and a hassle. It can also be quite expensive as well, especially if you hire professional help. To save yourself both time and money, you can patch the leak up instead. There are three different methods you can use. They include water pipe tape, water pipe epoxy, and a pipe patch kit. All of these products can be purchased at a home improvement store and are quite affordable.
When patching up a pipe that carries clean drinking water, you should always make sure that the tape, the patches, or the epoxy is safe to be used. This information will usually be listed on the outside of the package. The reason this is important is that some of the metal patches on the market are made with chemicals that can not only ruin your drinking water, they can also cause health complications.
Lastly, always remember that patches are not a permanent solution. By neglecting to fully repair your leaky pipes, they could rapture and cause water to flood your home. Having your home flooded causes serious damage that’s more expensive to replace than a pipe.
Test your water pressure
If it seems like you did improve the low water pressure in your kitchen sink, go ahead and do a water pressure test. To do this, begin by turning on the faucet in your laundry room. Now, you’ll want to head to the upper portion of your home with a faucet, a shower, or a bath and turn on the water. The idea is to see if you have adequate water flow, and if you don’t, then you know you still have a problem.
Another way you can test your water pressure is with the use of a pressure gauge. This gauge can be purchased at most home improvement stores. Typically, this tool costs anywhere from about $10 to $15 and works really well. So, to check your water pressure with this gauge, first, turn off every faucet and appliance in your home. Now, check the pressure of your water. This will give you a baseline. As long as your home’s water pressure is between 30 psi and 80 psi, you have nothing to worry about.
Municipal Problems
It’s important to note that the reason why you have low water pressure in your kitchen faucet could also be due to local municipal problems. If you’ve tried everything else listed here, and you’re still having issues, try calling down to your local water department and inquire about any current problems they’re experiencing.

- If You Have No Hot Water Pressure, Here’s What You Should Do - December 28, 2021
- What is the Right Shower Drain Pipe Size? - January 25, 2020
- Wet Vent Plumbing, What Is It? How Do You Utilize It? - November 17, 2019